Adorable Crochet Christmas Tree Amigurumi Pattern
Snowy windowsills feel warmer with a chubby green crochet Christmas tree sitting beside the glass, wearing wavy white trim and a golden star. Soft chenille yarn gives this little amigurumi tree a velvety, huggable finish.
Chunky chenille, three stepped tiers, and a sweet embroidered smile turn a plain Christmas tree into a plush friend. Two tiny log-slice feet keep it upright, while scalloped white edging marks each layer. Anyone comfortable with single crochet and decreases can finish this crochet Christmas tree in one cozy weekend.

Crochet Christmas Tree Pattern Overview
The tree is worked from the bottom up in continuous spiral rounds, so there is no joining and no visible seam. Each tier narrows with evenly spaced decreases. A back-loop-only round creates a small ledge, and the white scallops are stitched onto it afterward. The star and the two log feet are made separately and sewn on at the end. If you are new to this craft, a quick read about amigurumi explains the basics of working small stuffed shapes in the round.
The finished size is about 9 inches (23 cm) tall with chenille yarn and a 4 mm hook.
Materials for the Crochet Christmas Tree
- Green chenille yarn, about 100 g
- White chenille yarn, about 15 g
- Yellow yarn (chenille or soft cotton), about 10 g
- Brown yarn, about 10 g, plus a scrap of light brown for the wood rings
- 4 mm crochet hook
- 10 mm black safety eyes, one pair
- Black embroidery thread for the smile
- Polyester fiberfill
- Stitch marker, tapestry needle, scissors
Abbreviations (US terms)
- MR: magic ring
- sc: single crochet
- inc: two sc in the same stitch
- dec: single crochet two together
- sl st: slip stitch
- dc: double crochet
- BLO / FLO: back loop only / front loop only
Special Techniques
- Back-loop-only ledge. Working one round in BLO leaves a row of free front loops. Those loops become the shelf that holds each white scallop.
- Invisible decrease. Insert the hook into the front loops of two stitches, then pull up one loop. The fabric stays smooth, which matters with fuzzy chenille. A yarn weight guide can help you pick a similar yarn if you cannot find chenille.
- Scallop trim. Slip stitch, skip one, five dc in the next, skip one. Repeat around.
Time Box
- Prep: about 20 minutes to gather supplies and wind the yarn
- Stitching: about 5 to 6 hours for body, star, and feet
- Finishing: about 45 minutes for the trim, face, and assembly
Step-by-Step Crochet Christmas Tree Pattern
1. Bottom Skirt (Green)

R1: 6 sc in MR (6)
R2: inc in each st (12)
R3: (sc, inc) x6 (18)
R4: (2 sc, inc) x6 (24)
R5: (3 sc, inc) x6 (30)
R6: (4 sc, inc) x6 (36)
R7: (5 sc, inc) x6 (42)
R8: (6 sc, inc) x6 (48)
R9–R12: sc around (48)
Four plain rounds give the tree a tall skirt, which helps it sit flat.
2. First Ledge and Tier Two
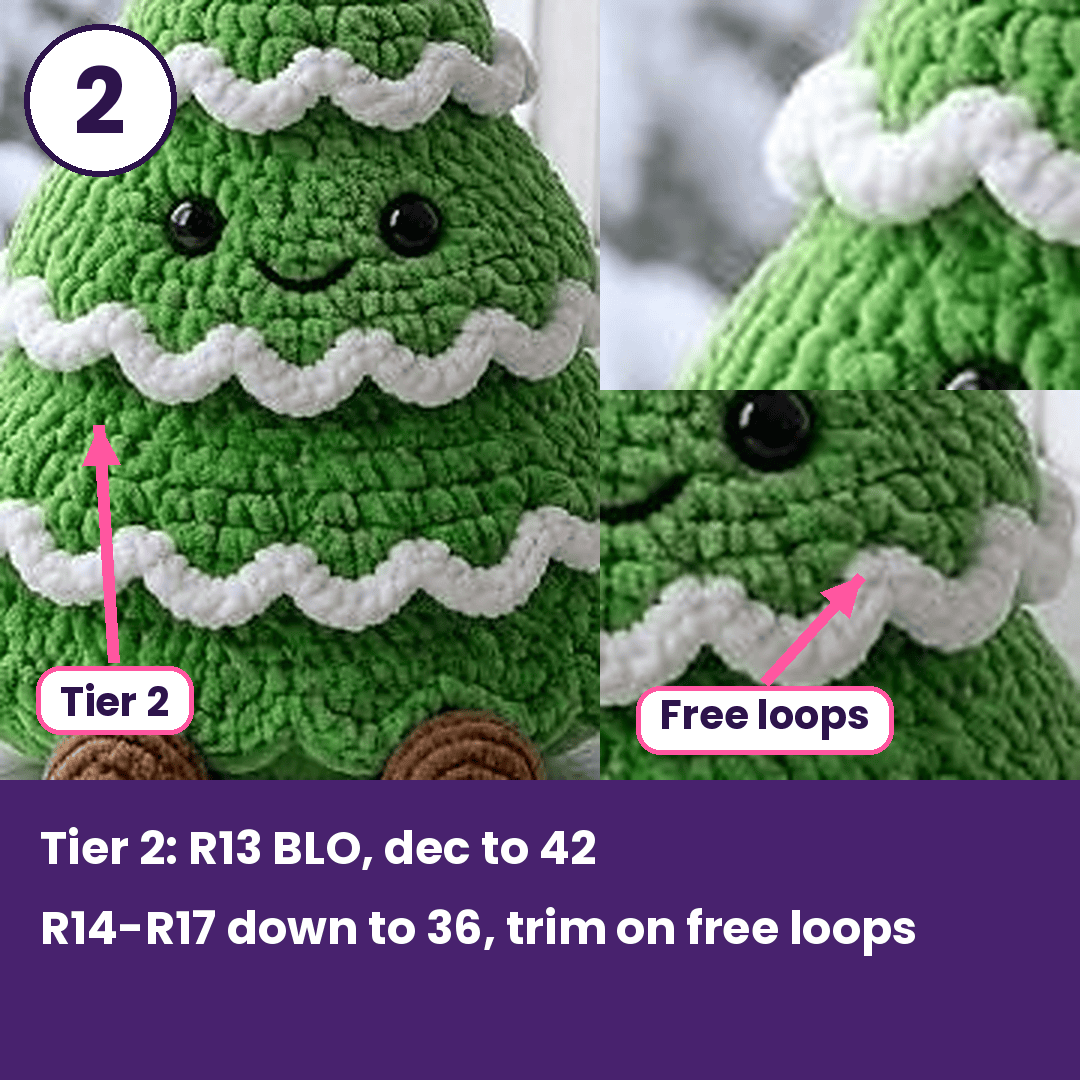
R13: BLO, (6 sc, dec) x6 (42)
R14: sc around (42)
R15: (5 sc, dec) x6 (36)
R16–R17: sc around (36)
Pro-Tip: Stuff as you go. Chenille compresses, so firm, even filling now prevents a lumpy cone later.
3. Second Ledge and Tier Three
R18: BLO, (4 sc, dec) x6 (30)
R19: sc around (30)
R20: (3 sc, dec) x6 (24)
R21: sc around (24)
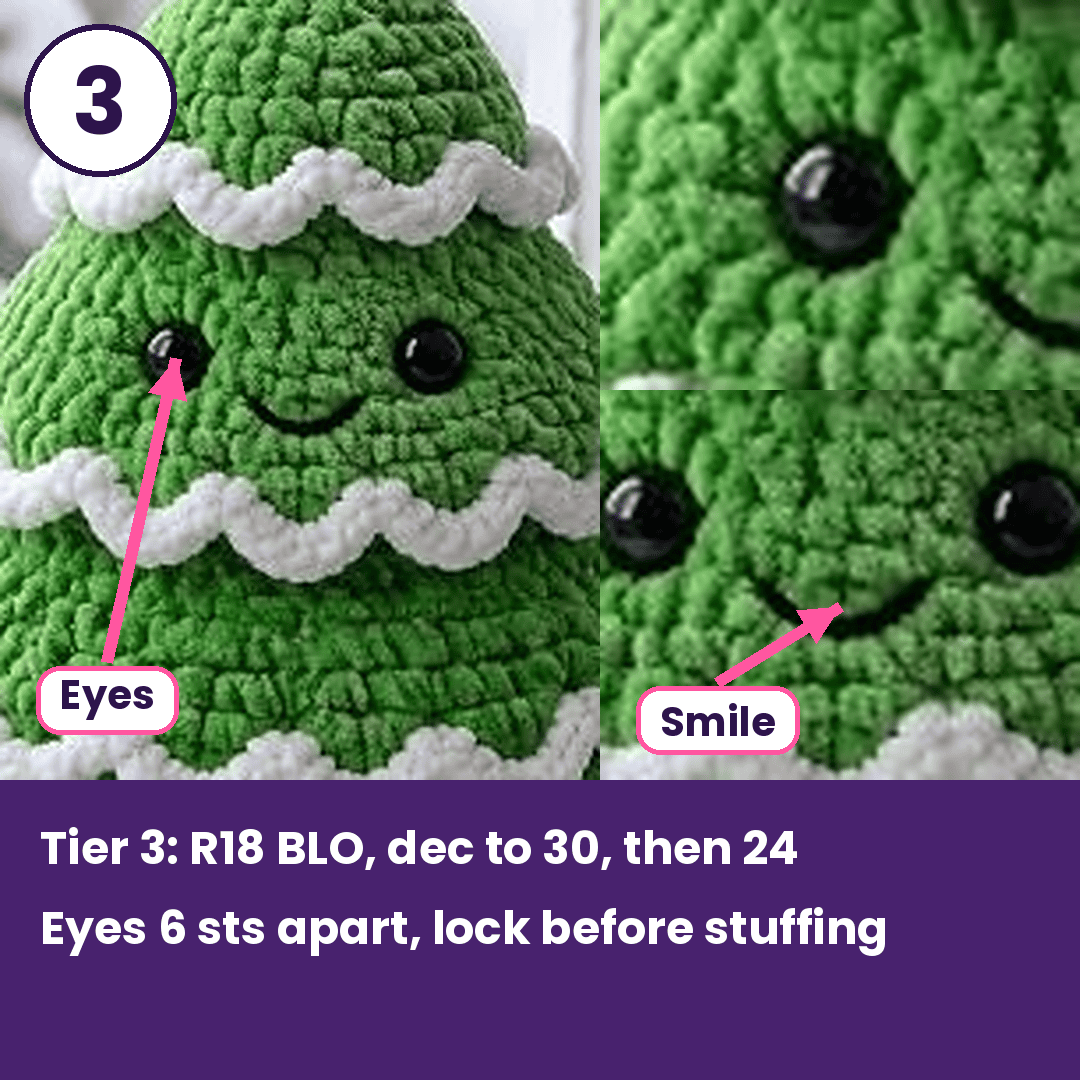
Face placement: Push the safety eyes between R15 and R16, six stitches apart, and lock them before moving on.
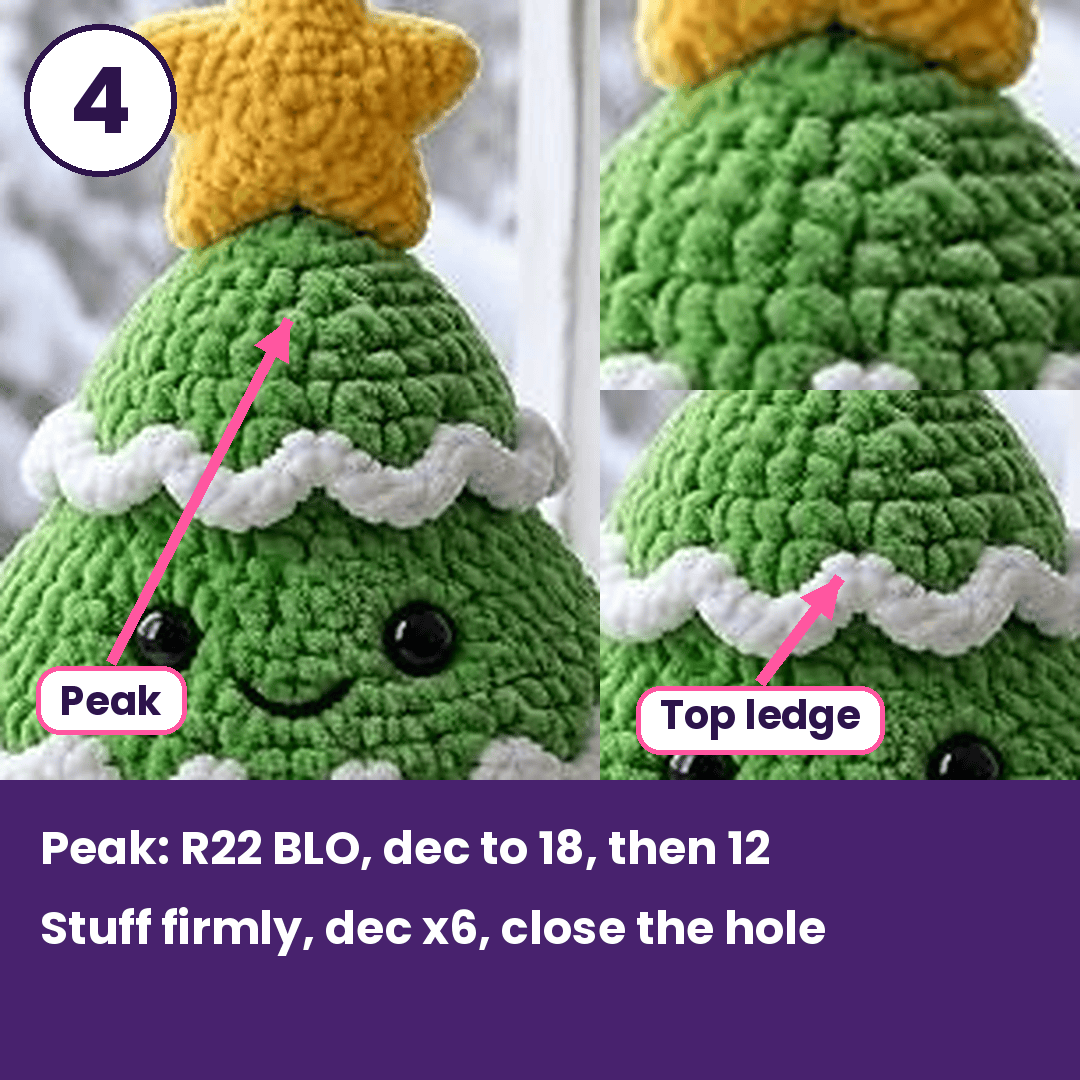
4. Top Ledge and Peak
R22: BLO, (2 sc, dec) x6 (18)
R23: sc around (18)
R24: (sc, dec) x6 (12)
R25: sc around (12)
Stuff firmly.
R26: dec x6 (6). Fasten off, close the hole, and weave in the end.
5. White Scallop Trim
Join white yarn in the free front loops of R12 (48 stitches). Repeat the scallop as follows, 12 times around:
sl st, skip 1, 5 dc in next, skip 1
Repeat on R17 (36 stitches, 9 scallops), then on R21 (24 stitches, 6 scallops).
Stitch check: count your loops before starting each trim row so the scallops land evenly.

6. Star (Make 2)
R1: 10 sc in MR, join
R2: ch 4, sl st in 2nd ch from hook, sc, hdc, sl st in next 2 sc of ring x5
Fasten off. Place both pieces together, sew around the edges, and add a pinch of stuffing before closing.
7. Log Feet (Make 2, Brown)
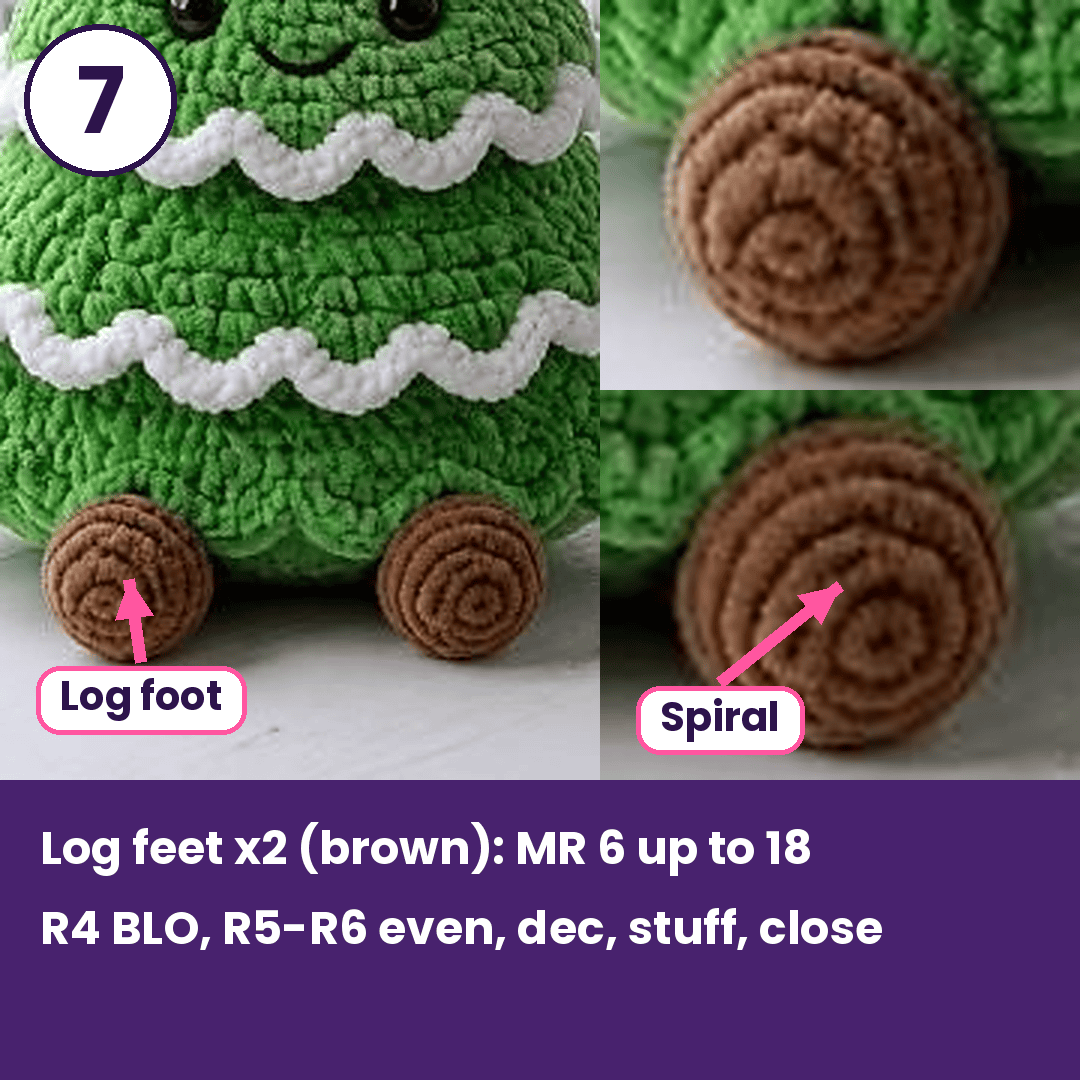
R1: 6 sc in MR (6)
R2: inc in each st (12)
R3: (sc, inc) x6 (18)
R4: BLO sc around (18)
R5–R6: sc around (18)
R7: (sc, dec) x6 (12)
Stuff, then dec x6 and close.
Embroider a small spiral on the flat circle with light brown yarn to mimic wood rings.
Crochet Christmas Tree Assembly
- Sew the star to the peak, angled slightly forward.
- Stitch the log feet to the front of the skirt, side by side, about 4 stitches apart.
- Embroider a small smile centered under the eyes with black thread.
- Trim stray fibers and brush the chenille gently.
Common Crochet Christmas Tree Mistakes
- Skipping the stitch count. Chenille hides stitches, so a miscount is easy. Recount at the end of every decrease round.
- Under-stuffing. A soft tree leans sideways. Add filling in small handfuls.
- Pulling scallops tight. Tight dc stitches make the trim curl instead of lying in waves.
- Placing eyes after stuffing. Always lock them while the body is still open.
Uses & Benefits of a Crochet Christmas Tree
Set the finished tree on a mantel, shelf, or windowsill for a soft holiday accent that needs no plugs or batteries. Tuck it into a gift basket, perch it beside a child’s reading corner, or hand it to a teacher as a keepsake. Chenille keeps it huggable, while the sturdy skirt lets it stand without support. For gift wrapping, a crochet Christmas gift box makes a lovely matching holder.
Beginner Tips
- Pick a light-colored chenille with visible stitch gaps.
- Use a locking marker at the start of every round.
- Practice the scallop on a small swatch first.
- Work in good daylight, since dark green chenille hides loops.
Materials Substitution Ideas
- Swap chenille for velvet or plush yarn with a 4 to 5 mm hook.
- Use cotton yarn for a flatter, firmer tree, with a 2.5 mm hook.
- Replace safety eyes with embroidered black knots for baby-safe versions.
Personalization Ideas
Color Twists
Try deep forest green, mint, or even soft pink for a modern look.
Extra Decorations
Sew tiny pom-pom ornaments or a string of seed beads across each tier.
Mini Version
Use sport-weight yarn and a 2.5 mm hook for an ornament-sized tree.
Name Tag
Stitch a child’s initial onto the skirt with white embroidery thread.
Troubleshooting Your Crochet Christmas Tree
- Tree leans: Add stuffing to the skirt and press the base flat.
- Trim flares out: Skip one more stitch between scallops next time.
- Star droops: Add a few stitches through the tip and base of the peak.
Washing & Care
Spot clean with a damp cloth and mild soap. Air dry away from heat, then fluff with a soft brush.
Creative Projects You Can Make With This Pattern
Pair the tree with this free crochet penguin amigurumi winter plush to build a cozy holiday scene on your shelf. Next, add the crochet Christmas kitten amigurumi beside it for a playful touch. You can also hang the crochet Christmas snowman bag charm from a branch of your display.
Bonus: Gift Topper Idea
Shrink the pattern to a 3-inch mini tree and sew a loop on the back. It becomes a hanging tag that doubles as a small ornament.
FAQs
What yarn works best for a crochet Christmas tree?
Chenille gives the plush look in the photo, but any worsted yarn works with a smaller hook.
Can beginners make it?
Yes. Only basic stitches and decreases appear, and the trim is the single new skill.
How tall is the finished tree?
About 9 inches with chenille and a 4 mm hook.
Is it safe for toddlers?
Replace safety eyes with embroidery and secure the star and feet with extra stitching.
Can the tree stand alone?
The four-round skirt and weighted feet keep it upright on flat surfaces.
Cozy Season Wrap-Up
A fuzzy green tree with wavy white trim brings holiday cheer without any tinsel or lights. Stitch one for yourself, make a second for a friend, and watch how fast the little forest grows.