Easy Crochet Heart Kitty Amigurumi Pattern for Beginners
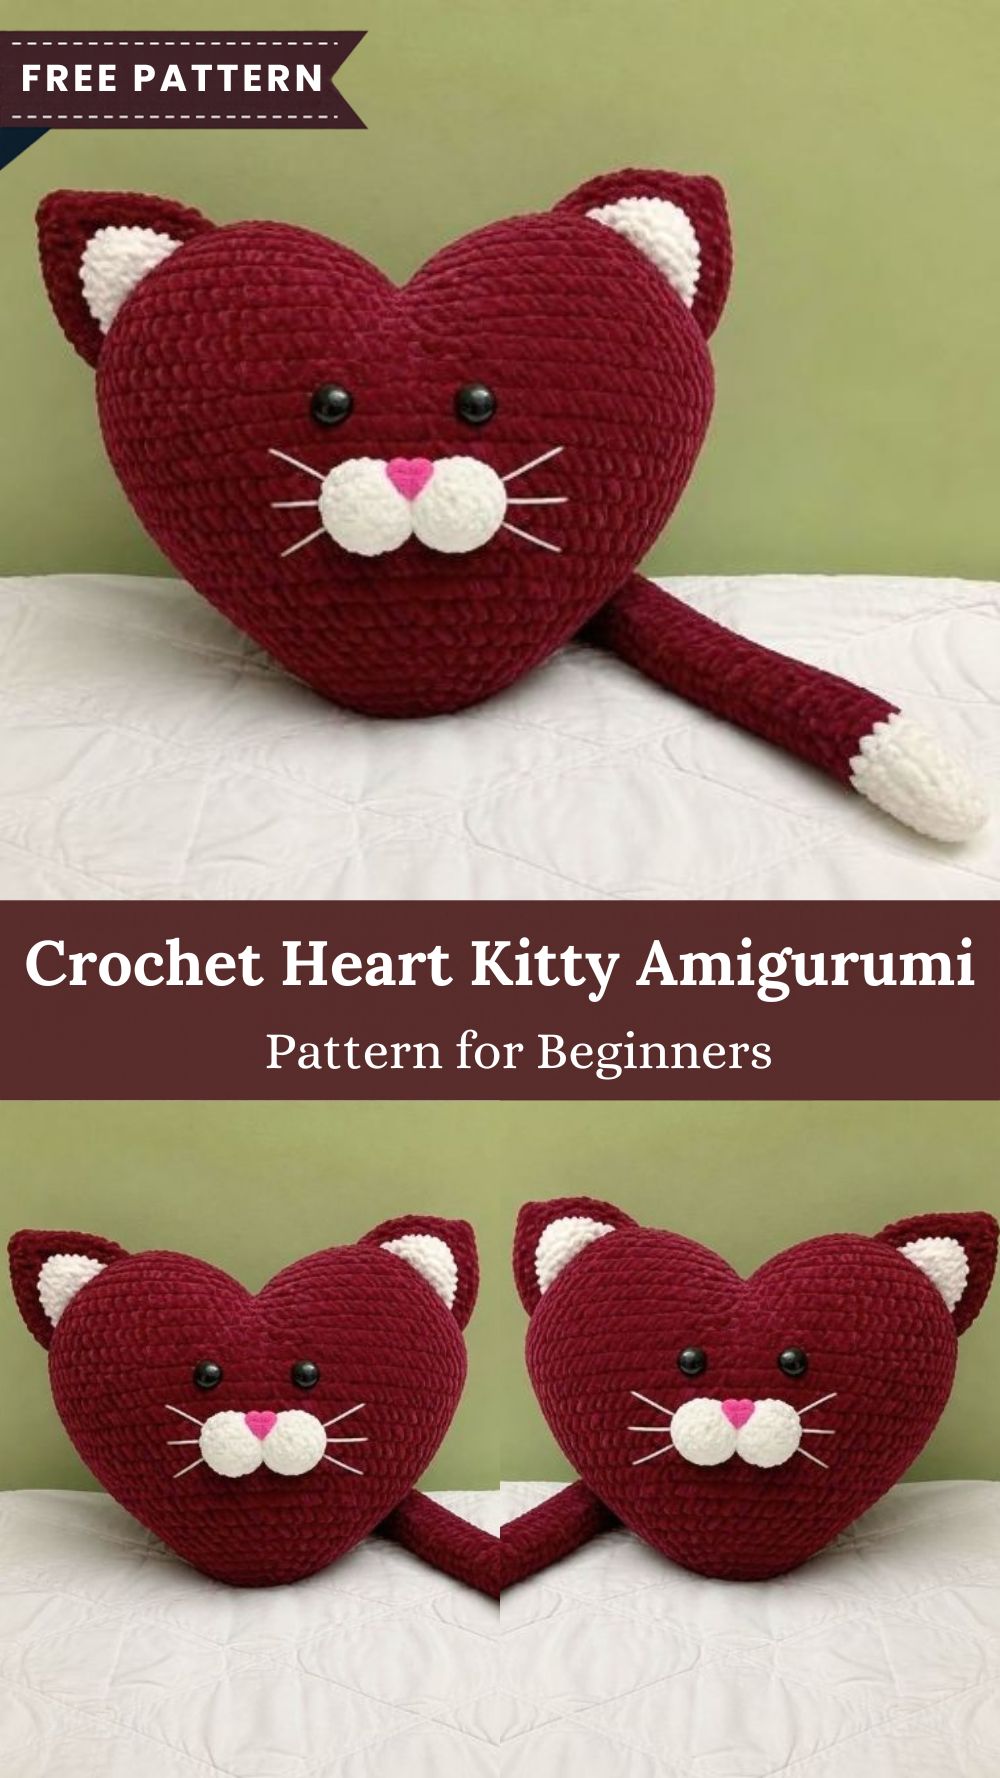
Heart-shaped things are lovely, but a heart-shaped cat is on another level. This crochet heart kitty shows you how to turn plush chenille yarn into a snuggly burgundy kitty with cream ears, whiskers, and a tail tipped in white. One simple heart makes the whole body, so beginners can follow along without stress and still end up with something gift-worthy.
Most plush cats are built from a round head and a separate body, which means extra pieces and extra sewing. This kitty skips all of that. The heart is her whole body, with two plump lobes for the cheeks, a gentle point at the bottom, and ears perched right on top. Chunky chenille yarn grows so quickly under your hook that you can finish your crochet heart kitty in a single weekend, even if this is your very first amigurumi.
Materials for the Crochet Heart Kitty
First, gather the supplies below, since chenille is easiest to handle when everything sits within reach.
- Super bulky (#6) chenille or velvet yarn in burgundy, about 190 yards (175 m)
- Super bulky yarn in white, about 35 yards (32 m)
- Small scrap of pink yarn for the nose
- 6 mm (J-10) crochet hook
- One pair of 12 mm black safety eyes
- Polyester fiberfill, about 5 oz (140 g)
- White embroidery floss for the whiskers
- Tapestry needle, 2 stitch markers, pins and scissors
Pattern Overview
Once finished, the crochet heart kitty measures about 10 in (25 cm) wide and 8 in (20 cm) tall, plus an 11 in (28 cm) tail. Meanwhile, the body is worked in the round as two lobes that get joined, so the ears, muzzle and tail are made separately and sewn on afterward. Besides single crochet, only increases, decreases and slip stitches appear. Also, every instruction uses US terms, and a standard yarn weight chart explains what super bulky (#6) means.
Abbreviations used:
MR = magic ring, sc = single crochet, inc = two sc in one stitch, dec = sc2tog (an invisible decrease works too), st(s) = stitch(es), Rnd = round, FO = fasten off.
However, gauge is not critical. Still, a tight fabric keeps the stuffing from peeking through the pile.
Special Techniques
First, the magic ring gives a closed center, so each lobe starts without a hole. Next, the invisible decrease goes through the front loops only, which hides it inside the chenille pile. Then comes the joining step, where two circles turn into one heart. Also, a clean tail tip needs a color change, so pull the new color through on the last yarn-over of the final stitch. Finally, count after every round, because the fuzzy pile hides stitches and a miscount shows quickly on a crochet heart kitty.
Time Box
Before starting, set aside about 15 minutes to gather supplies and wind the yarn. After that, plan 4 to 5 hours of stitching: the body takes roughly 2 hours, the ears 40 minutes, the muzzle 20 minutes and the tail 45 minutes. Finally, finishing the crochet heart kitty takes about 1 hour for sewing, stuffing touch-ups and the face.
Common Crochet Heart Kitty Mistakes
- Working too tight: because chenille hides loops, a tense hand makes the hook fight back, so keep loops relaxed.
- Losing the round marker: when it goes missing, the lobes shift and the heart ends up lopsided.
- Under-stuffing the lobes: flat lobes lose the heart outline, so push fiberfill into each curve before the opening narrows.
- Fixing the eyes too early: instead, pin them first, step back, then lock them in.
- Sewing the tail too high: when it sits near the lobes, it pulls the whole shape sideways, while a spot near the point looks natural.
Crochet Heart Kitty Pattern Instructions
Work in continuous rounds, and place a marker in the first stitch of every round.
Step 1: Stitch the Crochet Heart Kitty Lobes (Make 2)
Use burgundy yarn.
Rnd 1: First, work 6 sc in a MR (6)
Rnd 2: Then inc in each st around (12)
Rnd 3: Next, (sc in next st, inc) x6 (18)
Rnd 4: After that, (sc in next 2 sts, inc) x6 (24)
Rnd 5: Then (sc in next 3 sts, inc) x6 (30)
Rnd 6: Next, (sc in next 4 sts, inc) x6 (36)
Rnds 7–12: Once the lobe reaches full width, sc in each st around (36)
Afterward, FO lobe 1 and weave in the tail. However, leave lobe 2 live with the yarn still attached.
Why it matters: because both lobes match, the top of the heart stays even.
Pro-Tip: Before moving on, leave the lobes unstuffed, since a wide-open edge makes the joining round much easier.
Step 2: Join the Crochet Heart Kitty Lobes
First, set the finished lobe beside the live lobe so the two sit like the humps of a heart.
Rnd 13: Then sc in the next 18 sts of lobe 2. Next, choose a stitch on lobe 1 that faces lobe 2 and work 36 sc around the whole lobe. After that, return to lobe 2 and sc in the remaining 18 sts (72)
Although small gaps will show where the lobes meet, the leftover yarn tail closes them later.
Step 3: Build the Body
Rnds 14–17: Next, sc in each st around (72)
Before the opening narrows, stuff both lobes firmly and press the fiberfill deep into each curve.
Step 4: Shape the Crochet Heart Kitty Point
Rnd 18: Then (sc in next 10 sts, dec) x6 (66)
Rnd 19: Next, (sc in next 9 sts, dec) x6 (60)
Rnd 20: Again, (sc in next 8 sts, dec) x6 (54)
Rnd 21: After that, (sc in next 7 sts, dec) x6 (48)
Rnd 22: Next, (sc in next 6 sts, dec) x6 (42)
Rnd 23: Then (sc in next 5 sts, dec) x6 (36)
Since the opening is shrinking, add more stuffing now, and then keep going.
Rnd 24: Next, (sc in next 4 sts, dec) x6 (30)
Rnd 25: Again, (sc in next 3 sts, dec) x6 (24)
Rnd 26: Then (sc in next 2 sts, dec) x6 (18)
Rnd 27: After that, (sc in next st, dec) x6 (12)
Rnd 28: Finally, dec x6 (6)
Afterward, FO, thread the tail through the front loops of the last 6 sts, pull tight and hide the end inside.
Pro-Tip: While stuffing, squeeze the bottom gently between your fingers, because a slightly firmer point sharpens the heart shape.
Step 5: Make the Crochet Heart Kitty Ears
Outer ear, burgundy (make 2): Ch 11.
Row 1: First, sc in 2nd ch from hook and across (10), ch 1, turn
Row 2: Then dec, sc in next 6 sts, dec (8), ch 1, turn
Row 3: Next, dec, sc in next 4 sts, dec (6), ch 1, turn
Row 4: After that, dec, sc in next 2 sts, dec (4), ch 1, turn
Row 5: Then dec x2 (2), ch 1, turn
Row 6: Finally, dec (1)
FO, leaving a long tail.
Inner ear, white (make 2): Ch 7.
Row 1: First, sc in 2nd ch from hook and across (6), ch 1, turn
Row 2: Then dec, sc in next 2 sts, dec (4), ch 1, turn
Row 3: Next, dec x2 (2), ch 1, turn
Row 4: Finally, dec (1)
FO, leaving a long tail.
Step 6: Make the Crochet Heart Kitty Muzzle (Make 2)
Use white yarn.
Rnd 1: First, work 6 sc in a MR (6)
Rnd 2: Then inc in each st around (12)
Rnds 3–4: Next, sc in each st around (12)
Rnd 5: Finally, (sc in next st, dec) x4 (8)
Afterward, stuff lightly, FO and leave a long tail for sewing.
Step 7: Make the Crochet Heart Kitty Tail
Start with white yarn.
Rnd 1: First, work 6 sc in a MR (6)
Rnd 2: Then (sc in next st, inc) x3 (9)
Rnds 3–5: Next, sc in each st around (9)
Once Rnd 5 ends, switch to burgundy on the last yarn-over.
Rnds 6–35: Then sc in each st around (9)
While working, stuff lightly, and then FO and leave a long tail.
Because the thin white-tipped tail balances the heavy body, the cat reads as a cat.
Assemble Your Crochet Heart Kitty
- Eyes. First, pin the safety eyes below the center dip of the heart, about 5 stitches apart. Then check the look before locking the backs.
- Muzzle. Next, sew the two white puffs side by side, about two rounds under the eyes, so they touch in the middle.
- Nose. After that, embroider a small pink triangle across the seam between the puffs.
- Whiskers. Then pull three strands of white floss through each side of the muzzle, knot inside and trim to about 3 in.
- Ears. Afterward, sew each white inner piece onto its burgundy outer piece. Next, pin the ears on top of the lobes, tilted slightly outward, and stitch along the base.
- Tail. Once the face is done, attach the open end of the tail to the lower right side, a few rounds above the point, with the white tip pointing out.
- Gaps. Finally, close the tiny holes at the lobe join using the leftover yarn tail.
Uses and Benefits of a Crochet Heart Kitty
A crochet heart kitty works harder than most plush toys. For example, lean it against a headboard, give it to a sweetheart on Valentine’s Day, or let a child squeeze it during story time. Because the stitches are big and soft, the project finishes quickly. Also, leftover chenille can be turned into matching ears or a mini version, and handmade pieces like it sell well at holiday markets. If you enjoy chunky plush projects, you may also like this free crochet penguin amigurumi winter plush or this cute crochet unicorn amigurumi.
Beginner Tips
- Before using chenille, practice the magic ring on a scrap of cotton yarn, because a smooth cotton makes the loops easier to see.
- Choose a light-colored marker for the crochet heart kitty, since dark markers vanish into burgundy pile.
- Turn the work often and count each round out loud, because small slips are easier to catch early.
- When stuffing, add small handfuls instead of big clumps, so the curves stay smooth.
- If the pile feels sticky, pause and loosen your tension before continuing.
Personalization Ideas
Color Swaps
For a different look, try blush pink with cream ears, soft gray with a white tail tip, or classic black with a red ribbon.
Size Changes
Thinner yarn and a smaller hook make a pocket-size crochet heart kitty. However, thicker yarn and a bigger hook create a floor cushion. For another tiny project, try this small white koi fish pendant.
Face Details
Instead of safety eyes, stitch closed sleepy eyes in black yarn. Also, add cheeks with pink blush thread, or give the nose a heart shape.
Gift Touches
To make it giftable, embroider a tiny initial on one ear, tie a satin ribbon at the tail base, and tuck a handwritten card under the whiskers.
Washing and Cleaning Instructions
Chenille likes gentle care, so treat the crochet heart kitty kindly. First, spot-clean with a damp cloth and a drop of mild soap, then blot rather than rub. For a deeper clean, place the kitty in a mesh laundry bag and choose a gentle cycle with cool water. However, skip wringing and skip the dryer. Instead, lay it flat on a towel, and fluff the pile with a soft brush once dry.
FAQs
Can I use regular worsted yarn for the crochet heart kitty?
Yes. For example, hold two strands together with a 5 mm hook, and the finished size stays close to the original. However, the pile will be less fluffy.
Why do my chenille stitches look uneven?
Because chenille hides loops, tension varies easily, even on a crochet heart kitty. So work slowly, keep stitches loose, and tidy the pile with a soft brush at the end.
Is the crochet heart kitty safe for babies?
Safety eyes can still be risky for young children. Therefore, for a baby-friendly version, embroider the eyes and nose and sew the ears on tightly.
How do I keep the heart shape from collapsing?
Stuff the lobes firmly before the taper rounds, and then add small handfuls near the point. As a result, the heart keeps its outline for years.
Time to Snuggle Up With Your Crochet Heart Kitty
After all, a pair of plump lobes, two pointed ears and a skinny tail is all it takes to turn a simple heart into a crochet heart kitty with real personality. So pick a favorite velvety yarn, put on a movie and work one round at a time. By the end of the weekend, a new cuddle buddy will be waiting on the couch.