Crochet Panda Keychain Hugging Red Panda
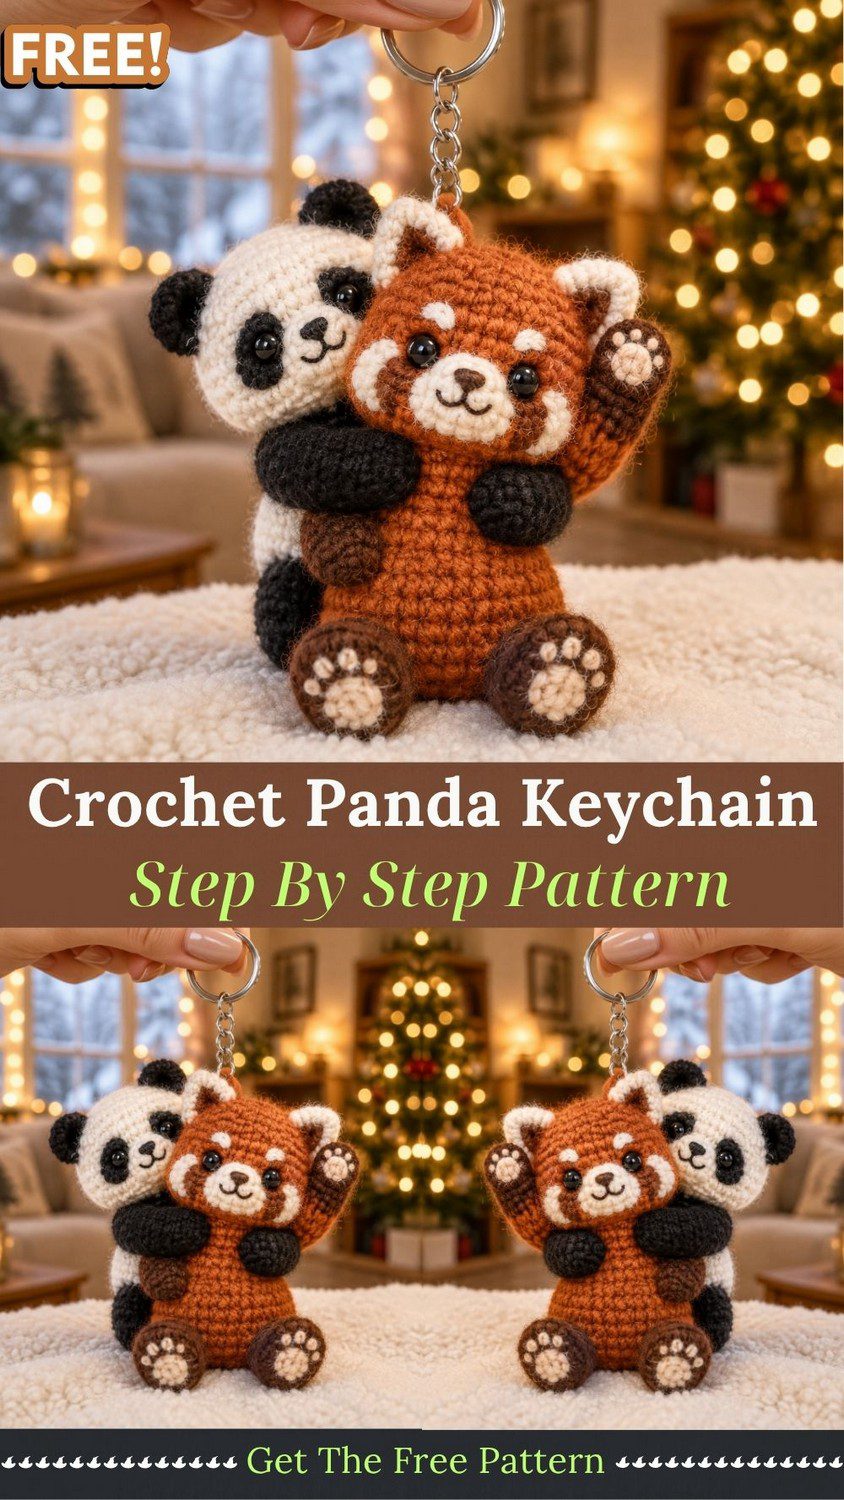
Round black-and-white cheeks, glossy little eyes, and a tiny bear hugging a rust-orange friend make this crochet panda keychain tough to walk past. It’s small enough to swing from a zipper or bag strap, and cute enough to brighten a gloomy day. Better yet, it needs nothing fancier than basic amigurumi stitches, so even a beginner can finish it in one sitting.
Most keychain toys go solo, but this one comes as a pair. A little panda wraps both arms around a red panda who waves hello, and that hug is the whole charm of the design. Every stitch has the kind of handmade warmth you just can’t pick up from a shop shelf. Beginners can work up the pair in a single afternoon, and whoever ends up with it will spot the effort right away.
Pattern Overview
Both animals are worked in continuous rounds from the top down. Therefore, you never join rounds or turn your work. The panda hugs from behind, so its arms stay long and slim. Meanwhile, the red panda sits upright with its legs stretched forward and one arm raised. In the end, the finished pair measures about 3.5 inches (9 cm) tall, although yarn choice can change that slightly.
Materials
- DK yarn in white, black, rust orange, dark brown and cream (cotton or acrylic)
- 2.5 mm crochet hook
- Four 6 mm safety eyes
- Polyester fiberfill
- Tapestry needle
- Stitch marker
- Small scissors
- Silver key ring with a short chain
- Black embroidery thread for the noses and mouths
- Pink blush or pastel chalk for the cheeks (optional)
Yarn Substitution Ideas
For crisp, tidy stitches, choose mercerized cotton. On the other hand, soft acrylic gives a fuzzier, plush finish. Likewise, black glass beads can replace safety eyes whenever the toy is meant for a small child.
Special Techniques You Will Need
- Magic ring: Every piece begins with it, because it closes the center tightly.
- Invisible decrease: Work through the front loops only, since smooth shapes depend on it.
- Color changes: Switch yarn on the final pull-through of the last stitch, so the stripes stay clean.
- Stuffing: Add small, firm amounts at a time. Consequently, the bodies hold their shape through daily use.
Time Box
- Preparation: about 10 minutes
- Stitching: around 2 hours 30 minutes
- Finishing and assembly: roughly 45 minutes
Abbreviations (US Terms)
MR – magic ring, sc – single crochet, inc – two single crochets in one stitch, dec – single crochet decrease, ch – chain, sl st – slip stitch, FO – fasten off. Additionally, the number in brackets shows the total stitches at the end of each round.
Instructions
Step 1: Make the Hugging Panda
Panda Head (White)
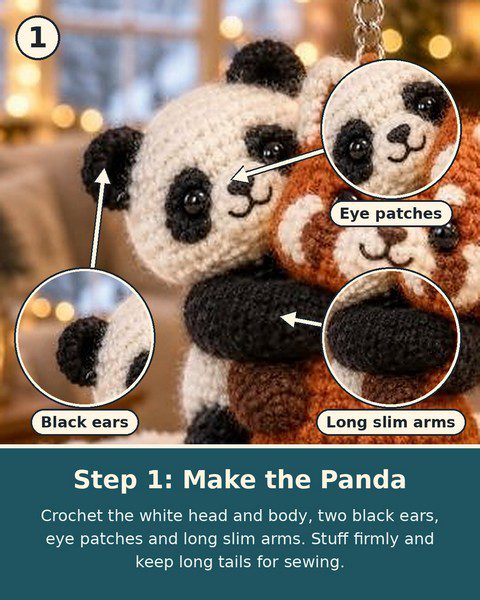
To begin, work R1: 6 sc in MR (6). Next, R2: inc in each stitch (12). Then R3: (1 sc, inc) x6 (18). After that, R4: (2 sc, inc) x6 (24). Following this, work R5–R8: sc around (24). Afterward, R9: (2 sc, dec) x6 (18). Finally, R10: (1 sc, dec) x6 (12).
Now insert the eyes between R6 and R7, leaving about 5 stitches between them. Stuff the head firmly, and then work R11: dec x6 (6). Lastly, FO and close the hole. Eyes go in before stuffing because adding them afterward is almost impossible.
Pro Tip: Lay the head flat and pin the eyes first. Otherwise, you may regret it, since moving them by a single stitch changes the whole expression.
Panda Body (White)
First, work R1: 6 sc in MR (6). Then R2: inc x6 (12). Next, R3: (1 sc, inc) x6 (18). After that, work R4–R6: sc around (18). Subsequently, R7: (4 sc, dec) x3 (15). Continue with R8–R9: sc around (15). Finally, R10: (3 sc, dec) x3 (12).
Stuff the body, and then work R11: dec x6 (6). To finish, FO and leave a long tail for sewing.
Panda Ears, Eye Patches and Arms (Black)
Ears (make 2). First, work R1: 6 sc in MR (6). Then R2: (1 sc, inc) x3 (9). Next, R3: sc around (9). Afterward, FO, leave a tail and flatten each piece without stuffing.
Eye patches (make 2). Start with ch 4. Then work 2 sc in the 2nd ch from the hook, and 1 sc in the next ch. After that, work 3 sc in the last ch. Next, continue along the opposite side with 1 sc and 2 sc (10). Finally, FO and leave a tail. Alternatively, felt ovals work well here.
Arms (make 2). To start, work R1: 6 sc in MR (6). Next, R2–R9: sc around (6). Then stuff lightly, FO and leave a tail. Make them slightly long, because they must stretch around the red panda.
Step 2: Make the Red Panda
Red Panda Head (Rust Orange)
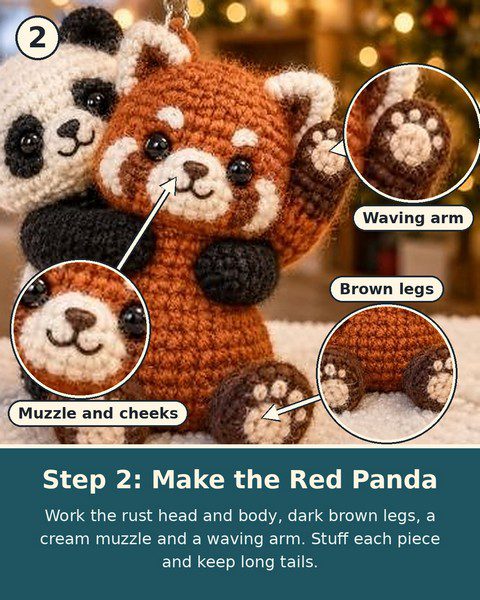
First, work R1: 6 sc in MR (6). Next, R2: inc x6 (12). Then R3: (1 sc, inc) x6 (18). After that, R4: (2 sc, inc) x6 (24). Following this, R5: (3 sc, inc) x6 (30). Subsequently, work R6–R9: sc around (30). Afterward, R10: (3 sc, dec) x6 (24). Then R11: (2 sc, dec) x6 (18). Finally, R12: (1 sc, dec) x6 (12).
Place the eyes between R7 and R8, with roughly 6 stitches between them. Next, stuff the head and work R13: dec x6 (6). Lastly, FO and close.
Red Panda Muzzle, Cheeks and Ears
Muzzle (cream). To begin, work R1: 6 sc in MR (6). Then R2: inc x6 (12). Next, R3: sc around (12). Afterward, FO, leave a tail and stuff very lightly.
Cheek patches (make 2, cream). Start with R1: 5 sc in MR (5). Then join with a sl st, FO and leave a tail.
Ears (make 2). First, begin with white and work R1: 6 sc in MR (6). Next, change to rust orange for R2: (1 sc, inc) x3 (9). Then R3: sc around (9). Finally, flatten the piece, FO and leave a tail.
Red Panda Body (Rust Orange)
First, work R1: 6 sc in MR (6). Then R2: inc x6 (12). Next, R3: (1 sc, inc) x6 (18). After that, R4: (2 sc, inc) x6 (24). Following this, work R5–R8: sc around (24). Subsequently, R9: (2 sc, dec) x6 (18). Then work R10–R12: sc around (18). Finally, R13: (1 sc, dec) x6 (12). Stuff, FO and leave a tail.
Red Panda Legs, Arms and Tail
Legs (make 2, dark brown). To start, work R1: 6 sc in MR (6). Then R2: inc x6 (12). Next, R3–R4: sc around (12). After that, R5: (1 sc, dec) x4 (8). Afterward, R6–R7: sc around (8). Finally, stuff firmly, FO and leave a tail.
Arms (make 2, rust orange). First, work R1: 6 sc in MR (6). Then R2–R8: sc around (6). Next, stuff lightly. Lastly, embroider a tiny cream paw pad on the tip of the arm that will wave.
Tail (optional, striped). To begin, work R1: 6 sc in MR (6). Then R2: (1 sc, inc) x3 (9). Next, R3–R4: sc around (9). After that, alternate 2 rounds of dark brown with 2 rounds of rust orange until you reach 10 rounds. Finally, stuff lightly, FO and leave a tail.
Step 3: Add the Faces
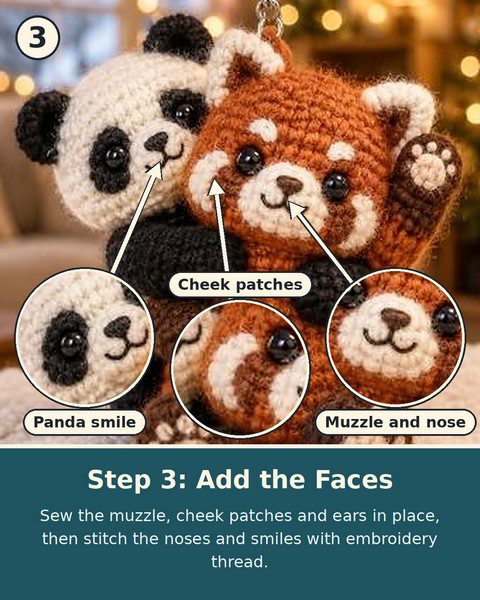
- First, sew the muzzle onto the red panda, between and slightly below the eyes.
- Next, stitch the cheek patches beside the muzzle.
- Then embroider a small brown nose and a gentle smile with 2 short stitches.
- After that, sew both ears to the head and tilt them slightly outward.
- Meanwhile, attach the panda’s eye patches around its safety eyes, and then sew on the black ears.
- Finally, stitch a tiny black nose and a curved smile with embroidery thread.
Pro Tip: Pin a piece of loose yarn in place to test the smile first. In fact, one extra stitch can turn happy into grumpy.
Step 4: Assemble the Crochet Panda Keychain
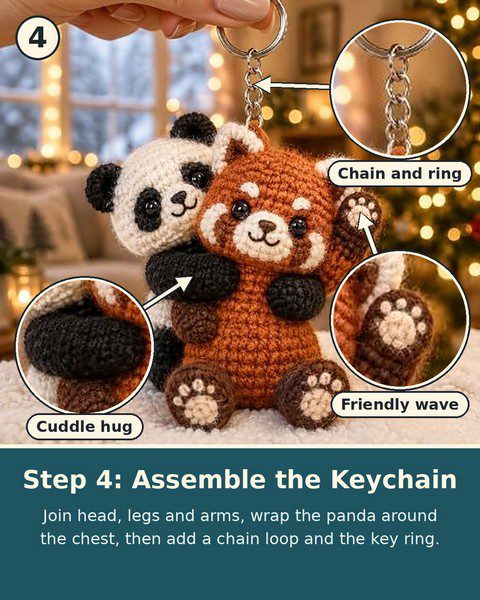
- First, sew the red panda’s head onto its body and center it well.
- Next, attach the legs at the bottom, pointing forward so the toy sits upright.
- Then sew one arm at the side and fix the other arm at an upward angle for the wave.
- After that, fasten the tail low on the back.
- Meanwhile, sew the panda’s head onto its body and place the panda behind the red panda.
- Afterward, wrap the panda’s arms around the red panda’s chest and stitch the paw tips together underneath.
- Subsequently, make a 6-chain loop in matching yarn and sew it between the red panda’s ears.
- Finally, slide the key ring through the loop.
Common Mistakes to Avoid
- Skipping the stitch marker. Losing the start of a round quickly distorts the shape.
- Using an oversized hook. Gaps appear, so the fiberfill peeks through.
- Overstuffing the arms. Stiff arms cannot hug properly.
- Sewing the ears too high. Placing them slightly to the sides looks more natural.
- Rushing the assembly. Pin every piece before the first stitch goes in.
Uses and Benefits of a Panda Keychain
Clip it onto a backpack zipper, hang it from a car mirror, or tuck it inside a gift card envelope. Moreover, it makes a charming tote bag accessory. Because the pair is so small, it also uses up leftover yarn. In addition, practicing tiny shapes sharpens your tension control.
Beginner Tips for Crocheting Tiny Toys
Count your stitches at the end of every round. Furthermore, work in good daylight whenever black yarn is involved, since dark stitches hide easily. Finally, take short breaks, because tired hands produce tight stitches.
Ways to Personalize Your Panda Keychain
Seasonal Scarves
For holiday gifting, crochet a miniature scarf in red and green.
Different Colors
Likewise, swap the rust orange for pink to create a sweet strawberry version.
Name Tags
Additionally, stitch a tiny initial onto the red panda’s belly for a personal present.
Mini Accessories
Alternatively, a small bow or beanie adds extra personality.
Bonus: Washing and Care Guide
Gentle hand washing keeps the fibers soft. First, fill a bowl with lukewarm water and add a drop of mild soap. Then squeeze the toy softly without rubbing. Next, rinse until the water runs clear. After that, press out the moisture with a towel and let the pair dry flat, away from direct heat. Finally, shape the arms and ears back into place.
Frequently Asked Questions
How long does the take?
Most crocheters finish both animals in about 3 hours 30 minutes, including assembly.
Can I make the keychain without safety eyes?
Absolutely. Black embroidery knots or small beads work nicely, and they are safer for toys given to small children.
Which yarn works best?
DK cotton produces clean, defined stitches. In contrast, soft acrylic gives a plusher result.
Why does my panda not hug properly?
Usually, the arms are too short. Therefore, add 2 extra rounds, and the hug will close comfortably around the red panda’s chest.
Can I sell finished keychains?
Yes, small-batch sales of items you made yourself are generally fine. However, please credit the pattern source if you share the instructions.
Grab Your Hook and Start Snuggling
Two tiny friends holding on tight add up to more than a simple accessory. Every time this crochet panda keychain swings from a bag, someone nearby smiles. So pick your favorite colors, pull out your hook and begin. Afterward, share your finished pair online, because a handmade hug deserves an audience.