Crochet Dalmatian Puppy Holding a Bone
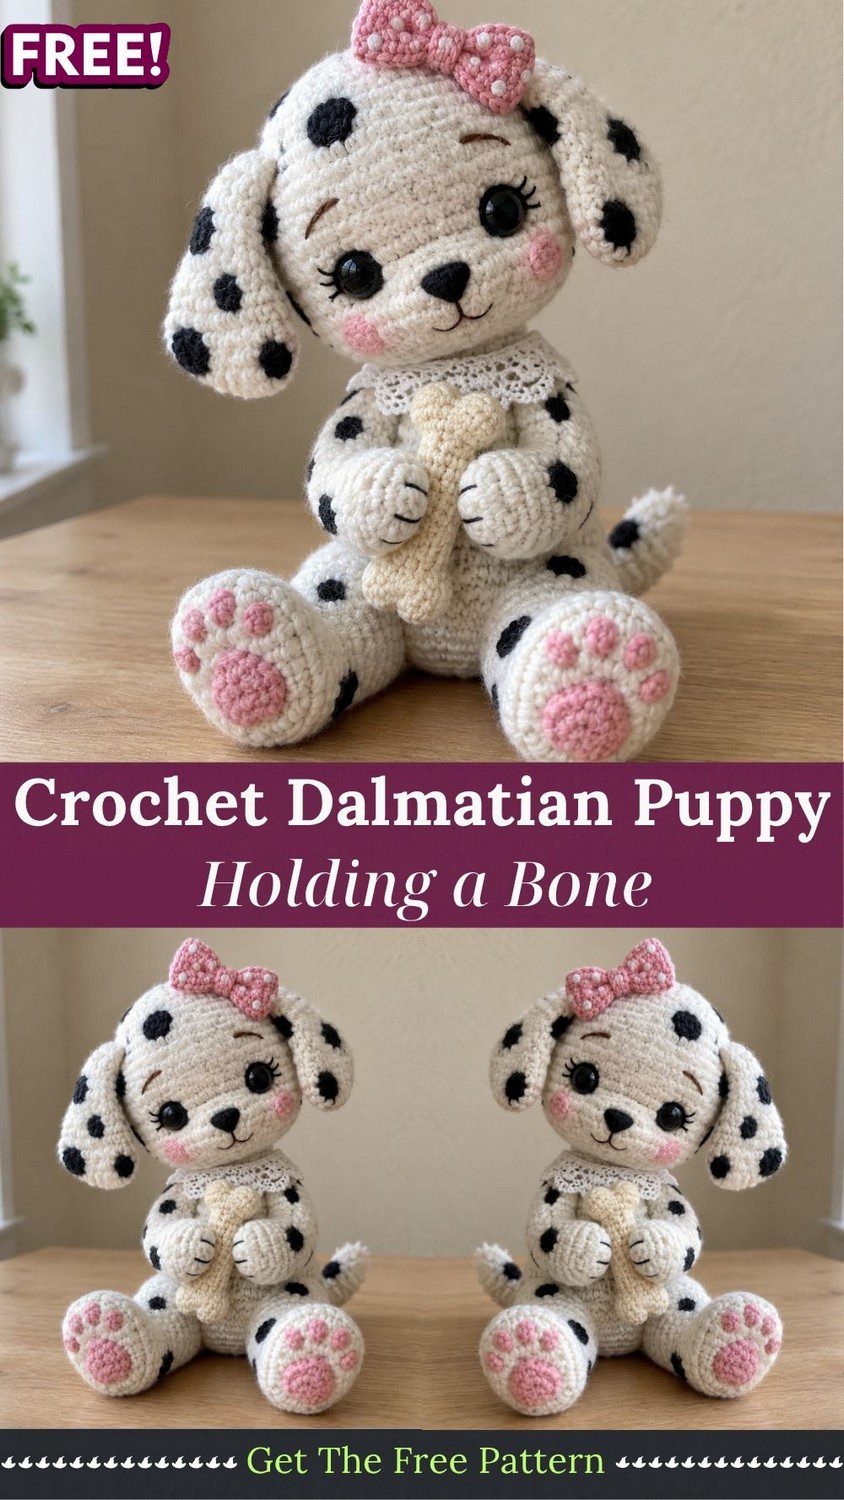
Cream stitches dotted in black rosy cheeks and a bone hugged to its chest turn this crochet dalmatian puppy into a bundle of mischief. A pink bow adds even more amigurumi charm.
Most dalmatian toys sit politely and stare straight ahead. This one, however, tilts its head as if it just heard the word walk. Meanwhile, both paws guard a tiny bone that nobody may touch. Pink cheeks, long lashes and a lace collar give the pup a sweet personality. Besides that, the simple shapes make it a rewarding project for a quiet weekend, even if you are fairly new to amigurumi.
Crochet Dalmatian Puppy Pattern Overview
Every piece is worked in continuous spiral rounds. Therefore, you can skip joining and turning chains, except for the bow and collar. The puppy sits upright with its legs stretched forward, and its short front arms cradle the bone. In the end, the finished toy stands about 8 inches (20 cm) tall with DK yarn.
Materials for the Crochet Dalmatian Puppy
- DK cotton or acrylic yarn in cream, black, pink, white and a little brown
- 3 mm crochet hook
- One pair of 12 mm black safety eyes
- Polyester fiberfill
- Tapestry needle and stitch marker
- Black and brown embroidery thread
- Thin white cotton thread for the lace collar
- Sewing pins
Yarn Substitution Ideas
Mercerized cotton keeps the spots crisp. On the other hand, soft acrylic creates a cuddlier feel. Likewise, felt circles can replace crocheted spots when time is short. Stitched spots, however, survive play and washing much better.
Special Techniques You Will Need
- Magic ring: Nearly every piece starts here, because it closes tightly and prevents gaps.
- Invisible decrease: Work through the front loops only, so the shaping stays smooth.
- Color changes: Swap yarn on the last pull-through of the final stitch. As a result, the edges stay clean.
- Satin stitch embroidery: Fill the nose and paw pads with parallel stitches placed close together.
Time Box
- Preparation: about 15 minutes
- Stitching: around 6 hours
- Finishing and assembly: roughly 1 hour
Abbreviations (US Terms)
MR – magic ring, sc – single crochet, inc – two single crochets in one stitch, dec – single crochet decrease, dc – double crochet, ch – chain, sl st – slip stitch, FO – fasten off. Additionally, the number in brackets shows the total stitches at the end of each round.
Crochet Dalmatian Puppy Instructions
Step 1: Crochet the Dalmatian Puppy Head
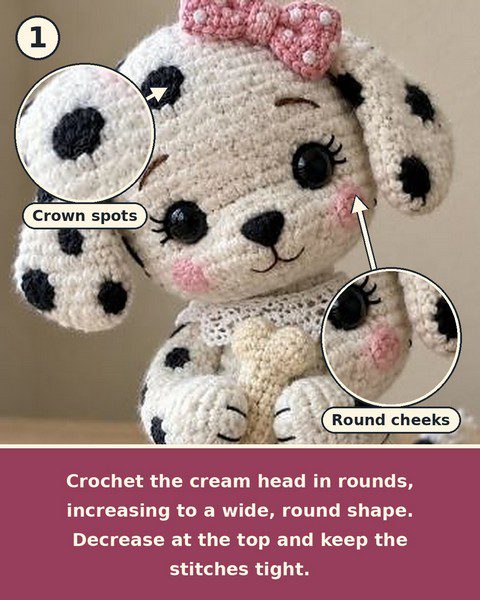
Use cream yarn. To begin, work R1: 6 sc in MR (6). Next, R2: inc x6 (12). Then R3: (1 sc, inc) x6 (18). After that, R4: (2 sc, inc) x6 (24). Following this, R5: (3 sc, inc) x6 (30). Afterward, R6: (4 sc, inc) x6 (36). Subsequently, R7: (5 sc, inc) x6 (42).
Now work R8–R18: sc around (42). Once that is done, R19: (5 sc, dec) x6 (36). Then R20: (4 sc, dec) x6 (30). Next, R21: (3 sc, dec) x6 (24). Finally, R22: (2 sc, dec) x6 (18).
Leave the head unstuffed for now, because the eyes go in first. Instead, place a stitch marker in the last stitch and set the piece aside. A wide, even head gives the pup its round, babyish look, so keep every stitch snug.
Step 2: Make the Muzzle and Cheeks
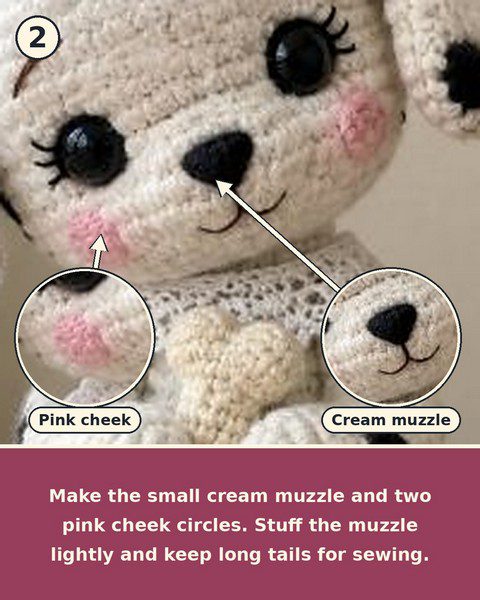
Muzzle (cream). First, work R1: 6 sc in MR (6). Then R2: inc x6 (12). Next, R3: (1 sc, inc) x6 (18). After that, R4–R5: sc around (18). Finally, stuff lightly, FO and leave a long tail.
Cheeks (make 2, pink). To start, work R1: 6 sc in MR (6). Then R2: inc x6 (12). Afterward, join with a sl st, FO and leave a tail for sewing.
Pro Tip: Keep the muzzle stuffing soft. Otherwise, a rock-hard muzzle pushes the nose upward and flattens the smile.
Step 3: Add the Face to Your Crochet Dalmatian Puppy
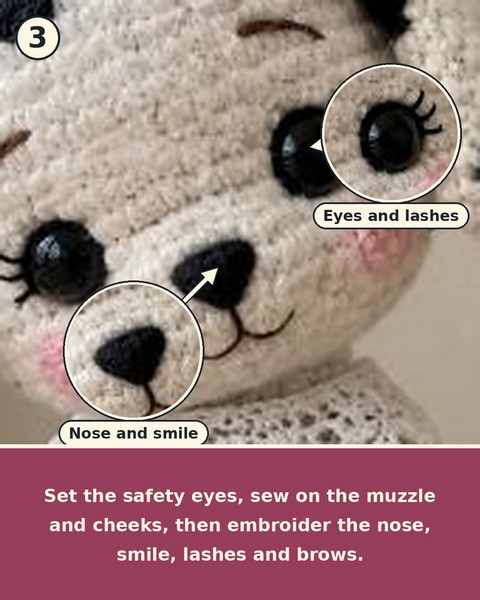
- First, push the safety eyes through the head between R12 and R13, leaving about 9 stitches between them. Then lock the washers on firmly.
- Next, stuff the head firmly and work R23: (1 sc, dec) x6 (12). After that, work dec x6 (6), FO and close.
- Then pin the muzzle between the eyes, slightly lower than center, and sew it on.
- Afterward, stitch the cheeks beside the muzzle, partly tucked under the eyes.
- Meanwhile, embroider a black triangle nose with satin stitch.
- Following that, add a short vertical line under the nose and a gentle curved smile.
- Finally, stitch 3 small lashes above each eye with black thread, plus two curved brown eyebrows.
The eyes must go in before stuffing, because nothing can be adjusted afterward.
Pro Tip: Pin the eyes and muzzle first, and then step back to check the expression from a distance. Moving a pin costs nothing, whereas undoing sewn stitches takes forever.
Step 4: Make the Puppy Body
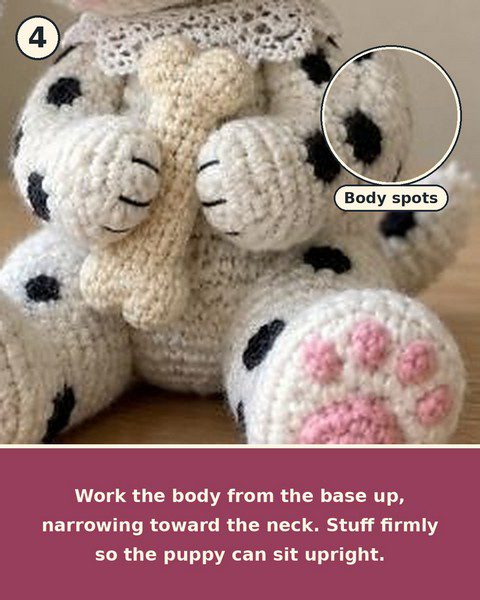
Use cream yarn. First, work R1: 6 sc in MR (6). Then R2: inc x6 (12). Next, R3: (1 sc, inc) x6 (18). After that, R4: (2 sc, inc) x6 (24). Following this, R5: (3 sc, inc) x6 (30). Subsequently, work R6–R9: sc around (30).
Afterward, R10: (3 sc, dec) x6 (24). Then work R11–R14: sc around (24). Next, R15: (2 sc, dec) x6 (18). After that, work R16–R17: sc around (18). Finally, stuff firmly and work R18: (1 sc, dec) x6 (12). FO and leave a long tail.
Firm stuffing in the base lets the puppy sit upright without toppling, so do not skimp there.
Step 5: Make the Legs and Arms
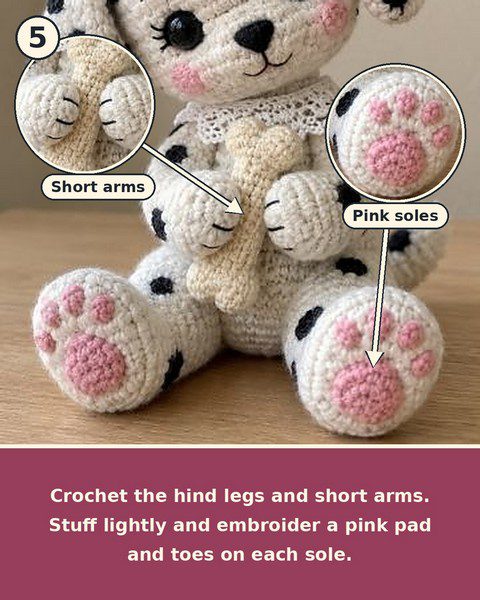
Hind legs (make 2, cream). To begin, work R1: 6 sc in MR (6). Then R2: inc x6 (12). Next, R3: (1 sc, inc) x6 (18). After that, work R4–R6: sc around (18). Subsequently, R7: (1 sc, dec) x6 (12). Then work R8–R10: sc around (12). Finally, stuff and FO with a long tail. Embroider one large pink pad and three small toe pads on each sole.
Front arms (make 2, cream). First, work R1: 6 sc in MR (6). Then R2: (1 sc, inc) x3 (9). Next, work R3–R4: sc around (9). After that, R5: (1 sc, dec) x3 (6). Afterward, work R6–R10: sc around (6). Finally, stuff lightly, FO and leave a tail. In addition, add two tiny black toe stitches at each paw tip.
Step 6: Make the Ears, Tail and Bone
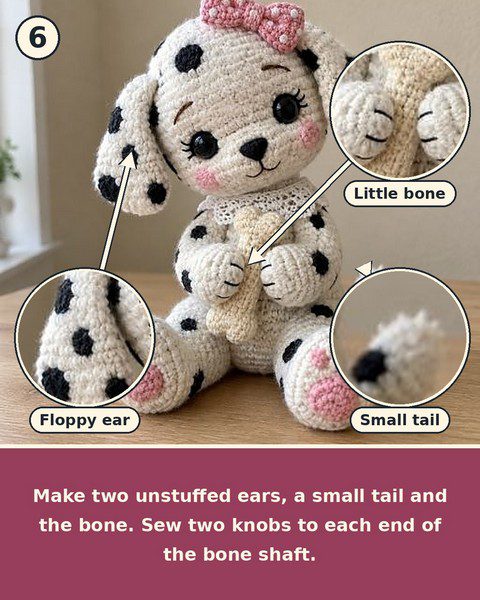
Ears (make 2, cream). To start, work R1: 6 sc in MR (6). Then R2: inc x6 (12). Next, R3: (1 sc, inc) x6 (18). After that, work R4–R9: sc around (18). Subsequently, R10: (1 sc, dec) x6 (12). Then R11: sc around (12). Lastly, FO and leave a tail. Do not stuff the ears, because floppy ears drape better when flat.
Tail (cream). First, work R1: 6 sc in MR (6). Then R2: (1 sc, inc) x3 (9). Next, work R3–R4: sc around (9). After that, R5: (1 sc, dec) x3 (6). Afterward, work R6–R8: sc around (6). Finally, stuff lightly and FO.
Bone (cream). For the shaft, work R1: 6 sc in MR (6). Then work R2–R6: sc around (6). Next, stuff and FO. For the knobs, make 4. Start with R1: 6 sc in MR (6). Then R2: (1 sc, inc) x3 (9). After that, R3: sc around (9). Subsequently, R4: (1 sc, dec) x3 (6). Finally, stuff, FO and sew two knobs to each end of the shaft.
Step 7: Make the Spots, Bow and Collar
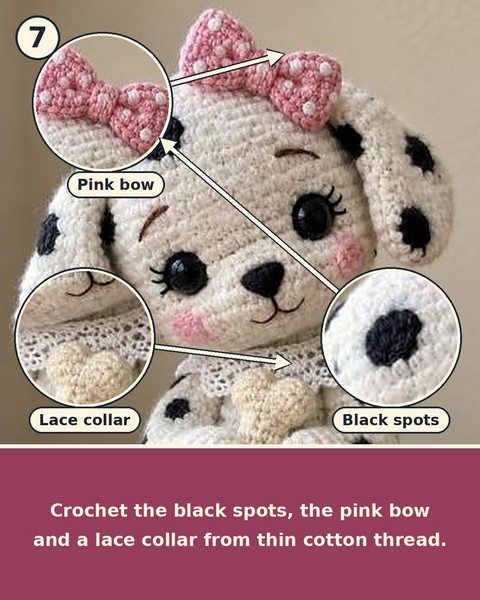
Spots (black). For large spots, work R1: 6 sc in MR (6). Then R2: inc x6 (12). Afterward, join and FO. For small spots, work R1: 5 sc in MR (5), then join and FO. Overall, make about 6 large and 6 small spots.
Pro Tip: Place the spots with pins before stitching. Uneven spacing gives a natural dalmatian pattern, whereas perfect rows tend to look stiff.
Bow (pink). First, ch 11. Then sc in the 2nd ch from the hook and across (10). Next, work rows 2–10: ch 1, turn, sc across (10). After that, pinch the center and wrap a small pink strip around it. Finally, sew it in place and add tiny white French knots as polka dots.
Lace collar (white thread). To begin, ch 41. Then work row 1: sc in the 2nd ch from the hook and across (40). Next, row 2: ch 1, turn, sc in the next st, skip 1 st, 5 dc in the next st, skip 1 st, and repeat to the end.
Step 8: Assemble
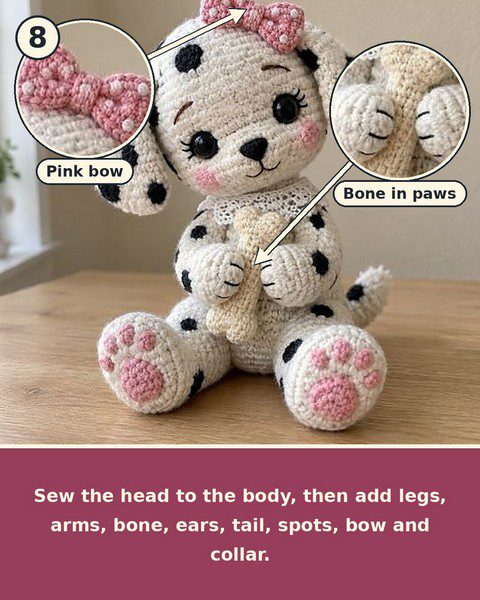
- First, sew the head onto the body and center it well.
- Next, attach the hind legs at the bottom, pointing forward so the toy sits steadily.
- Then sew the arms to the sides of the chest, angled inward.
- After that, slide the bone between the paws and stitch it in place.
- Afterward, fasten the ears at the upper sides of the head, one slightly higher than the other.
- Meanwhile, sew the tail low on the back.
- Subsequently, pin the spots across the head, ears, body, legs and tail, and then stitch them down.
- Following that, pin the bow between the ears and stitch it firmly.
- Next, slip the lace collar around the neck, sew the ends together and secure it with 2 hidden stitches.
- Finally, brush a little pink chalk over the cheeks for a rosy finish.
Common Mistakes to Avoid
- Overstuffing the head. Too much filling flattens the cheeks and stretches the stitches.
- Skipping the stitch marker. Losing the round start changes the shape quickly.
- Sewing the ears too high. Placing them slightly lower makes the face sweeter.
- Making perfect spots. Uniform patterns look artificial.
- Rushing assembly. Pin every piece first, and then check the sitting balance.
Uses and Benefits
Place the pup on a nursery shelf, rest it against a desk lamp, or tuck it into a gift basket. Moreover, it looks lovely beside a birthday card. Beyond decoration, the project sharpens your shaping skills and builds embroidery confidence. Likewise, it uses up leftover yarn efficiently.
Beginner Tips
Count your stitches at the end of every round. Furthermore, work in daylight whenever black yarn is involved, since dark stitches hide mistakes. Finally, take short breaks, because relaxed hands produce neater tension.
Ways to Personalize Your Dalmatian Puppy
Different Spot Colors
Brown or gray spots create a playful alternative to classic black.
New Bow Shades
Similarly, lavender, mint or yellow bows suit different gift occasions.
Name Tags
In addition, embroider a tiny name on the collar for a personal present.
Seasonal Accessories
Alternatively, a miniature scarf or Santa hat transforms the pup for holiday gifting.
Bonus: Gift Wrapping Ideas
A finished puppy deserves a nice presentation. First, tuck it into a small kraft paper box lined with tissue. Then tie a thin ribbon around the box, matching the pink of the bow. Next, slip a handwritten note under the ribbon, perhaps naming the pup. Finally, add a paper bone tag, so the receiver smiles before the box is even open.
Frequently Asked Questions
How long does the crochet dalmatian puppy take to make?
Most crocheters finish it in around 7 hours, including embroidery and assembly.
Can I make it without safety eyes?
Absolutely. Black embroidered eyes work nicely, and they suit toys meant for babies.
What yarn size works best?
DK cotton produces clean, defined stitches. In contrast, soft acrylic gives a plusher finish.
How can I make the puppy larger?
Use chunky yarn with a 4 mm hook. Consequently, the same pattern grows to roughly 11 inches.
Can I sell finished puppies?
Yes, small-batch sales of items made from the pattern are generally welcome. However, please mention the pattern source when sharing instructions.
Time to Let Those Spots Shine
A spotted pup guarding a tiny bone has a way of making people smile. So pick your favorite shades, start your first magic ring and let every spot find its own place. Afterward, share your crochet dalmatian puppy online, because a handmade friend deserves a wide audience.