
Crochet Coffee Mug Pattern Crafted With Whimsical Charm
Soft mint yarn, rosy cheeks, and a creamy heart floating on chocolate-brown coffee come together in this Crochet Coffee Mug Pattern. Best of all, the finished amigurumi cup looks adorable on any desk, is easy to make, and works as a sweet gift for coffee lovers.
Imagine a tiny mint-green mug with blushing cheeks, a happy smile, and a creamy heart resting on chocolate-brown coffee. That is exactly what you will make with this Crochet Coffee Mug Pattern. Because it is worked in simple rounds with single crochet stitches, it feels quick and relaxing from start to finish. Once it is done, place it on your desk, style it on a shelf, or hand it to a kid as a cuddly play toy. It also makes a thoughtful handmade gift for coffee lovers, friends, and teachers who deserve something cozy.

Crochet Coffee Mug Pattern Overview
Most coffee cup amigurumi designs land between 3.5 and 6 inches tall, so yarn weight and hook size decide the final look. For example, this Crochet Coffee Mug Pattern stands about 4 inches (10 cm) tall and 4 inches (10 cm) wide when worked in chunky yarn with a 4 mm hook. Including the handle, it measures roughly 5.5 inches (14 cm) across. Thinner yarn gives a smaller cup, while thicker yarn gives a bigger one. Moreover, everything is worked in continuous spiral rounds, so the body has no seam.
Here is how your time will be spent:
- Prep: about 15 minutes to wind yarn and gather supplies
- Stitching: about 3 hours for the body, top, handle, and heart
- Finishing: about 45 minutes for the face and assembly
Materials for This Crochet Coffee Mug Pattern
- Chunky (weight 5) yarn in mint green, about 45 yards (41 m)
- Chocolate brown yarn, about 15 yards (14 m)
- Cream or white yarn, about 5 yards (5 m)
- Small scraps of pink and black yarn or embroidery floss
- 4 mm (G-6) crochet hook
- Two 10 mm black safety eyes (embroidered eyes are safer for little ones)
- Polyester fiberfill
- Stitch marker, tapestry needle, and scissors
- Optional: a thin plastic canvas circle for a flat base
Abbreviations (US terms): MR: magic ring. sc: single crochet. inc: two sc in the same stitch. dec: invisible decrease. BLO: back loop only. sl st: slip stitch. st(s): stitch(es). FO: fasten off.
Before you start, a few quick techniques will make this Crochet Coffee Mug Pattern much smoother:
- Magic ring: Starting each piece with a magic ring closes the center completely. As a result, no stuffing peeks through the middle.
- Invisible decrease: Insert the hook through the front loops of the next two stitches, pull up a loop, and finish one sc. Compared with a standard decrease, the rim stays smoother and neater.
- Tight tension: Choose a hook slightly smaller than the yarn label suggests. Gaps are the biggest enemy here, since white fiberfill shows through loose stitches.
Crochet Coffee Mug Pattern Instructions
Step 1: Mug Body (Mint Green)
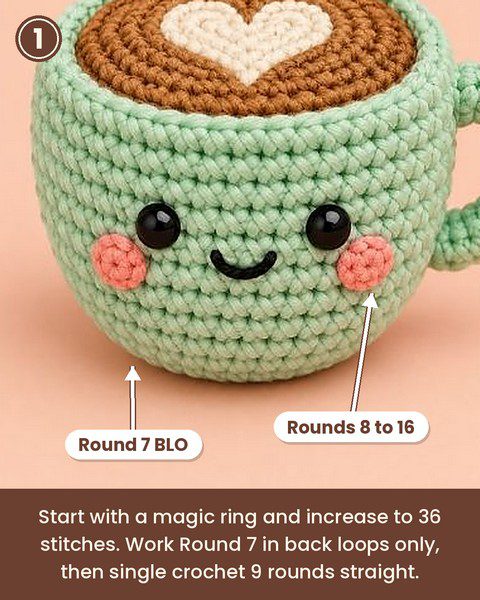
Make a MR and work in spiral rounds.
- Round 1: 6 sc in MR (6)
- Round 2: inc in each st (12)
- Round 3: (sc 1, inc) x 6 (18)
- Round 4: (sc 2, inc) x 6 (24)
- Round 5: (sc 3, inc) x 6 (30)
- Round 6: (sc 4, inc) x 6 (36)
- Round 7: BLO sc in each st (36)
- Rounds 8–16: sc in each st (36)
Pro-Tip: Round 7 creates a crisp base edge. Therefore, pull the yarn snug on that round so the cup sits flat.
Step 2: Rim
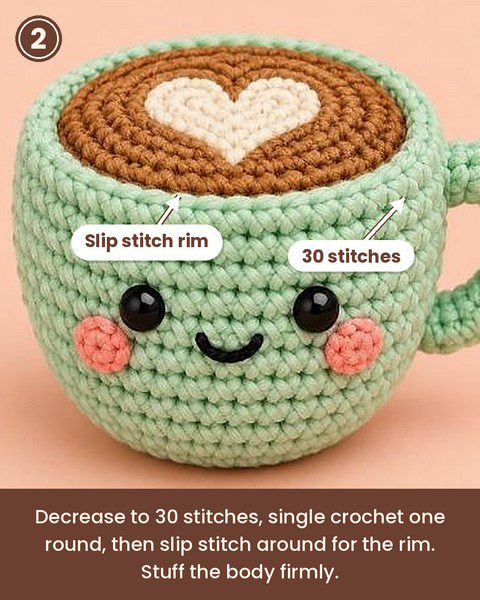
- Round 17: (sc 4, dec) x 6 (30)
- Round 18: sc in each st (30)
- Round 19: sl st in each st (30)
Fasten off and weave in the end. Then stuff the body firmly, but keep a little extra fiberfill nearby for the final shaping. Why it matters: the slip stitch round forms a firm lip, which later frames the coffee top.
Step 3: Coffee Top (Chocolate Brown)
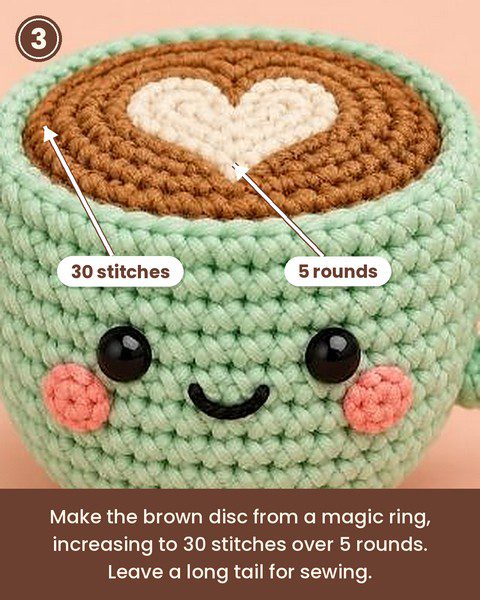
Make a MR.
- Round 1: 6 sc in MR (6)
- Round 2: inc in each st (12)
- Round 3: (sc 1, inc) x 6 (18)
- Round 4: (sc 2, inc) x 6 (24)
- Round 5: (sc 3, inc) x 6 (30)
Fasten off, leaving a long tail for sewing.
Step 4: Handle (Mint Green)
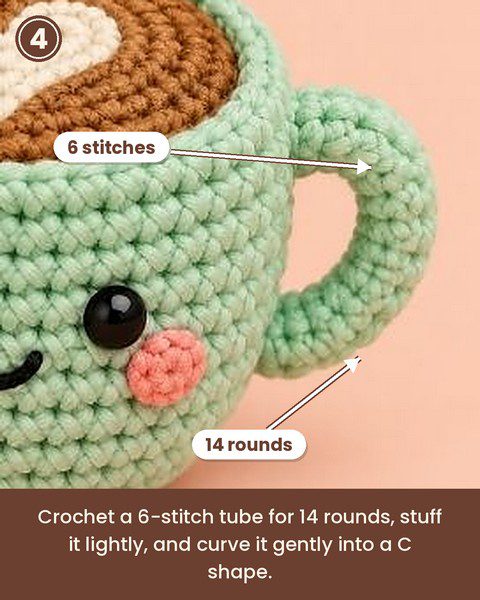
Make a MR.
- Round 1: 6 sc in MR (6)
- Rounds 2–15: sc in each st (6)
Fasten off with a long tail. After that, add a small amount of fiberfill and curve the tube into a gentle C shape.
Step 5: Latte Art Heart (Cream)
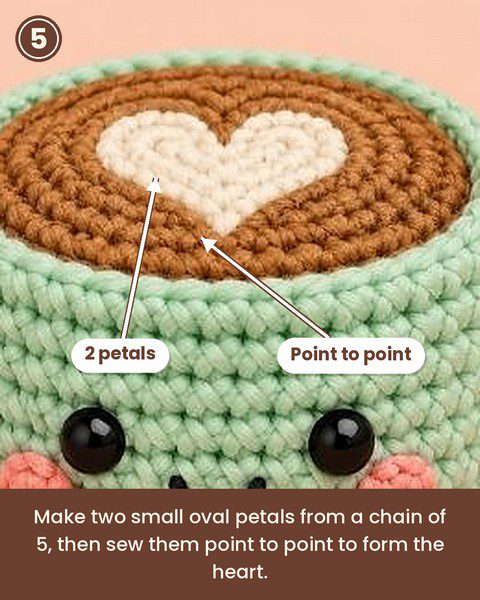
Make two petals. For each one, chain 5. Sc in the 2nd chain from the hook, sc in the next 2 chains, and work 3 sc in the last chain. Continue along the underside of the chain with 1 sc in each of the next 3 chains, then sl st to the first sc (9 sc). Fasten off, leaving a tail.
Step 6: Face and Cheeks
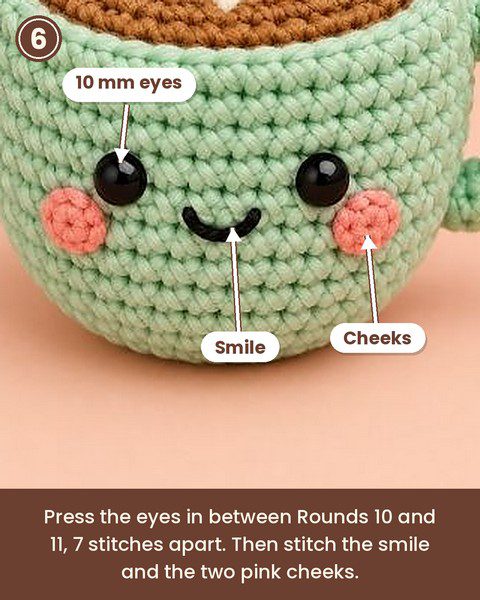
Insert the safety eyes between Rounds 10 and 11, with 7 stitches between them. Next, use black floss to embroider a small curved smile centered between the eyes, about one round below. Finally, stitch two pink circles just outside the eyes and one round lower, wrapping the yarn three or four times for a soft blush.
Assembling Your Crochet Coffee Mug Pattern
Step 7: Attach the Coffee Top
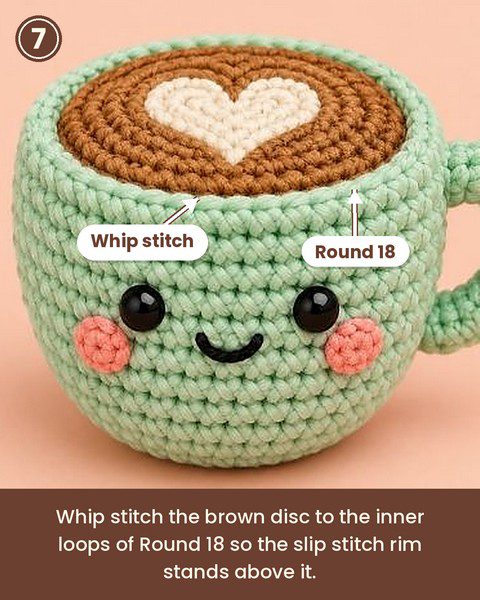
Pin the brown disc inside the cup so it sits just below the rim. Then whipstitch its edge to the inner (back) loops of Round 18. Before closing the final gap, add any last fiberfill.
Step 8: Attach the Handle
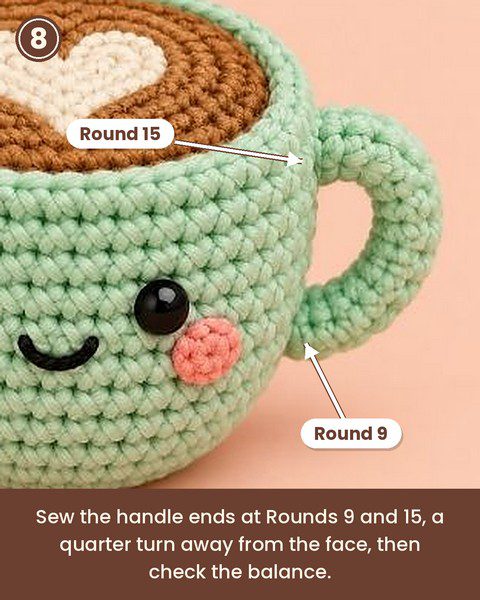
Position the handle a quarter turn away from the face, roughly 9 stitches to the right of its center. Sew the top end at Round 15 and the bottom end at Round 9. Pin it first, since a lopsided handle is hard to unpick.
Pro-Tip: Hold the cup at arm’s length before sewing. In this way, you can check that handle height and face position look balanced from the front.
Step 9: Attach the Heart

Place the two petals on the brown top with their pointed ends touching at the bottom and their rounded tops angled outward. Sew them down, and then add a tiny cream straight stitch below as a stem.
Common Mistakes in the Crochet Coffee Mug Pattern
- Loose tension: Gaps let the fiberfill show, so drop a hook size if needed.
- Under-stuffing: A soft body slumps and wrinkles the walls. Therefore, pack the stuffing in small pieces.
- Skipping the stitch marker: Spiral rounds are easy to lose track of, especially at Round 7.
- High-set handle: Attaching it too close to the rim makes the cup look tilted.
- Crooked eyes: Always count stitches before pressing the safety eyes in.
Beginner Tips for the Crochet Coffee Mug Pattern
Start with smooth, light-colored yarn, because stitches are easier to see. Also, count stitches at the end of every increase round. If a round feels off, pull it out immediately rather than hoping it evens out. Furthermore, work the coffee top first as a practice piece, since it teaches the increase pattern in only five rounds.
Uses and Benefits
A finished mug rests beside a monitor, sits on a bookshelf, or perches on a kitchen windowsill, adding a bit of café warmth wherever it lands. In addition, it works as a pincushion, since firm stuffing grips pins well. Beyond decoration, the project sharpens skills with increases, invisible decreases, and tidy assembly. Because it needs only small amounts of yarn, leftover stash gets used up too. Finally, wrapped in tissue, the cup becomes a thoughtful present for coffee lovers, teachers, and coworkers.
Personalization Ideas
- Seasonal colors: Swap the mint body for pumpkin orange in autumn, or red with a white heart for winter.
- Different latte art: Replace the heart with a spiral, a star, or a tiny leaf for a new café menu.
- Mini version: Use fingering or DK yarn with a 2.75 mm hook for a small ornament-sized cup.
- New expressions: Try sleepy closed eyes or tiny sparkle stitches to give each cup its own mood.
Washing and Cleaning Instructions
Spot clean with a damp cloth and a drop of mild soap. Afterward, press out the moisture and air dry away from direct heat. However, avoid machine washing, since the stuffing and safety eyes may shift. If the cup is meant for a young child, swap safety eyes for embroidered ones.
Crochet Coffee Mug Pattern FAQs
Is this crochet coffee mug pattern beginner friendly?
Yes. The pattern uses only sc, increases, and decreases, plus basic sewing.
What yarn works best for a crochet coffee mug?
Smooth chunky acrylic or cotton blend yarn gives clear stitch definition. Velvet yarn also works, although it hides stitches.
How big is the finished mug?
About 4 inches (10 cm) tall and 4 inches wide, or roughly 5.5 inches including the handle, using chunky yarn and a 4 mm hook.
Can this crochet coffee mug pattern skip the handle?
Absolutely. Without it, the cup works nicely as a pincushion or a stacking decoration.
A Cup Worth Stitching Slowly
Some projects earn their charm through small details, and this mug is a good example. The firm rim, the spiral coffee, and the little heart come together into something that looks store-made but feels deeply personal. So take your time with tension and stuffing, because those two habits matter most. In the end, your finished Crochet Coffee Mug Pattern cup waits for its first spot on your shelf, ready to make an ordinary morning feel a little warmer.