
Crochet Ghost Keychain Pattern in Witch Hat
If you want a Halloween craft that is cute instead of scary, try this Crochet Ghost Keychain Pattern. As a result, beginners can finish the white ghost and its witch hat in one evening. Better still, it looks great on keys or bags and makes a sweet gift.
Ghosts don’t have to be scary, and this one proves it. Instead, he has soft white yarn, pink cheeks, a tiny smile, and a black witch hat with an orange stripe. Because this Crochet Ghost Keychain Pattern only uses single crochet, even a beginner can finish it in one evening. Once it’s all done, clip it to your keys, hang it on a school bag, or set it beside your Halloween decor. Besides that, it makes a sweet little handmade gift for kids, friends, and teachers who love simple, cozy fall crafts.
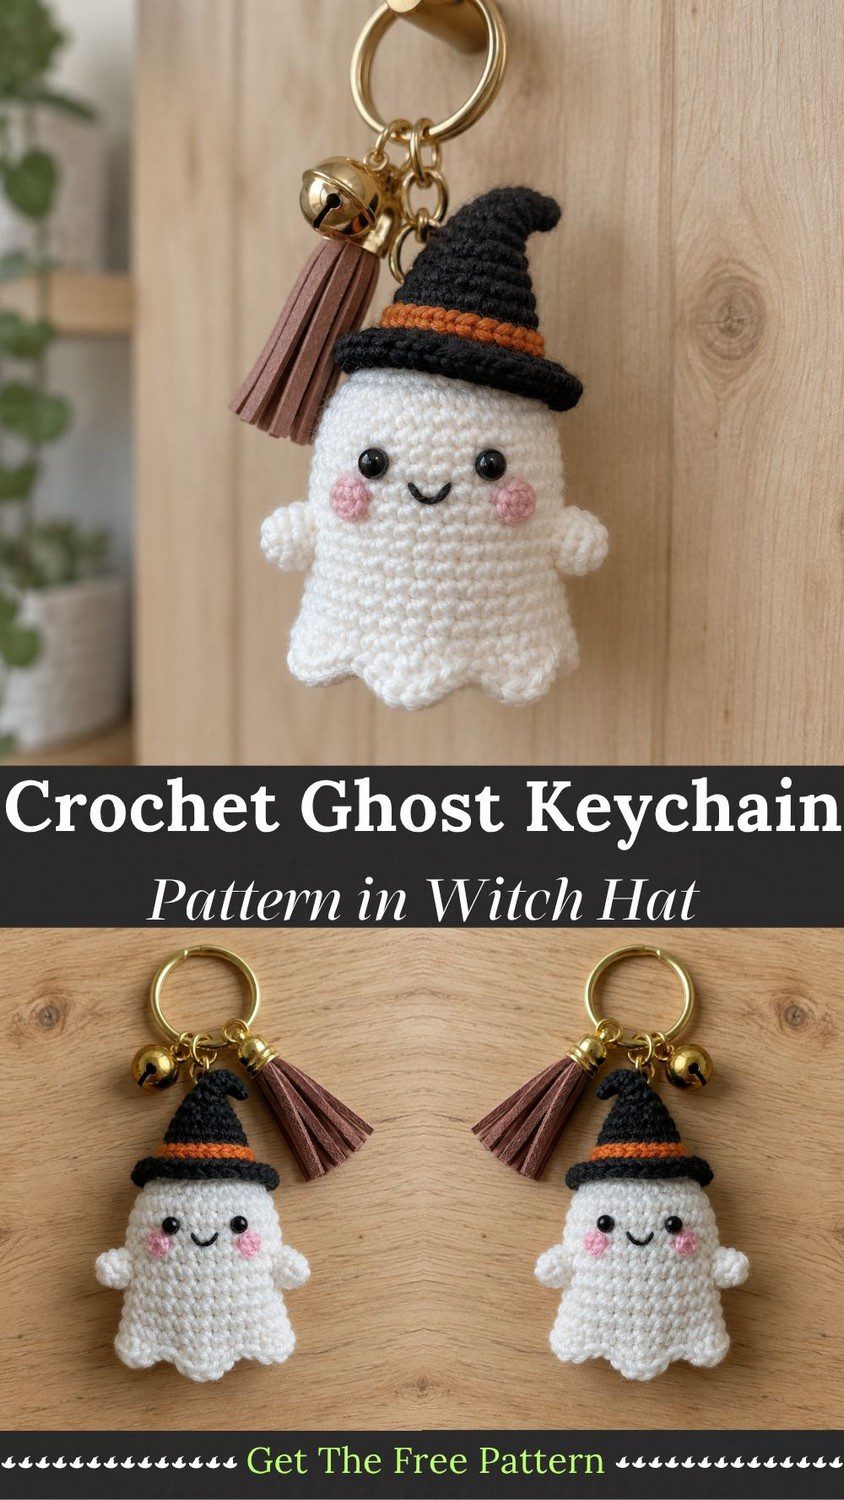
Crochet Ghost Keychain Pattern Overview
Most ghost keychains land between 2.5 and 3 inches tall in DK cotton with a 3.0 mm hook, while small witch hats in similar yarn run about 6 cm. Combined, this Crochet Ghost Keychain Pattern gives a charm that measures about 3.3 inches (8.5 cm) tall and 2.5 inches (6.5 cm) wide, not counting the hardware. In contrast, the ghost alone stands roughly 2.5 inches (6.5 cm). However, heavier yarn gives a bigger charm, so choose accordingly. Moreover, everything is worked in continuous spiral rounds, which keeps seams to a minimum.
Next, here is how your time will be spent:
- Prep: about 15 minutes to wind yarn and gather hardware
- Stitching: about 3 hours for the body, hem, arms, and hat
- Finishing: about 45 minutes for the face, assembly, and key ring
Materials for This Crochet Ghost Keychain Pattern
First, gather these supplies before you start, so you never have to pause mid-round.
- DK weight cotton yarn in white, about 30 yards (27 m)
- Black DK yarn, about 12 yards (11 m)
- Orange DK yarn, about 3 yards (3 m)
- Pink yarn scraps for cheeks
- 3.0 mm crochet hook
- Two 6 mm black safety eyes
- Black embroidery floss
- Polyester fiberfill
- Gold key ring, small jingle bell, two jump rings, and a brown faux suede tassel
- Stitch marker, tapestry needle, scissors, and small pliers
Abbreviations (US terms): MR: magic ring. sc: single crochet. dc: double crochet. inc: two sc in one stitch. dec: invisible decrease. FLO: front loop only. BLO: back loop only. sl st: slip stitch. FO: fasten off.
Also, three quick techniques will make the crochet ghost keychain pattern much easier:
- Magic ring: Each piece starts with a magic ring, so no hole opens at the top of the head or the hat tip.
- Front loop brim: Working the first brim round in the front loops creates a flat shelf. Because of that, the hat brim spreads outward instead of curling down.
- Ruffled hem: Shell stitches worked into leftover front loops form the wavy ghost edge. Although they look complicated, the rhythm repeats only six times.
Crochet Ghost Keychain Pattern Instructions
Step 1: Head and Body (White)
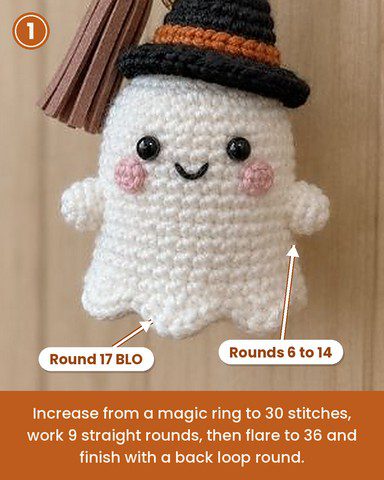
To begin, make a MR and work in spiral rounds.
- Round 1: 6 sc in MR (6)
- Round 2: inc in each st (12)
- Round 3: (sc 1, inc) x 6 (18)
- Round 4: (sc 2, inc) x 6 (24)
- Round 5: (sc 3, inc) x 6 (30)
- Rounds 6–14: sc in each st (30)
- Round 15: (sc 4, inc) x 6 (36)
- Round 16: sc in each st (36)
- Round 17: BLO sc in each st (36)
Why it matters: Round 17 leaves the front loops of Round 16 free, and the ruffle grows from them later.
Step 2: Face
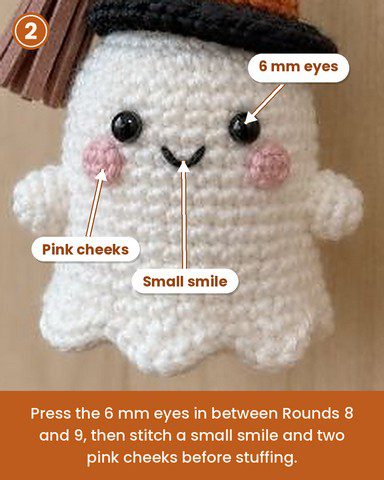
First, press the safety eyes in between Rounds 8 and 9, 6 stitches apart. Then embroider a small smile with black floss, about 3 stitches wide, one round below the eyes. Finally, stitch two pink circles just outside the eyes and one round lower.
Step 3: Stuff and Close the Base
Next, begin the decreases so the body starts to close.
- Round 18: (sc 4, dec) x 6 (30)
- Round 19: (sc 3, dec) x 6 (24)
- Round 20: (sc 2, dec) x 6 (18)
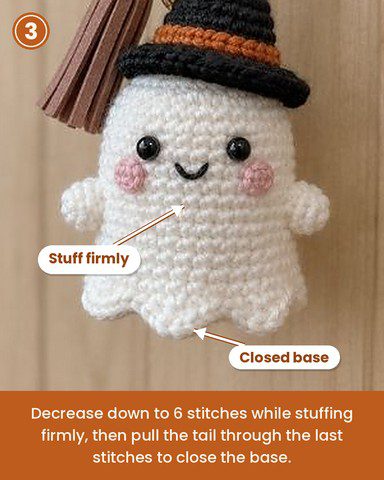
At this point, stuff firmly, packing the head first. Afterward, finish the last two rounds.
- Round 21: (sc 1, dec) x 6 (12)
- Round 22: dec x 6 (6)
Then fasten off and pull the tail through the last stitches to close the base.
Step 4: Ruffled Hem
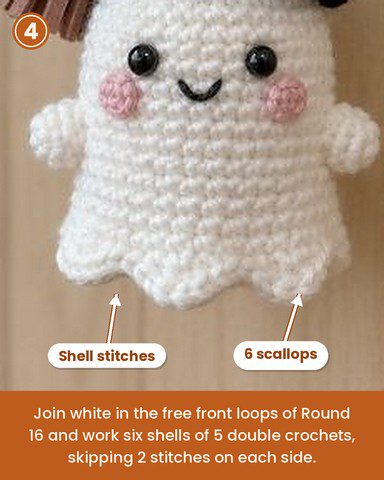
Join white yarn in a front loop of Round 16. Next, repeat this sequence six times: skip 2 stitches, work 5 dc in the next stitch, skip 2 stitches, sl st in the next stitch. After that, fasten off and weave in the end.
Pro-Tip: Space the shells evenly by counting 36 loops before starting. Otherwise, the last scallop ends up cramped.
Step 5: Arms (Make 2)
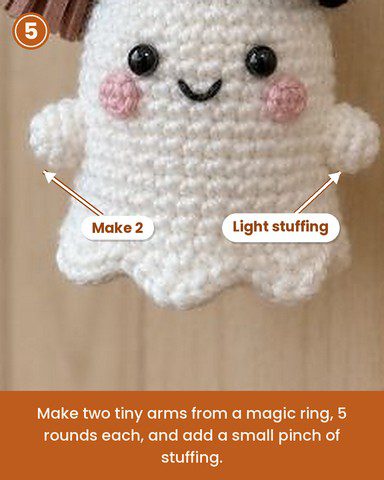
Meanwhile, the arms work up fast, so start each one with a MR.
- Round 1: 6 sc in MR (6)
- Round 2: (sc 1, inc) x 3 (9)
- Rounds 3–4: sc in each st (9)
- Round 5: (sc 1, dec) x 3 (6)
Fasten off with a tail. Then add a tiny pinch of fiberfill.
Step 6: Hat Cone (Black and Orange)
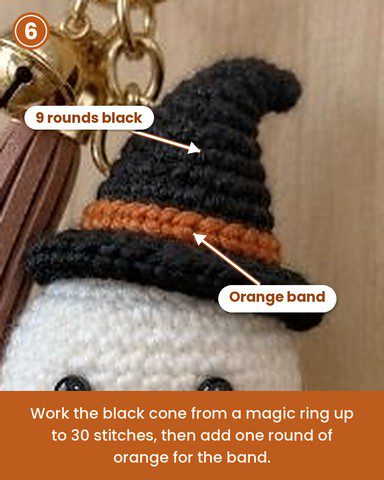
Now switch to black yarn and make a MR.
- Round 1: 6 sc in MR (6)
- Round 2: sc in each st (6)
- Round 3: (sc 1, inc) x 3 (9)
- Round 4: (sc 2, inc) x 3 (12)
- Round 5: sc in each st (12)
- Round 6: (sc 1, inc) x 6 (18)
- Round 7: sc in each st (18)
- Round 8: (sc 2, inc) x 6 (24)
- Round 9: (sc 3, inc) x 6 (30)
- Round 10: change to orange, sc in each st (30)
Step 7: Hat Brim (Black)
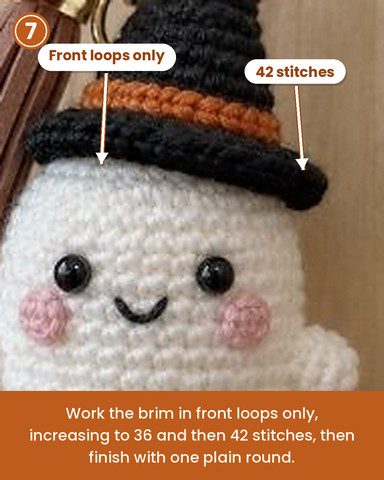
Then change back to black and work the brim in these rounds.
- Round 11: change to black, FLO (sc 4, inc) x 6 (36)
- Round 12: (sc 5, inc) x 6 (42)
- Round 13: sc in each st (42)
Fasten off with a long tail. Afterward, stuff the cone tip with a small pinch of fiberfill.
Pro-Tip: Keep the brim round loose enough to lie flat. Consequently, the hat sits neatly on the ghost.
Assembling Your Crochet Ghost Keychain Pattern
Step 8: Attach the Arms
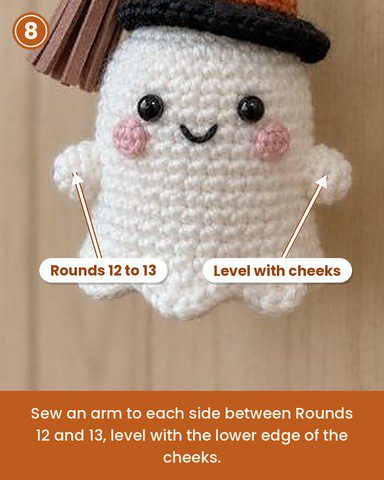
First, sew one arm to each side between Rounds 12 and 13, level with the lower edge of the cheeks. However, pin both first, since uneven arms are the quickest way to spoil the face.
Step 9: Attach the Hat
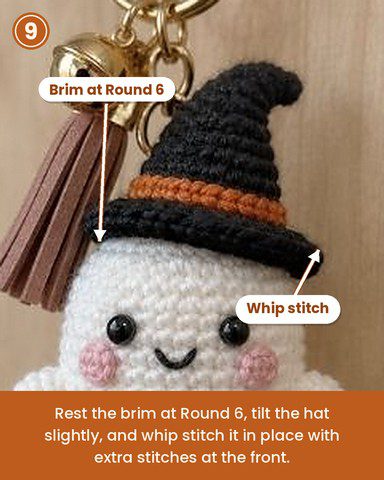
Next, place the hat with the brim resting at Round 6 and tilt it slightly to one side. Then whip stitch around the brim through the head. Also, add a few extra stitches at the front so it stays put.
Step 10: Add the Keychain Hardware
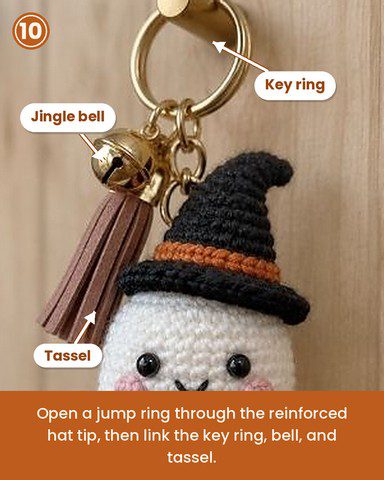
To start, reinforce the hat tip with two small stitches. After that, open a jump ring with pliers, slide it through the tip, and close it. Finally, attach the key ring, bell, and tassel with a second jump ring.
Common Mistakes in the Crochet Ghost Keychain Pattern
Even so, a few small slips are easy to avoid when you know them in advance.
- Loose tension: Gaps let the fiberfill show, so drop a hook size if needed.
- Overstuffing the head: Overfilled heads pull the eyes apart, so pack in small pieces.
- Skipping the loop check: Therefore, count the 36 free loops before starting the ruffle.
- Heavy hardware: A big tassel drags the hat sideways, so keep it small.
- Mismatched arms: Instead of guessing, always pin them before sewing.
Beginner Tips for the Crochet Ghost Keychain Pattern
Start with smooth cotton, since stitches stay easy to see. In addition, use a stitch marker on every round, because small pieces hide the beginning of a round quickly. Likewise, if a count feels off, pull the round out right away. Meanwhile, practice the hat brim on scrap yarn first, as the front loop round is the trickiest part. Once that feels easy, the rest of the pattern flows smoothly.
Uses and Benefits
A finished ghost clips onto a backpack, dangles from a zipper pull, hangs from a rearview mirror, or tucks into a tote strap. Besides carrying seasonal cheer, it sharpens skills with increases, decreases, and tidy assembly. Because only small amounts of yarn are needed, leftovers get used up quickly. Moreover, a batch makes sweet party favors, and each ghost can wear a different hat color. Finally, wrapped in tissue, one becomes an easy gift for classmates, coworkers, or Halloween fans.
Personalization Ideas
For a fresh look every time, try one of these simple changes.
- New hat colors: Try purple with a lime band, or deep teal with a gold stripe.
- Glow yarn ghost: Use glow-in-the-dark yarn for the body, so it gives a quiet nighttime shine.
- Mini bow detail: Add a tiny ribbon bow at the neck for a friendlier look.
- Pumpkin charm: Attach a small orange pumpkin beside the bell for a matching seasonal pair.
Materials Substitution Ideas
Worsted yarn with a 3.5 mm hook gives a chunkier ghost about an inch taller. Alternatively, sport weight with a 2.5 mm hook creates a mini charm. Acrylic works if cotton is unavailable, although cotton holds its shape better. Likewise, swap the tassel for a small felt star. In addition, replace safety eyes with embroidered ones for gifts meant for young children.
Crochet Ghost Keychain Pattern FAQs
How big is the finished ghost?
It measures about 3.3 inches (8.5 cm) tall with the hat, when worked in DK cotton with a 3.0 mm hook.
Can beginners make this crochet ghost keychain pattern?
Yes, because the pattern uses only sc, increases, decreases, and a short shell round.
Can the hat be skipped in this crochet ghost keychain pattern?
Absolutely. Instead, attach the ring at the top of the head, and the ghost works well alone.
Is the keychain safe for kids?
Embroidered eyes and a securely sewn hat make it safer. However, small parts still need supervision.
A Little Ghost Worth Carrying
Small projects often leave the biggest smiles, and this ghost proves it. The ruffled hem, tilted hat, and tiny jingle bell give it plenty of personality for only a few hours of stitching. So take extra care with tension and the ruffle, because those details carry the whole design. Before long, your finished Crochet Ghost Keychain Pattern charm will dangle from a bag, ready to turn every ordinary errand into a small Halloween moment.
