
Free Crochet Cherry Keychain Pattern
Two plump red cherries, two tiny smiles, and one shiny gold clasp. This free crochet cherry keychain pattern turns a little red yarn into a charm that makes people smile at your bag every single day.
Some projects look so cute that you want to start them right away, and this one is exactly that. Picture a pair of round red cherries with rosy cheeks and shiny black eyes. They hang from twisted brown stems under a small green leaf, so the whole charm swings gently from your keys. That is the crochet cherry keychain you are about to make.
The best part is how simple it is. Each cherry is just a small ball, so if you can make a magic ring and a single crochet, you already have the skills. Because everything is worked in tiny rounds, it also makes a perfect evening project. In fact, you can finish a whole pair before your tea gets cold.
I wrote every round in plain words, so you never have to guess what comes next. Now grab your hook, pick your reddest yarn, and let’s make something sweet together.
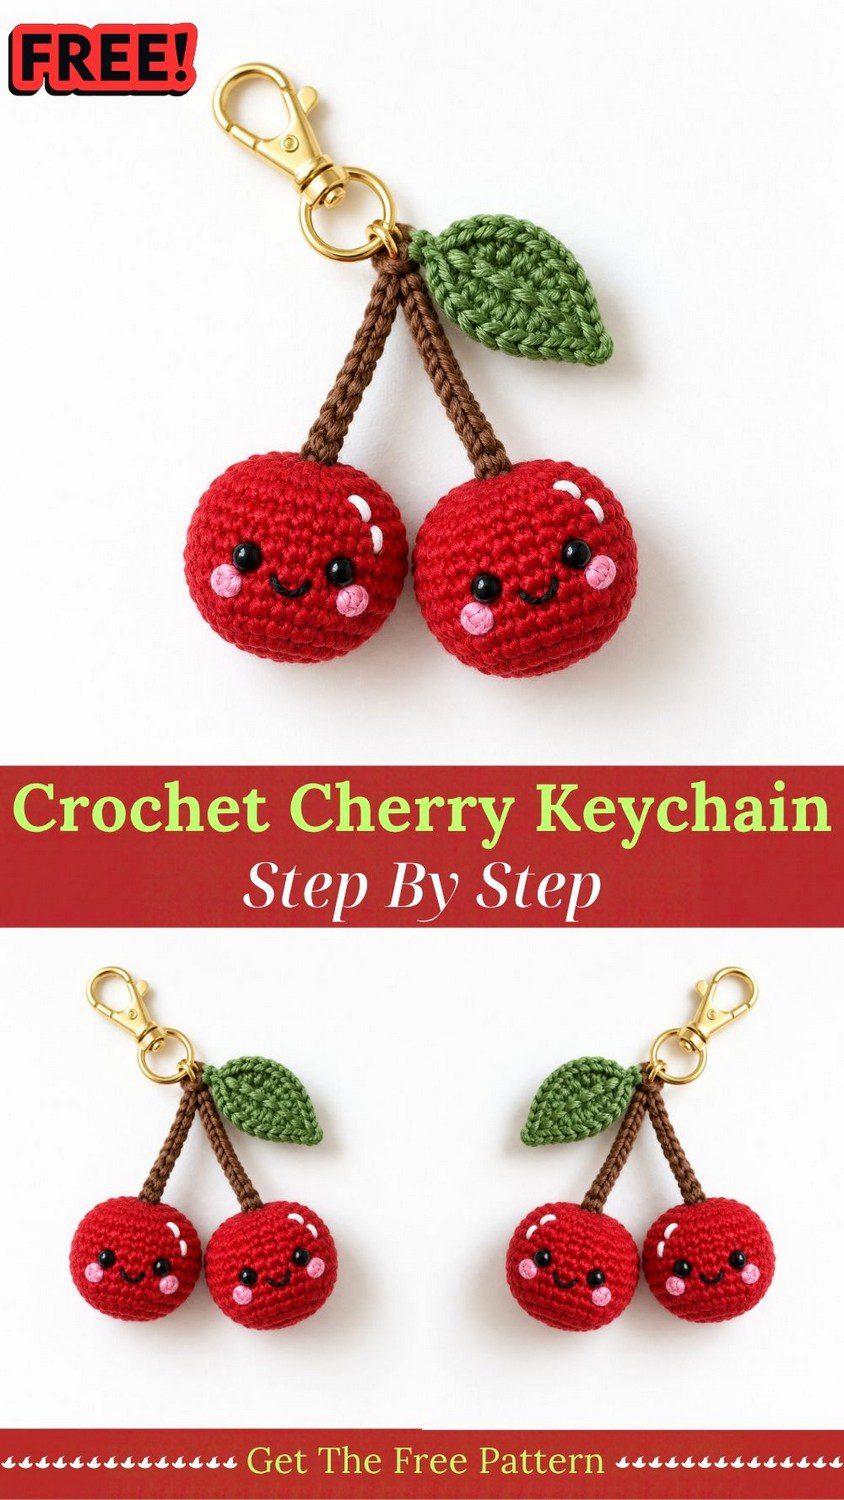
Crochet Cherry Keychain Skill Level and Finished Size
This crochet cherry keychain is beginner friendly. First, you only need a magic ring, single crochet, increases, and decreases. Then a little embroidery finishes the face.
Each cherry measures about 3.5 cm (1.4 in) across when made with cotton yarn and a 2.5 mm hook. From the top of the stems to the bottom of the cherries, the charm hangs about 8 cm (3 in), not counting the clasp. However, your size may change a little depending on your yarn and tension. For example, a thicker yarn with a bigger hook will give you bigger, chunkier cherries.
Materials for Your Crochet Cherry Keychain
- Red cotton yarn (sport or DK weight), about 8 g
- Brown cotton yarn, about 2 g
- Green cotton yarn, about 1 g
- A small scrap of white yarn or embroidery thread for the shine stitches
- 2.5 mm crochet hook
- Four black safety eyes (6 mm), or black beads sewn on
- Pink embroidery thread or a little powder blush for the cheeks
- Polyester fiberfill
- Tapestry needle
- Stitch marker
- Scissors
- Gold keyring, lobster clasp and one small jump ring
Cotton yarn gives the cleanest stitches and keeps the cherries firm, so it is my first choice here. Also, if you plan to gift the keychain to a small child, sew on black beads or embroider the eyes with thread instead of using safety eyes. That way, nothing can come loose.
Abbreviations (US Terms)
- MR: magic ring
- sc: single crochet
- inc: two single crochets in the same stitch
- dec: single crochet two stitches together
- hdc: half double crochet
- dc: double crochet
- ch: chain
- sl st: slip stitch
- st: stitch
- ( )x6: repeat the steps inside the brackets six times
Before You Start
Work in a continuous spiral and do not join your rounds. Instead, place a stitch marker in the first stitch of every round and move it up as you go.
Also, crochet tightly. A smaller hook than your yarn label suggests keeps the stuffing from peeking through the stitches. Finally, remember that the number in brackets at the end of a line is your total stitch count for that round.
Crochet Cherry Keychain Pattern: The Cherries (Make 2)
Use red yarn and your 2.5 mm hook for both cherries.
Round 1: To begin, make 6 sc in a magic ring and pull it tight. (6)
Round 2: Next, make 2 sc in every stitch around, which means 6 inc. (12)
Round 3: After that, work (1 sc, 1 inc) x6. (18)
Round 4: Then work (2 sc, 1 inc) x6. (24)
Rounds 5 to 8: Now make 1 sc in each stitch around for 4 rounds. (24)
Add the eyes: Once round 8 is done, place the eyes between rounds 6 and 7, with about 5 stitches between them. Press the backs on firmly. If you use beads, however, sew them on after the stuffing is finished.
Round 9: Next, work (2 sc, 1 dec) x6. (18)
Stuff the cherry: At this point, fill the ball with fiberfill. Push the stuffing into the sides first, so the shape stays round instead of flat.
Round 10: Then work (1 sc, 1 dec) x6. (12)
Round 11: Finally, make 6 dec. (6)
If there is room, add a little more stuffing. After that, cut the yarn, thread the tail through the front loops of the last 6 stitches, pull tight, and hide the end inside the cherry.
How to Crochet the Stems (Make 2)
Switch to brown yarn for the stems.
Round 1: First, make 5 sc in a magic ring. (5)
Rounds 2 to 21: Next, make 1 sc in each stitch around for 20 rounds. (5)
Because the tube curls a bit on its own, it gets a twisted, natural look. You do not need to stuff it. When you reach the end, leave a long tail at the top, then fasten off and cut the yarn.
How to Crochet the Leaf (Make 1)
Now pick up the green yarn.
Foundation: First, ch 9.
First side: Starting in the 2nd chain from the hook, make 1 sc, then 2 hdc, then 3 dc, and then 1 hdc. You will have 7 stitches.
Leaf tip: Next, in the last chain, work (1 hdc, 3 dc, 1 hdc) all in the same chain.
Second side: After that, turn and work down the other side of the foundation chain. Make 1 hdc, 3 dc, 2 hdc and 1 sc. Finally, finish with 1 sl st into the first stitch, then fasten off and leave a tail for sewing.
Fold the leaf slightly along the middle so it looks like it is bending in the breeze. In addition, a few small stitches on the underside will keep that fold in place.
Face and Finishing Details
This part gives your cherries their personality, so take your time.
The smile: First, use dark thread to stitch a tiny smile in the middle, just below the eyes. Two or three short stitches shaped like a little curve are plenty.
The cheeks: Next, embroider a small pink oval beside each eye with pink thread. Otherwise, you can brush on a touch of blush with a dry cotton swab for a softer look.
The shine: Last, take the white yarn and sew one short curved stitch on the top left of each cherry. This tiny line makes the cherry look glossy and round, just like real fruit.
Putting Your Crochet Cherry Keychain Together
- First, sew the open end of one brown stem into the center top of a cherry, right in the dip where the magic ring closed. Then repeat with the second cherry.
- Next, bring both stems together at the top and tie their tails in a firm knot.
- After that, place the leaf over the joined stems and sew it on securely, so it covers the knot.
- Then pass a jump ring through the top of the stems, right beneath the leaf, and attach the keyring and lobster clasp.
- Finally, trim every loose end and tuck it neatly inside.
Give both cherries a gentle squeeze to even out the stuffing. Then hold them side by side and check that the faces tilt a little toward each other, because that makes them look like best friends.
Helpful Tips for a Perfect Crochet Cherry Keychain
Keep your stitches tight. Loose stitches show the white stuffing through the red yarn, so go down one hook size if that happens to you.
Make both cherries match. Count the rounds for the second cherry just as carefully as for the first. Otherwise, even one extra round can make the pair look uneven.
Pin before you sew. Pin the stems and leaf in place first and look at them from a few feet away. It is much easier to fix the position before sewing than after.
Choose strong hardware. Small keychains get a lot of tugging, so a sturdy lobster clasp and a closed jump ring will keep your cherries safe on busy days.
Bonus: Cute Ways to Style and Gift Your Crochet Cherry Keychain
Once your cherries are done, you may find that you want to make a few more. Here are some ideas to get you started.
- Bag charm: Clip the cherries to a tote or backpack zipper for an instant pop of color.
- Car mirror hanger: Swap the keyring for a short loop of cord and hang them from the mirror.
- Gift tag topper: Tie one to a wrapped present instead of a ribbon bow.
- Color play: Make one cherry in deep red and the other in pink for a sweet two-tone pair.
- Mini set: Use thinner yarn and a 1.75 mm hook to make tiny cherries for earrings or a necklace.
A small handmade gift like this feels personal, and it costs very little to make. Besides that, a short note saying you crocheted it yourself makes it even more special.
Frequently Asked Questions
Can I use acrylic yarn for a crochet cherry keychain?
Yes, you can. Acrylic is softer and a little stretchier, so your cherries may come out slightly larger. To fix that, use a hook one size smaller and keep the stitches tight.
How long does a crochet cherry keychain take?
Most crocheters finish the whole keychain in about two to three hours. Beginners may need a little longer, which is perfectly fine.
Can I make the cherries bigger?
Absolutely. You can use thicker yarn and a larger hook. Alternatively, add one more even round, plus one more decrease round at the end, until you reach the size you like.
How do I keep the stems from curling too much?
A little curl is part of the charm. However, if you want straighter stems, stuff each one lightly with a thin strip of fiberfill.
Your Crochet Cherry Keychain Is Ready to Swing
That is all it takes. A magic ring, a handful of stitches, and a bit of patience give you a pair of cherries with more cheer than anything you can buy in a shop. So clip them onto your keys, and every time you reach for your bag, they will be there to greet you.
If you enjoyed this pattern, make a few in different colors and share your photos. I would love to see your cherries.
