
Crochet Giraffe Keychain Perfect Little Gift
Butter-yellow cotton, chestnut spots and a tiny cream muzzle turn this crochet giraffe keychain into a palm-sized friend for any school bag. The pieces are so small that you can finish the whole thing in one relaxed weekend. In fact, I stitched mine during a movie night, and it was done before the credits rolled, so it also works as a last-minute gift.
Why do so many giraffe keychains end up looking like lumpy yellow bean bags? Usually the spots and legs get rushed, and therefore the charm gets lost. However, this one has a big round head, short arms and neat brown hooves, so it has real personality even at this size. Because the parts are tiny, the pattern works up fast, and the finished crochet giraffe keychain looks far pricier than it cost. Later, I handed one to my cousin, and she asked which shop I bought it from.
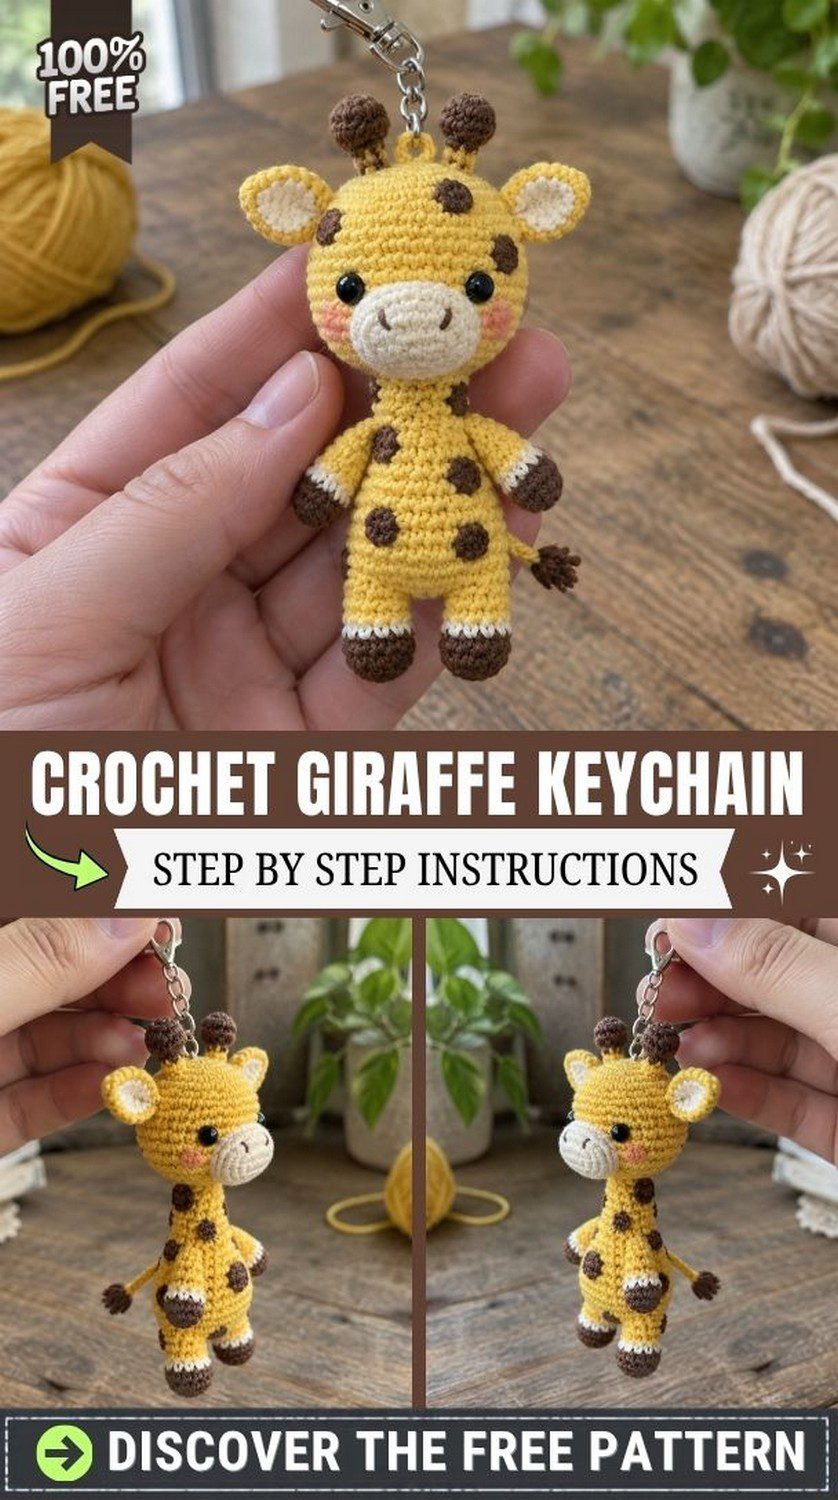
Crochet Giraffe Keychain Pattern Overview
Before you pick up the hook, here is the quick version of what you are making.
- Skill level: Advanced beginner. Every stitch is basic, but the small parts, color changes and sewing ask for a little patience, so take your time.
- Finished size: About 3.7 in (9.5 cm) tall including the horns, not counting the clasp, and roughly 2.2 in (5.5 cm) wide across the ears.
- Colors: Butter yellow, cream and chestnut brown.
- Stitches used: Magic ring, single crochet, increase, decrease and slip stitch.
- Construction: Ten small pieces are worked in spiral rounds, and then they are sewn together.
Materials for Your Crochet Giraffe Keychain
- Yellow cotton yarn (sport or DK weight): about 33 yd (30 m)
- Cream cotton yarn: about 9 yd (8 m)
- Chestnut brown cotton yarn: about 11 yd (10 m)
- 2.5 mm crochet hook: a small hook keeps the fabric dense, so the stuffing never peeks through.
- 6 mm black safety eyes or small black beads
- Polyester fiberfill
- Peach or pink embroidery floss for the cheeks
- Dark brown embroidery floss for the nose dots
- Keychain clasp with a short chain and a small jump ring
- Stitch marker, tapestry needle, pins and scissors
Safety note: for a baby or toddler, embroider the eyes instead of using safety eyes, because loose parts can be risky.
Special Techniques for the Giraffe Keychain
Abbreviations
- MR = magic ring
- sc = single crochet
- inc = two sc in one stitch
- dec = invisible decrease
- sl st = slip stitch
- st = stitch
- R = round
- ( ) x3 = repeat the stitches inside the brackets three times
- ( ) at the end of a round = total stitch count
Magic Ring
The ring closes the center of every piece with no gap. Therefore, pull the tail firmly after the first round.
Changing Colors
First, switch yarn while finishing the last stitch of the old color. Then pull the new color through the final two loops, and the join stays tidy.
Invisible Decrease
First, insert the hook into the front loop of two stitches, yarn over, and pull through both. After that, complete the stitch. As a result, the fabric stays smooth with no holes.
How Long the Crochet Giraffe Keychain Takes
- Prep: 10 minutes for winding yarn and gathering supplies
- Stitching: 3 to 3.5 hours for all ten pieces
- Finishing: about 1 hour for the face, sewing and keychain hardware
- Total: roughly 4 to 5 hours, so a relaxed weekend is plenty
Crochet Giraffe Keychain Pattern Instructions
First, work every piece in continuous spiral rounds without joining, and mark the first stitch of each round. Also, keep your tension snug throughout.
Step 1: Giraffe Keychain Head
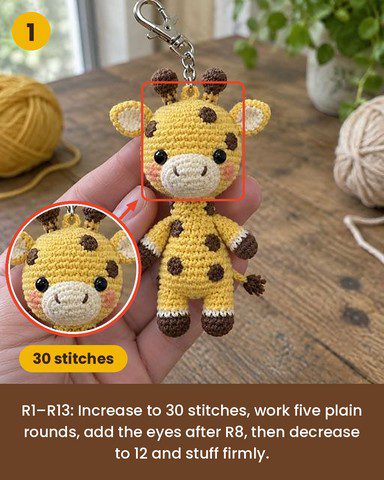
First, use yellow.
- R1: 6 sc in MR (6)
- R2: inc in each st (12)
- R3: (1 sc, inc) x6 (18)
- R4: (2 sc, inc) x6 (24)
- R5: (3 sc, inc) x6 (30)
- R6–R10: sc in each st (30)
Next, between R8 and R9, insert the safety eyes about 7 stitches apart and then fasten the backs.
- R11: (3 sc, dec) x6 (24)
- R12: (2 sc, dec) x6 (18)
After that, stuff the head firmly.
- R13: (1 sc, dec) x6 (12)
Finally, fasten off, thread the tail through the last 12 stitches and pull the opening closed.
Pro-Tip: Fix the eyes before stuffing, because once the head is full, moving them is nearly impossible.
Step 2: Muzzle
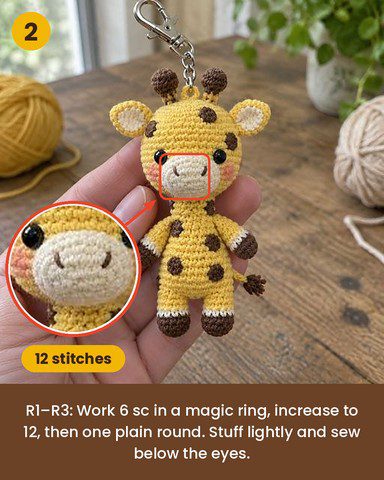
First, use cream.
- R1: 6 sc in MR (6)
- R2: inc in each st (12)
- R3: sc in each st (12)
Next, fasten off with a long tail and stuff lightly. Also, a soft muzzle gives the face its gentle, rounded look.
Step 3: Ears (Make 4 Discs)
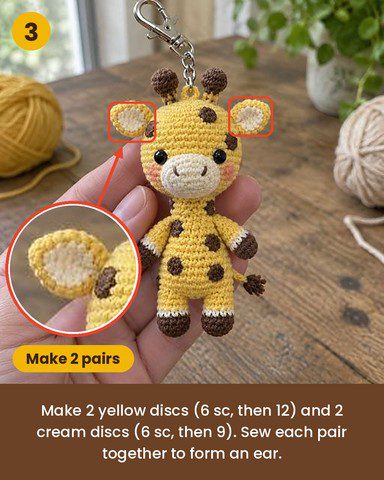
- Yellow discs (make 2): R1: 6 sc in MR (6). R2: inc in each st (12).
- Cream discs (make 2): R1: 6 sc in MR (6). R2: (1 sc, inc) x3 (9).
Then fasten off each disc with a tail. Next, place a cream disc slightly off-center on a yellow disc and whip stitch them together to form one ear.
Step 4: Horns (Make 2)
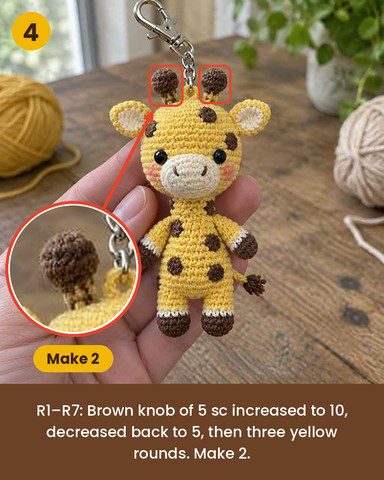
First, start with brown.
- R1: 5 sc in MR (5)
- R2: inc in each st (10)
- R3: sc in each st (10)
- R4: dec x5 (5)
Next, add a pinch of fiberfill, and then switch to yellow.
- R5–R7: sc in each st (5)
Finally, fasten off with a long tail.
Step 5: Body
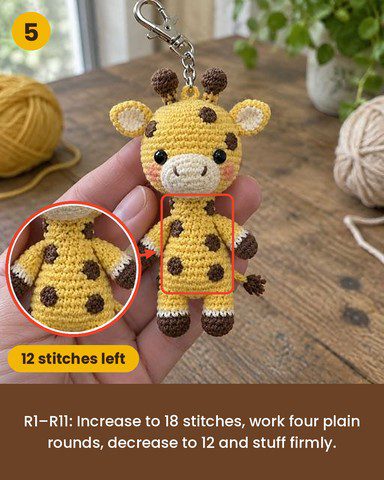
First, use yellow.
- R1: 6 sc in MR (6)
- R2: inc in each st (12)
- R3: (1 sc, inc) x6 (18)
- R4–R7: sc in each st (18)
- R8: (4 sc, dec) x3 (15)
- R9–R10: sc in each st (15)
After that, stuff firmly.
- R11: (3 sc, dec) x3 (12)
Finally, fasten off with a long tail for joining the head.
Pro-Tip: Count 12 stitches before fastening off, since the neck must match the head opening exactly for a neat join.
Step 6: Arms (Make 2)
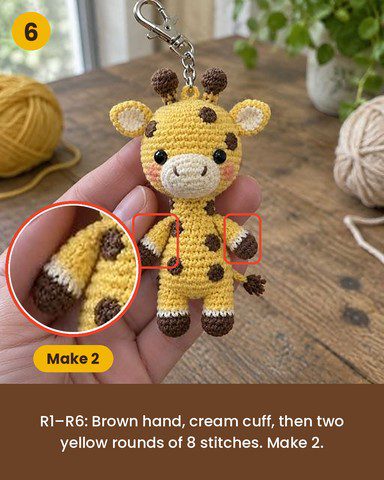
First, start with brown.
- R1: 6 sc in MR (6)
- R2: (2 sc, inc) x2 (8)
- R3: sc in each st (8)
Next, switch to cream.
- R4: sc in each st (8)
Then switch to yellow.
- R5–R6: sc in each st (8)
Finally, stuff very lightly and then fasten off with a long tail.
Step 7: Legs (Make 2)
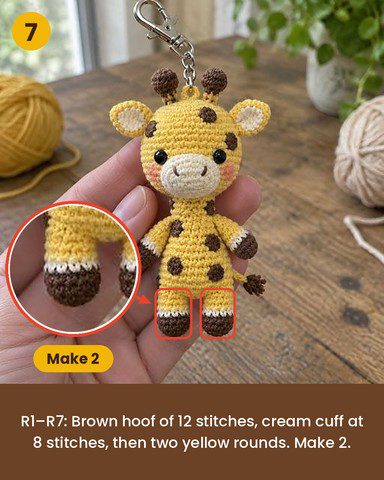
First, start with brown.
- R1: 6 sc in MR (6)
- R2: inc in each st (12)
- R3: sc in each st (12)
Next, switch to cream.
- R4: (1 sc, dec) x4 (8)
- R5: sc in each st (8)
Then switch to yellow.
- R6–R7: sc in each st (8)
Finally, stuff and fasten off with a long tail. Also, the brown hoof is wider than the leg, so it helps the giraffe stand steadily.
Step 8: Tail
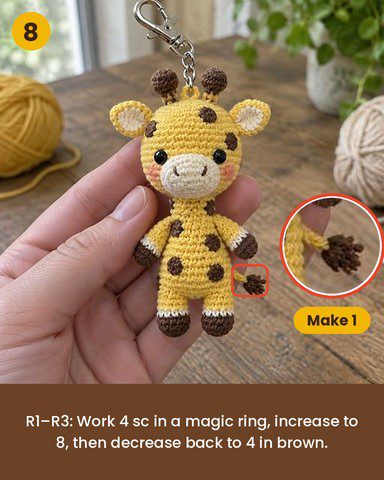
First, use brown.
- R1: 4 sc in MR (4)
- R2: inc in each st (8)
- R3: dec x4 (4)
Finally, fasten off with a long tail.
Step 9: Spots (Make 9)
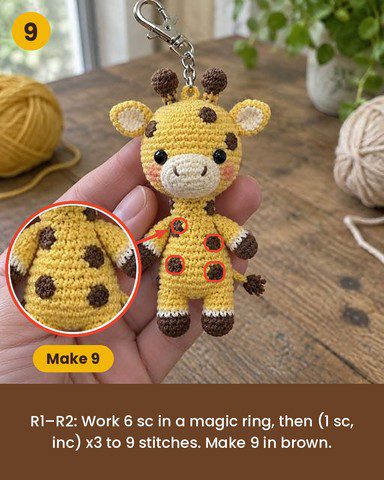
First, use brown.
- R1: 6 sc in MR (6)
- R2: (1 sc, inc) x3 (9)
Finally, sl st, and then fasten off with a tail for sewing.
Step 10: Assembling the Crochet Giraffe Keychain
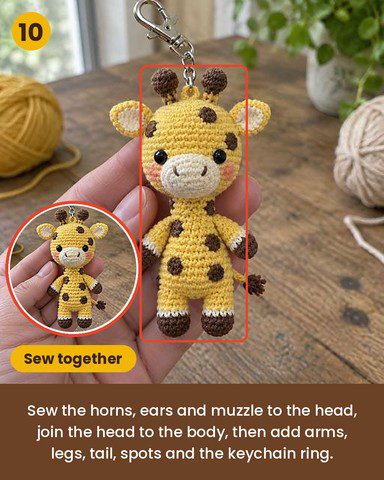
- First, sew the horns to the crown, about 3 stitches on either side of the center.
- Next, pin the ears to the sides of the head at R6 and R7, with the cream side facing forward, then stitch them on.
- Then sew the muzzle between and just below the eyes.
- After that, add four spots to the head, avoiding the ears and horns.
- Then embroider two tiny brown nose dots on the muzzle and a short peach stitch on each cheek.
- Now join the head to the body by sewing around the neck twice.
- After that, attach the arms at R8 and R9 on the sides of the body.
- Next, sew the legs to the bottom of the body, side by side.
- Then stitch the tail to the back and add five spots to the body.
- Finally, pass a small jump ring through the crown stitches between the horns, secure it with yellow thread and clip on the keychain chain.
Common Mistakes With a Crochet Giraffe Keychain
- Crocheting loosely, because that lets the white stuffing show through
- Stuffing the head and body unevenly, so the giraffe leans
- Sewing the head on with only one pass, causing a wobbly neck
- Placing the eyes too far apart, which makes the face look blank
- Using a huge jump ring, since it pulls on the crown stitches
Uses and Benefits of This Giraffe Keychain
First, you can clip the giraffe onto a backpack zipper, hang it from a car mirror, tuck it into a gift bag or dangle it beside your house keys. Since the toy is tiny and light, it travels everywhere without weighing anything down. Cotton yarn keeps the stitches crisp and tough, while the cheerful colors lift any plain school bag. Besides that, making it builds small-scale skills such as color changes, shaping and neat sewing, so the next project feels easier.
Beginner Tips for the Crochet Giraffe Keychain
- First, keep a stitch marker in the first stitch of every round.
- Also, count your stitches at the end of each round, especially after decreases.
- Next, stuff in tiny pieces, because that gives a smoother shape.
- Finally, leave long tails on every part, because they become your sewing yarn.
- Pin each piece in place before you sew, then check the face from a short distance.
Yarn Substitution Ideas
Mercerized cotton gives the sharpest stitches, although soft acrylic in sport weight also works nicely. However, if your yarn is thicker, use a 3 mm hook and expect a slightly larger giraffe. Likewise, black beads can replace safety eyes, and a plain ring with a small ribbon loop can replace the metal clasp.
Troubleshooting Your Giraffe Keychain
The Head Tips Forward
First, add a little more stuffing to the back of the head, then sew the neck again with two extra passes.
The Giraffe Will Not Stand
First, make sure both legs are the same length and sewn at the same height. After that, lightly pad the bottom of the body.
Stuffing Shows Between Stitches
Instead, switch to a hook half a size smaller, or tighten your tension on the next piece.
Washing Your Crochet Giraffe Keychain
First, spot clean with a damp cloth and a drop of mild soap. Then dab gently, rinse the cloth and press out extra moisture with a dry towel. Please skip the washing machine, because the metal clasp and small parts do not tumble well. Finally, air dry it away from direct heat.
Personalization Ideas
Try New Color Combos
For example, swap yellow for baby blue or mint to create a fantasy giraffe, and use pink for the muzzle.
Add Tiny Accessories
Also, tie a thin ribbon bow around the neck, or sew on a tiny scarf for winter.
Stitch a Name Tag
Finally, embroider an initial on the belly with brown floss for a personal touch.
Bonus: Gift Packaging Ideas for the Giraffe Keychain
A keychain this small deserves a thoughtful wrapper, so make the packaging count. For example, slip the giraffe into a small kraft envelope with a handwritten note, or tie it to a card with twine. Besides that, for birthdays, tuck it inside a tiny cardboard box lined with tissue paper. Meanwhile, seasonal gifts look lovely in a mini cotton pouch with the clasp peeking out.
Crochet Giraffe Keychain FAQs
Is the giraffe keychain really beginner-friendly?
Yes, as long as you can work magic rings and decreases. The pieces are small, so mistakes are quick to fix.
Which yarn gives the neatest result?
Mercerized or smooth cotton in sport weight gives crisp stitches, and it holds its shape after months on a bag.
Can I use acrylic instead of cotton?
Absolutely. However, the giraffe will feel a little softer and slightly less defined.
Are the safety eyes suitable for children?
For babies and toddlers, embroider the eyes with black thread instead, because safety matters more than looks.
How do I stop the head from wobbling?
First, sew around the neck twice with the long tail, and then add a little extra stuffing at the base of the head.
Your Little Giraffe Is Ready to Go
So that’s your crochet giraffe keychain done. It might take a few evenings, but honestly that’s the nice part, because you’re never in a rush. Just go easy on the face. If the eyes look a bit off, don’t worry, pull them out and redo them, since I’ve done that more times than I can count. Sew everything on slowly and check that it sits straight. Then clip on the clasp, and you’re finished. Hang it on your bag, put it on your keys, or give it to someone you like, because they’ll probably keep it for years. And once you’ve made one, I bet you’ll want to start another.


