Crochet Christmas Tree Amigurumi Pattern for Beginners
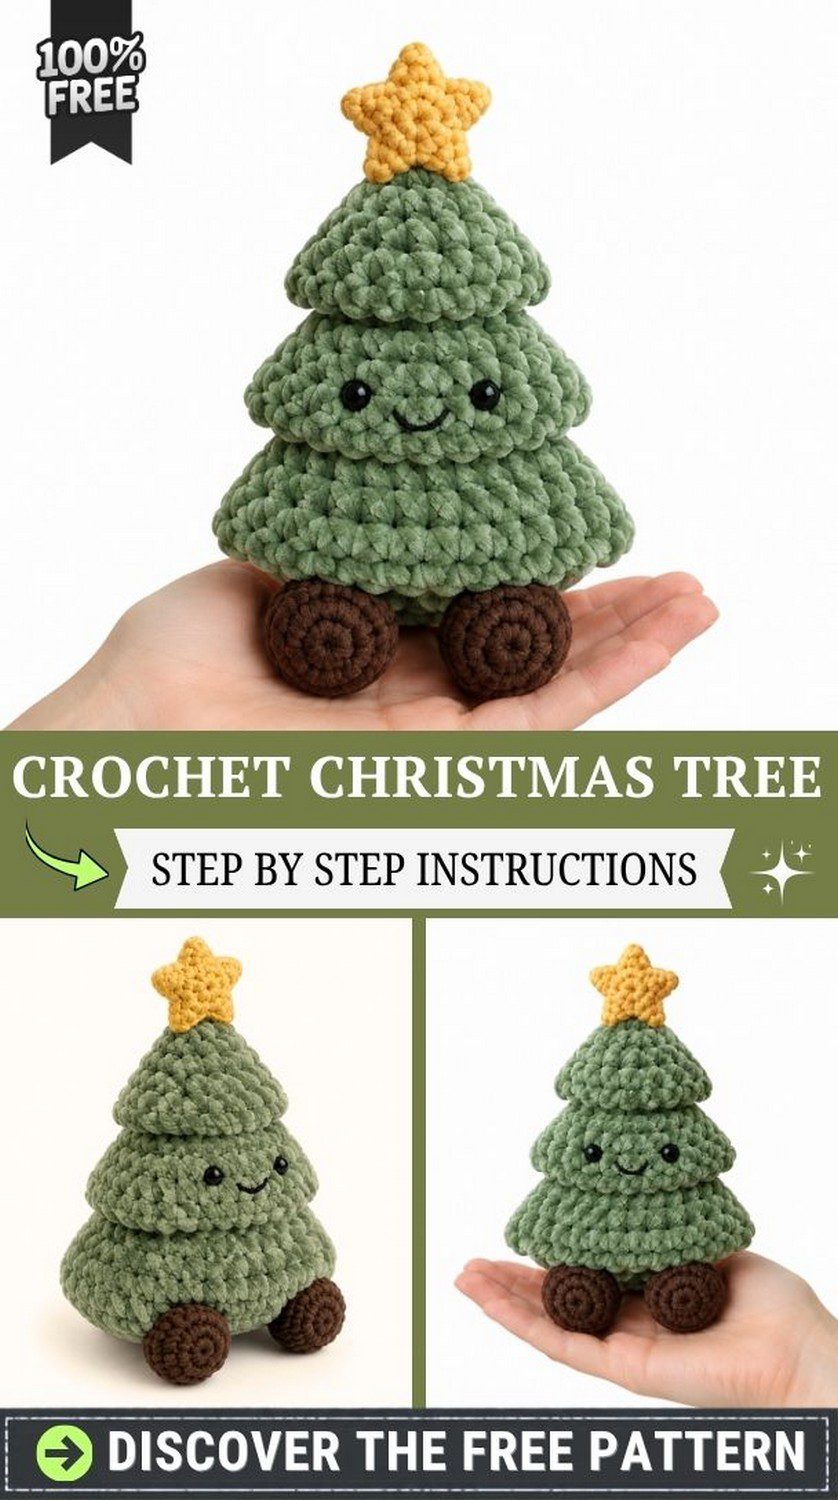
A squishy, sage-green tree is exactly what you get with this crochet Christmas tree amigurumi pattern, which I designed with beginners in mind. Because the stitches stay simple from start to finish, you can complete the whole plush tree in one relaxing evening. In fact, it is one of the easiest holiday projects I have ever put together.
Usually, beginner trees turn out flat and plain. This one, however, has three puffy tiers, a gentle smile and little brown wheels at the bottom. Instead of joining rounds, I worked the body in a continuous spiral with chunky chenille yarn, so every round grows fast and the stitches are easy to count. Besides being quick, it also makes a sweet handmade gift, and I have already added a couple to my own pile of presents!
Crochet Christmas Tree Amigurumi Pattern Overview
Before you pick up the hook, here is a quick snapshot so you know exactly what you are signing up for.
- Skill level: Beginner. Only basic stitches are needed, and the body never gets joined.
- Finished size: About 6.5 in (16.5 cm) tall including the star, and roughly 5 in (12.5 cm) wide at the base.
- Construction: The body is worked in one piece from the top down. The star, wheels and face are made separately.
- Stitches used: Magic ring, chain, single crochet, increase, invisible decrease, half double crochet and slip stitch.
Materials for the Crochet Christmas Tree Amigurumi Pattern
First, gather everything in one spot. That way, you will not have to pause halfway through a round to hunt for your needle.
- Sage green super bulky chenille (velvet) yarn: about 45 yd (40 m)
- Golden yellow chenille yarn: about 10 yd (9 m)
- Chocolate brown chenille yarn: about 10 yd (9 m)
- 4 mm (G-6) crochet hook: chenille labels usually suggest a bigger hook, yet a smaller one keeps the fabric tight so the stuffing stays hidden.
- 10 mm black safety eyes or 8 mm black beads
- Black embroidery thread for the smile
- Polyester fiberfill: one generous handful
- Stitch marker, tapestry needle and scissors
Safety note: if the tree is meant for a baby or toddler, skip the safety eyes and embroider them with black thread instead.
Special Techniques You Will Need
Magic Ring
Basically, the magic ring gives the top tier and the wheels a closed center with no gap. After the first round, pull the tail firmly so the opening disappears.
Invisible Decrease
Insert the hook into the front loop of the next two stitches, yarn over, then pull through both loops at once. Finally, complete the stitch with a normal single crochet. As a result, the fabric stays smooth with no holes.
Back Loop Only (BLO)
Generally, working one round in the back loops only leaves a tiny ledge on the front. In fact, that ledge is what creates the layered look between the tiers.
Abbreviations
- MR = magic ring
- ch = chain
- sl st = slip stitch
- sc = single crochet
- hdc = half double crochet
- inc = two sc in one stitch
- dec = invisible decrease
- BLO = back loop only
- R = round
- st = stitch
- ( ) x6 = repeat the stitches inside the brackets six times
- ( ) at the end of a round = total stitch count
Time Box
- Prep: 15 minutes for gathering supplies and winding yarn
- Stitching: 2.5 to 3 hours for all the parts
- Finishing: about 40 minutes for the face, stuffing and sewing
- Total: roughly 3.5 to 4 hours, which easily fits into one relaxed evening
Crochet Christmas Tree Amigurumi Pattern Instructions
To start, work in continuous spiral rounds without joining, and mark the first stitch of every round. Also, crochet tightly throughout, since a firm fabric hides the stuffing best.
Step 1: Top Tier of the Christmas Tree
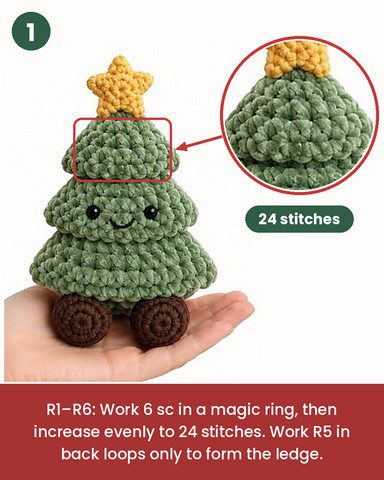
Use sage green.
- R1: 6 sc in MR (6)
- R2: inc in each st (12)
- R3: (1 sc, inc) x6 (18)
- R4: (2 sc, inc) x6 (24)
- R5: BLO, sc in each st (24)
- R6: sc in each st (24)
Next, add a small pinch of fiberfill before moving on.
Pro-Tip: Because chenille hides stitches easily, tilt the piece toward the light after each round, then count before continuing.
Step 2: Middle Tier of the Christmas Tree
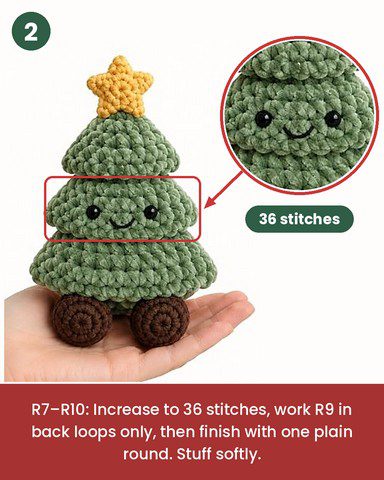
- R7: (3 sc, inc) x6 (30)
- R8: (4 sc, inc) x6 (36)
- R9: BLO, sc in each st (36)
- R10: sc in each st (36)
Then stuff the tier softly. Otherwise, the ledge from the BLO rounds will not stay crisp, since it needs even stuffing.
Step 3: Bottom Tier of the Christmas Tree
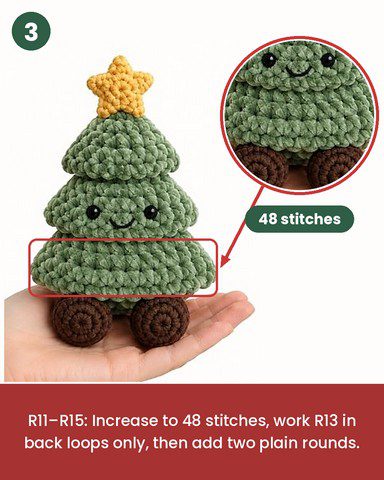
- R11: (5 sc, inc) x6 (42)
- R12: (6 sc, inc) x6 (48)
- R13: BLO, sc in each st (48)
- R14: sc in each st (48)
- R15: sc in each st (48)
Step 4: Closing the Base
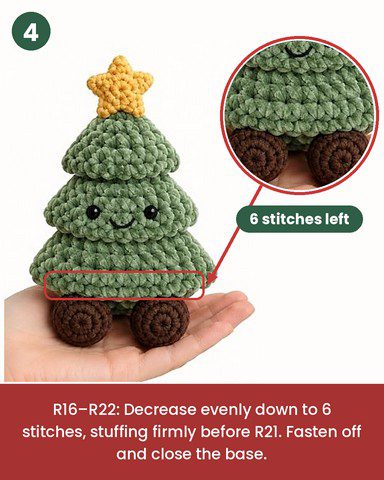
- R16: (6 sc, dec) x6 (42)
- R17: (5 sc, dec) x6 (36)
- R18: (4 sc, dec) x6 (30)
At this point, stuff firmly and push fiberfill into every tier.
- R19: (3 sc, dec) x6 (24)
- R20: (2 sc, dec) x6 (18)
- R21: (1 sc, dec) x6 (12)
- R22: dec x6 (6)
Finally, fasten off, thread the tail through the last six stitches, pull tight and hide the end inside.
Pro-Tip: Add the last bit of fiberfill before R21, because a firmly stuffed base keeps the tree standing straight.
Step 5: Golden Star for the Tree Topper (Make 2)
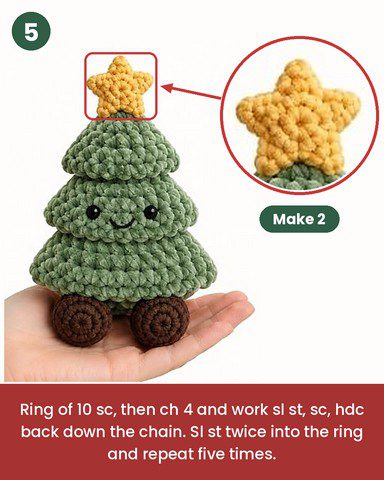
Use golden yellow.
- R1: Ch 1, 10 sc in MR, sl st to the first sc to join (10)
- Points: *ch 4. Starting in the 2nd ch from hook, work sl st, sc, hdc. Then sl st in each of the next 2 sts of the ring.* Repeat from * to * five times in total.
Next, fasten off and leave a long tail. Since two stars sewn together look puffier and sturdier than one flat star, make a second one before moving on.
Step 6: Wheels for the Christmas Tree (Make 2)
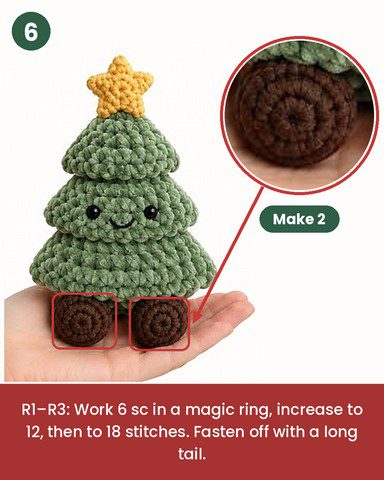
Use chocolate brown.
- R1: 6 sc in MR (6)
- R2: inc in each st (12)
- R3: (1 sc, inc) x6 (18)
Finally, sl st in the next st and fasten off, leaving a long tail for sewing. Once finished, each wheel should measure about 2 in across.
Step 7: Adding the Face
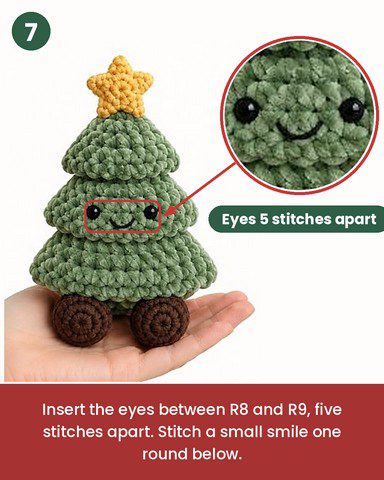
To begin, insert the safety eyes in the middle tier between R8 and R9, about 5 stitches apart, and fasten the backs securely. After that, stitch a small smile with black thread, centered and one round below the eyes. Pull the thread gently, so the smile sits in the fabric without puckering it.
Step 8: Assembling Your Crochet Christmas Tree Amigurumi
- Place the two stars together and whip stitch around the edges with the long tail, adding a tiny bit of fiberfill before closing.
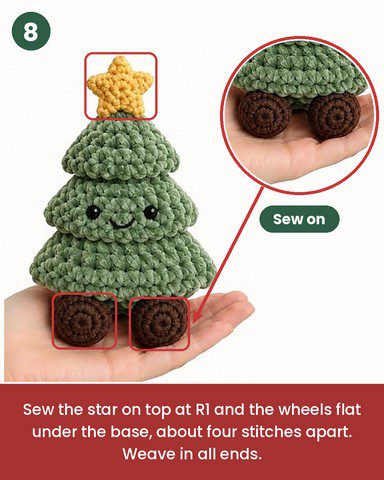
- Sew the star onto the top of the tree at R1.
- Pin both wheels flat against the base around R16 and R17, about four stitches apart and slightly toward the front.
- Sew each wheel on with small, firm stitches, then weave in every end.
Common Mistakes to Avoid
Even an easy project has a few traps. Luckily, these are simple to dodge once you know them.
- Crocheting loosely, which lets white stuffing peek through the gaps
- Skipping the stitch marker and losing count in a fluffy round
- Working the ledge rounds in both loops, so the tiers blend into one cone
- Overstuffing the top tier early and stretching the stitches
- Placing the eyes unevenly because the tree was not held straight
Uses and Benefits of a Crochet Christmas Tree Amigurumi
For example, you can perch the tree on a mantel, tuck it between wrapped gifts, prop it on a desk or set it beside a window as a soft seasonal accent. Moreover, the yarn is plush and the shape is simple, so it also becomes a cuddly gift for kids, teachers and neighbors. Besides, it is quick to finish and gentle on a budget. Overall, it is a satisfying first amigurumi that leaves you with a proud, practical result.
Beginner Tips for This Crochet Christmas Tree Amigurumi Pattern
- Pick a hook one or two sizes smaller than the yarn label suggests.
- Count stitches at the end of every round, especially in the 36 and 48 stitch rounds.
- Use a stitch marker or a scrap of contrasting yarn in the first stitch.
- Stuff in small pieces instead of one big lump for a smoother shape.
- Work in good daylight, because dark chenille is harder to read.
Yarn Substitution Ideas
For instance, velvet yarn and blanket-style yarn both give the same plush look and are easy to find. Alternatively, regular worsted acrylic works if you pair it with a 3.5 mm hook, although the tree will come out smaller and less squishy. As for color, any green is fine, so deep forest, mint or even white for a snowy tree are all good choices.
Troubleshooting Your Crochet Christmas Tree Amigurumi
The Tree Leans to One Side
Usually, uneven stuffing is the cause. To fix it, press fiberfill into the thinner side through a gap near the base before closing it, then adjust the wheels.
Stuffing Shows Through the Stitches
First, switch to a smaller hook or tighten your tension. Sometimes, a slightly darker fiberfill hides the problem as well.
The Tiers Look Droopy
Add a bit more filling to each tier. In addition, make sure the BLO rounds were worked in the back loops only.
Washing and Cleaning Instructions
First, spot clean with a damp cloth and a drop of mild soap, then press gently with a dry towel. Please skip the machine, because chenille can lose its softness when tumbled. Afterward, let the tree air dry away from heat and fluff the pile with your fingertips.
Personalization Ideas for the Christmas Tree Amigurumi
Pick New Colors
Swap the green for mint, teal or snowy white. Likewise, use silver instead of yellow for a frosty topper.
Add Tiny Decorations
For example, sew on small beads, mini pom-poms or a thin strand of sparkly yarn as a garland around the middle tier.
Dress It with a Ribbon
Alternatively, tie a narrow ribbon bow near the base, or attach a small tag with a name for gift giving.
Bonus: Make the Crochet Christmas Tree Amigurumi in Three Sizes
Yarn weight changes the final height, so one pattern can create a tiny family of trees. As a rough guide, DK yarn with a 2.5 mm hook gives a mini tree around 3.5 to 4 in tall. Meanwhile, worsted yarn with a 3.5 mm hook lands near 4.5 to 5 in. Finally, the super bulky version written above reaches about 6.5 in. Still, measure your first tier before continuing, because every crocheter’s tension is a little different.
Frequently Asked Questions
Is this crochet Christmas tree amigurumi pattern really suitable for a first project?
Yes, because every part uses basic stitches. Likewise, the spiral construction means no joining or turning for the body.
Which hook works best with chenille yarn?
A 4 mm hook is a reliable choice because it keeps the fabric dense enough to hold stuffing without straining your hands.
How tall is the finished Christmas tree amigurumi?
Overall, it measures about 6.5 in (16.5 cm) with the star and about 5 in (12.5 cm) across the base.
Can children play with it?
Yes, as long as you embroider the eyes and sew every part firmly. Then the tree makes a safe, soft toy for little ones.
Can I use regular acrylic yarn instead of chenille?
Yes. However, expect a smaller, firmer tree, and test your size before you begin the base.
A Little Tree Worth Keeping
So that is your little tree done, with three cozy tiers, a tiny golden star on top and wheels ready to roll it anywhere. Honestly, I love how quickly this crochet Christmas tree amigurumi pattern comes together, and you can easily finish it in a single evening with a cup of tea beside you. As long as your tension stays snug, the shape will settle in just right. Once you weave in that last end, set it on a shelf or a table and take a moment to enjoy it. Overall, it really does make the room feel warmer. And if you loved making this one, trust me, the next will feel even easier, so go ahead and start another.