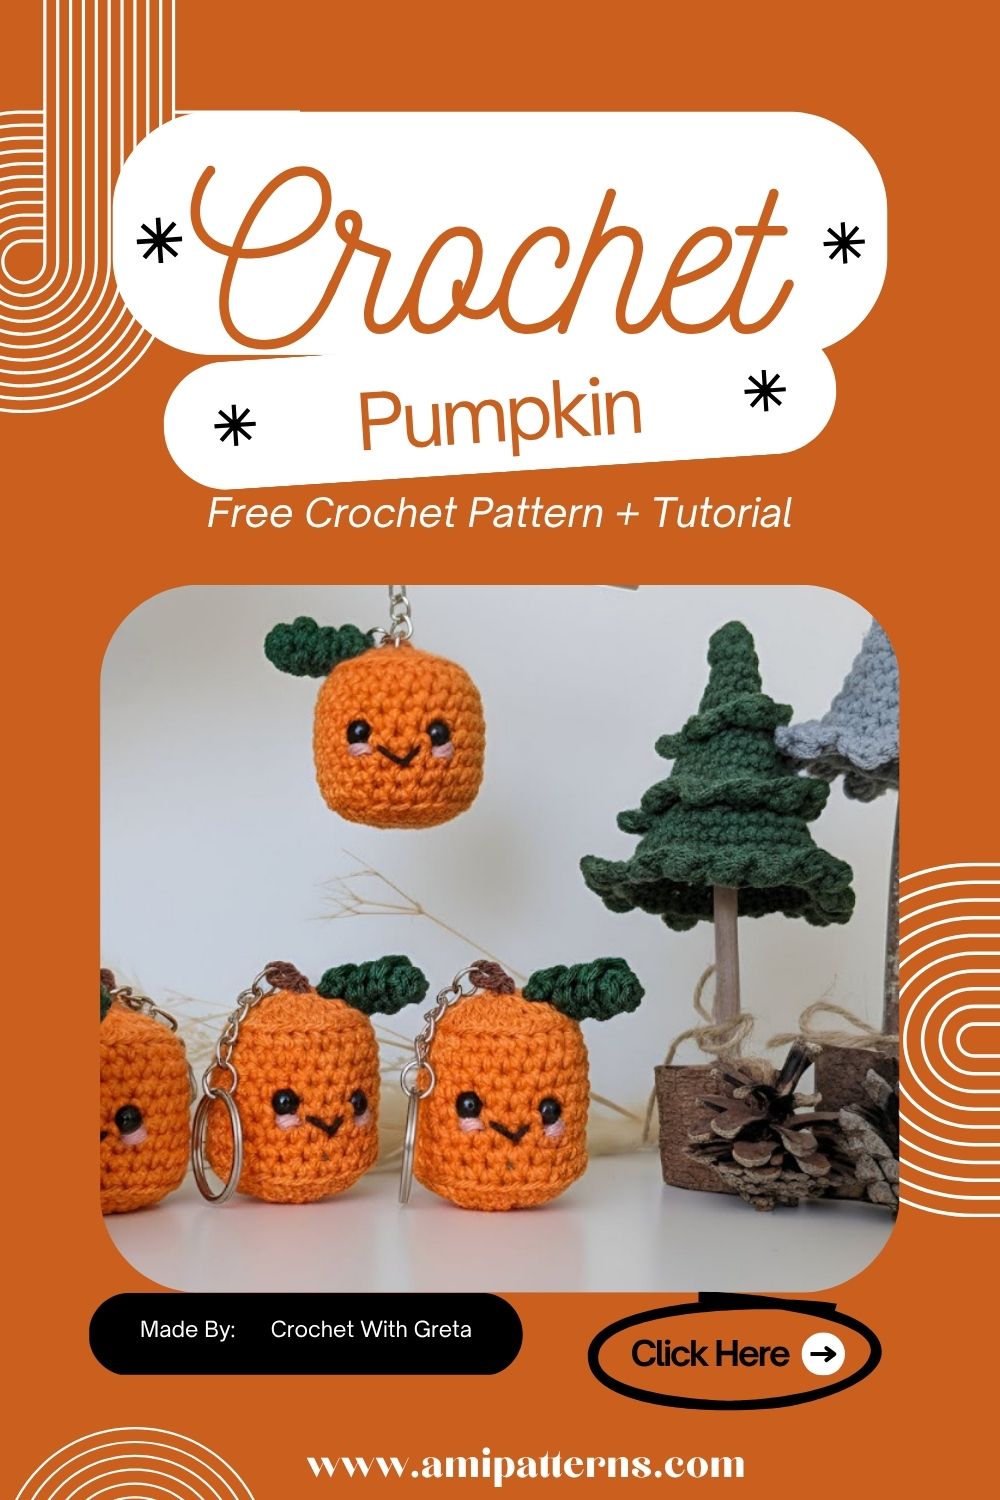
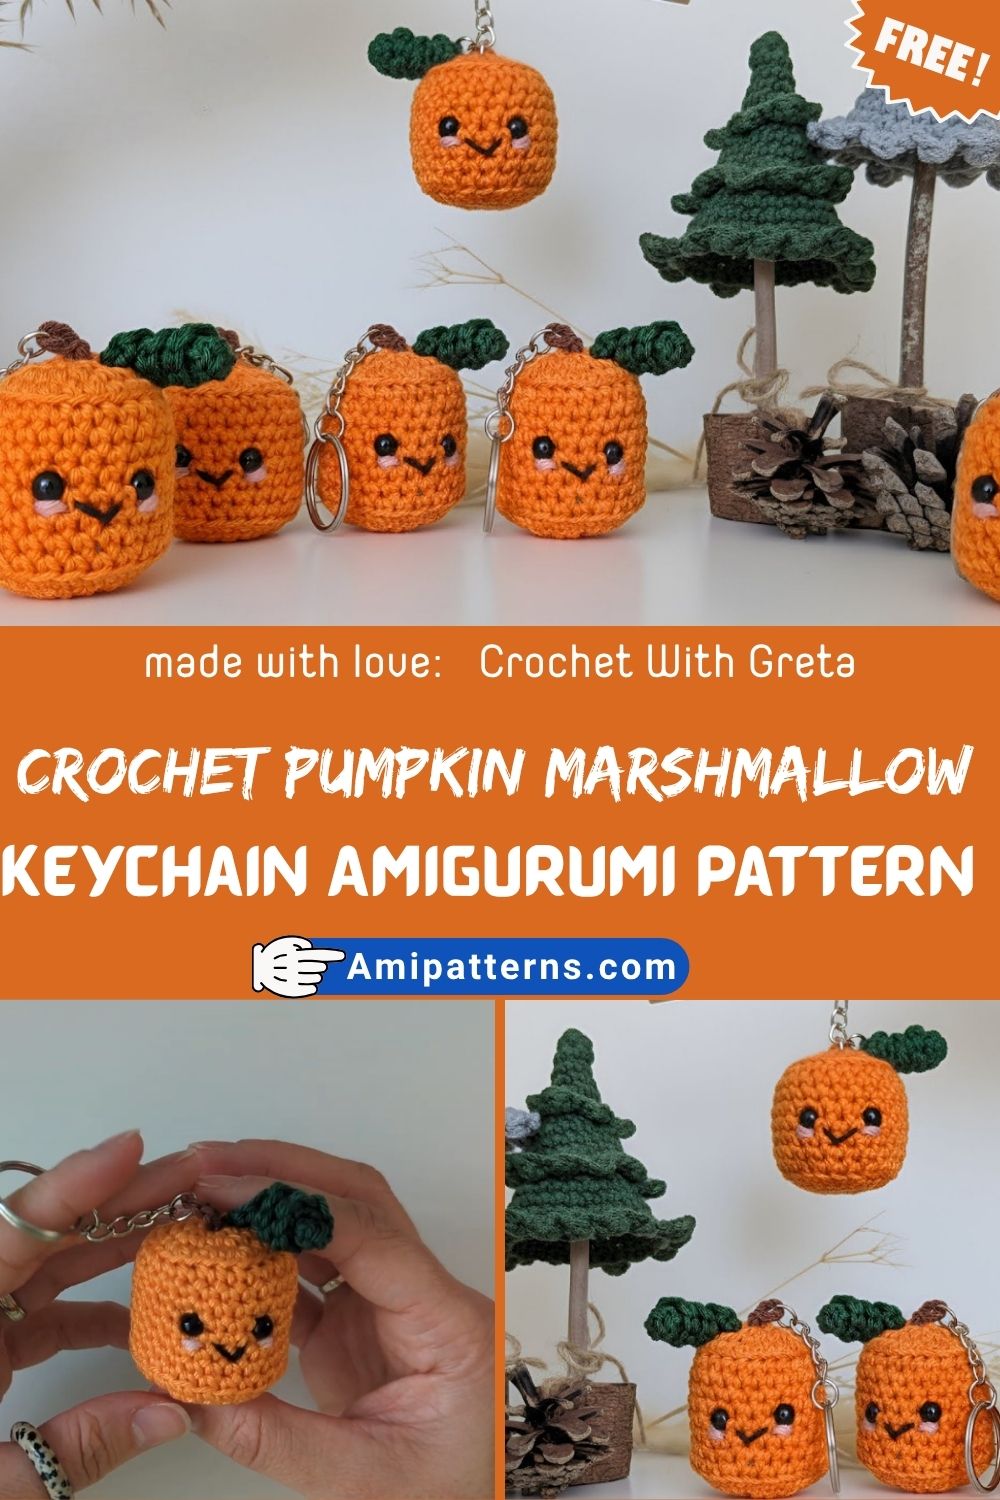
Free Crochet Pumpkin Marshmallow Keychain Pattern for Fall
There is something about crochet toys that always makes people smile. With their size, soft textures or their fitting nicely in the palm of your hand, at least in my opinion, they show so much personality.
It’s for that very reason that the Crochet Pumpkin Marshmallow Keychain Amigurumi Pattern Lovers is popular among crochet fanatics. This is a super cute accessory that captures two cute concepts: a chubby little pumpkin and a fluffy marshmallow form, all in one, which you can take everywhere!
You can attach it to your keys, backpack, purse, or present it to a special somebody and it’s just so warm, it’s so handmade. Each stitch brings character to the work and each finished piece is unique.
This is a super easy, relaxing and rewarding weekend project, if you’re looking for one, it’s certainly a project that should be on your hook!
Why Everyone Loves This Crochet Pumpkin Marshmallow
Small amigurumi projects are very popular as they are quick and easy to complete and don’t use a lot of yarn. You don’t need to make a big blanket or cuddly toy in weeks, it can be made in a few hours.
This crochet pumpkin keychain pattern is particularly attractive, as it can be crocheted all year round. It is, of course, the perfect fit for fall decorations, but its marshmallow-like silhouette is so sweet that it’s good year round.
It is also one of those projects that calls for creativity. Switch to a different color yarn, add a little face, add rosy cheeks or use pastel colors instead of the classic orange. Each version is different in appearance, making it even more fun to crochet. You’ll soon end up with a whole collection.
Skill Level & Overall Experience
This project may seem like a lot of work, but it is actually very easy to do.
The stitches are any stitches you can use, the shaping is simple, and it’s small so it’s easy to fix any errors without having to unravel dozens of rows.
For those new to amigurumi, this pattern serves as a good practice for continuous rounds, increases, decreases, and evenly stuffing your creation.
It’s an ideal project to finish as a relaxing task for quiet evenings when you just want to have fun with crocheting without following complicated instructions for the more experienced crocheter. It’s so relaxing to see a flat circle turn into a soft little pumpkin when you put it in your hands.
Abbreviations
- MR – Magic Ring
- ch – Chain
- sc – Single Crochet
- inc – Increase
- dec – Invisible Decrease
- sl st – Slip Stitch
- st – Stitch
- FO – Fasten Off
Materials You’ll Need
- Yarns: Soft cotton or cotton-blend yarn
- 1 pound of orange yarn for the pumpkin
- Cream or white yarn for marshmallow top
- 2 brown yarns for the leaves
- Green varnish (optional)
- 2.5 mm or 3 mm crochet hook
- Fiberfill stuffing
- Stitch marker
- Yarn needle
- Scissors
- Safety eyes or black embroidery thread
- A keychain ring featuring a lobster clasp. Lobster clasp key ring.
The use of cotton yarn will help to maintain the shape of a pumpkin, and a softer yarn will be ideal for making soft toys.
Step-by-Step Crochet Pumpkin Marshmallow Pattern
Step 1: Making the Bottom
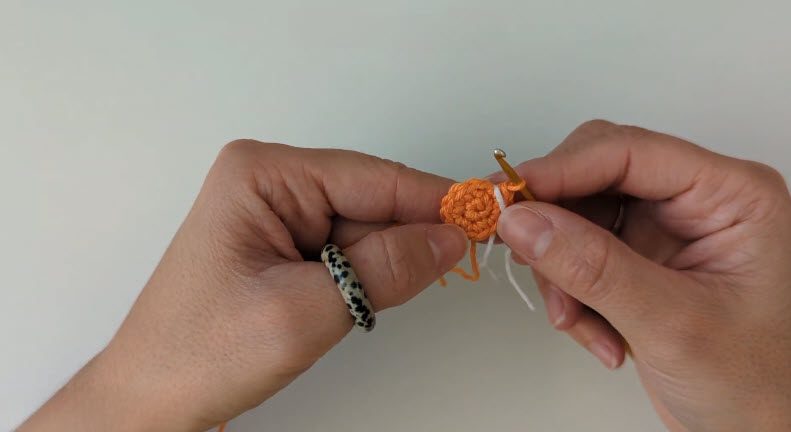
- Begin with a magic ring.
- Make 6 single crochets into the ring.
- Tighten the ring and pull tightly.
- Round 2: Add stitches to all stitches.
- Round 3: Work one single crochet, increase.
- Round 4: 2 sc and 1 inc.
- Repeat until about two inches wide at the base.
Dedicate time during these initial rounds as they will set up the overall form of your pumpkin.
If the base is smooth and even, then things will run more smoothly.
Step 2: Building the Pumpkin Body

After you get to the desired width, don’t add any more. Now only crochet one single crochet into each stitch around. The sides will gradually get up after each round.
It is in this place that the pumpkin begins to form. Continue until the body is nearly equal in height to its width. The little bit of soft, plush material should feel soft and squishy in your hand.
Step 3: Creating the Marshmallow Top
Change to your cream or white yarn. Make a few rounds of crochet; crochet without increasing.
This results in the fluffy marshmallow part that imparts the playfulness to the design. The color contrast immediately draws the little toy to attention.
The mini pumpkin amigurumi pattern looks really cute when both colors are combined!
Discover how to stuff a toy. Learn the art of stuffing a toy. Open the pumpkin, and fill with fiberfill slowly before closing it.
Step 4: Stuffing the Toy

It’s soft enough to be slightly squishy when you squeeze it, which makes the finished keychain a lot more fun to squeeze!
Don’t add too much stuffing at once. That will help maintain an even shape for the pumpkin without any lumps.
Step 5: Closing the Top
Start to taper down evenly around. Do invisible decreases to ensure neatness of stitches.
Repeat until there is only a small hole left. Stuff (if needed) then finish with a final amount.
Securely tie off and trim even with the ends of the border. Now you have a round pumpkin for the finishing touches.
Adding the Pumpkin Details
Slightly pulling the surface will help create a realistic pumpkin look. Feed a long piece of yarn through the middle of the yarn from the top to the bottom. Wrap around the outside a number of times, gently after each wrap.
Typically, it’s 6 to 8 sections that will make a beautiful pumpkin shape. Don’t pull too hard. The aim is not deep dents, but rather soft curves. This really makes a ball look like a pumpkin.
Making the Stem
Using brown yarn, crochet a tiny cylinder. Stuff it lightly or not at all for a more relaxed appearance. Securely sew it to the middle of the pumpkin. If you want a bit of extra color, you can smaller leaves too in green yarn with crochet. They are not necessary, but really make the toy more joyful.
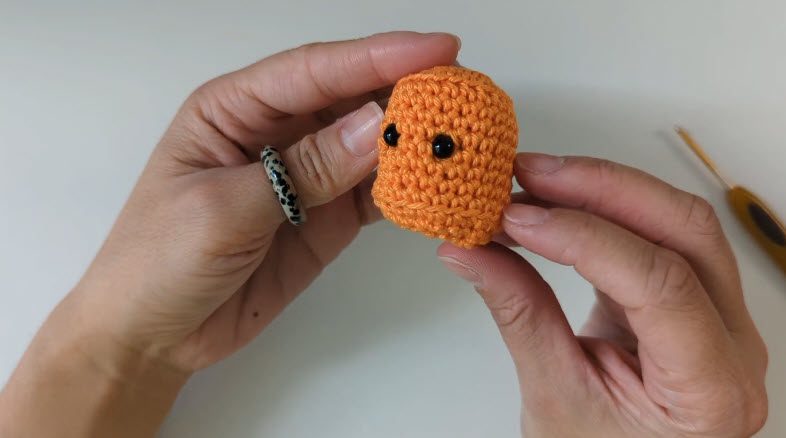
Adding a Cute Face
Here’s the fun part! Use black thread to sew on small safety eyes and/or embroider sleepy eyes. This pumpkin is given personality with a little smile.
Pink blush or fabric paint or embroidery thread is also used by many crocheters to add little pink cheeks. The expression doesn’t need to be in a perfect state. A little imperfection can make handmade toys even more loveable.
Turning It Into a Keychain
Lace through the top of the stem with a small jump ring. Secure your lobster clasp from the key chain or lobster clasp. It’s as easy as that.
Your pumpkin can be used to decorate backpacks, handbags, purses, school bags, wallets, zipper pulls, or even car keys. The crochet marshmallow keychain idea also makes for great gifting tops that go above and beyond the normal bows. It is a decoration which people use long after the gift is opened!
Ways to Customize Your Pumpkin
Instead of the traditional orange, you might try:
- Sage green
- Soft pink
- Lavender
- Cream
- Mustard yellow
- Dusty blue
Micro embroidered flowers, mini bows, freckles, or sleepy eyelashes can be attached, too!
All the little details alter the character of the toy. There are no two pumpkins that are exactly the same, and that’s the fun part.
Why This Pattern Stands Out
There are even amigurumi projects that need dozens of separate pieces to be done before they are assembled. This one has a fresh and simple approach.
Most of the pumpkin body is worked in one piece which is so easy and yet looks great.
Some of its greatest benefits are:
- Consumes very little yarn
- Beginner-friendly construction
- Quick afternoon project
- Ideal for use at craft fairs.
- Cares for the environment
- Easy to customize
The cute crochet plush keychain is also a great product to utilize in small handmade companies, since it’s inexpensive to make and there are plenty of chances to personalize it.
Video Pattern Here:
Helpful Crochet Tips
Never leave off a stitch marker when working in continuous rounds. You can easily get lost in the round numbering. Stitches must be somewhat tight. Stuffing could show through with loose stitches. Secure weave in before changing yarn colors when changing yarn colors.
Don’t rush when adding the face and other details. A mere stitch up or down the eyes can make all the difference in your pumpkin’s expression. Most importantly, don’t compare your finished toy to anyone else’s.Handmade products can be unique, and that’s what’s great about them.
Fun Ways to Use Your Pumpkin
The little project has a lot more uses than it looks like.
You can use it as:
- Backpack charm
- Purse accessory
- Keychain
- Gift topper
- Desk decoration
- Car mirror charm
- Party favor
- Halloween basket filler
- Handmade market product
- Cute collectible
It’s a great project for the leftover yarn that may be languishing in your stash.
Pattern Tip You’ll Be Glad You Remember
Take time to fill the stuffing. Small amounts added slowly will make the pumpkin a great deal smoother than if everything is added at once. In addition, create several yarn tails through the stitches before cutting them off. With keychains being used frequently, additional security will ensure that your little pumpkin will last for years.
Final Thoughts
It just feels good to complete such a small crochet item. Does not take weeks to complete but equally rewarding as a much larger make. It’s impossible not to love this little companion, with its soft shape, fluffy top, and little details made by hand.
It’s a project you begin because it’s cuter than you think and then find yourself repeating for friends, family or maybe even yourself in every color you can imagine.
Sometimes the tiniest crochet designs make a big impact. A happy pumpkin is the result of a little yarn, a simple hook and some creativity.