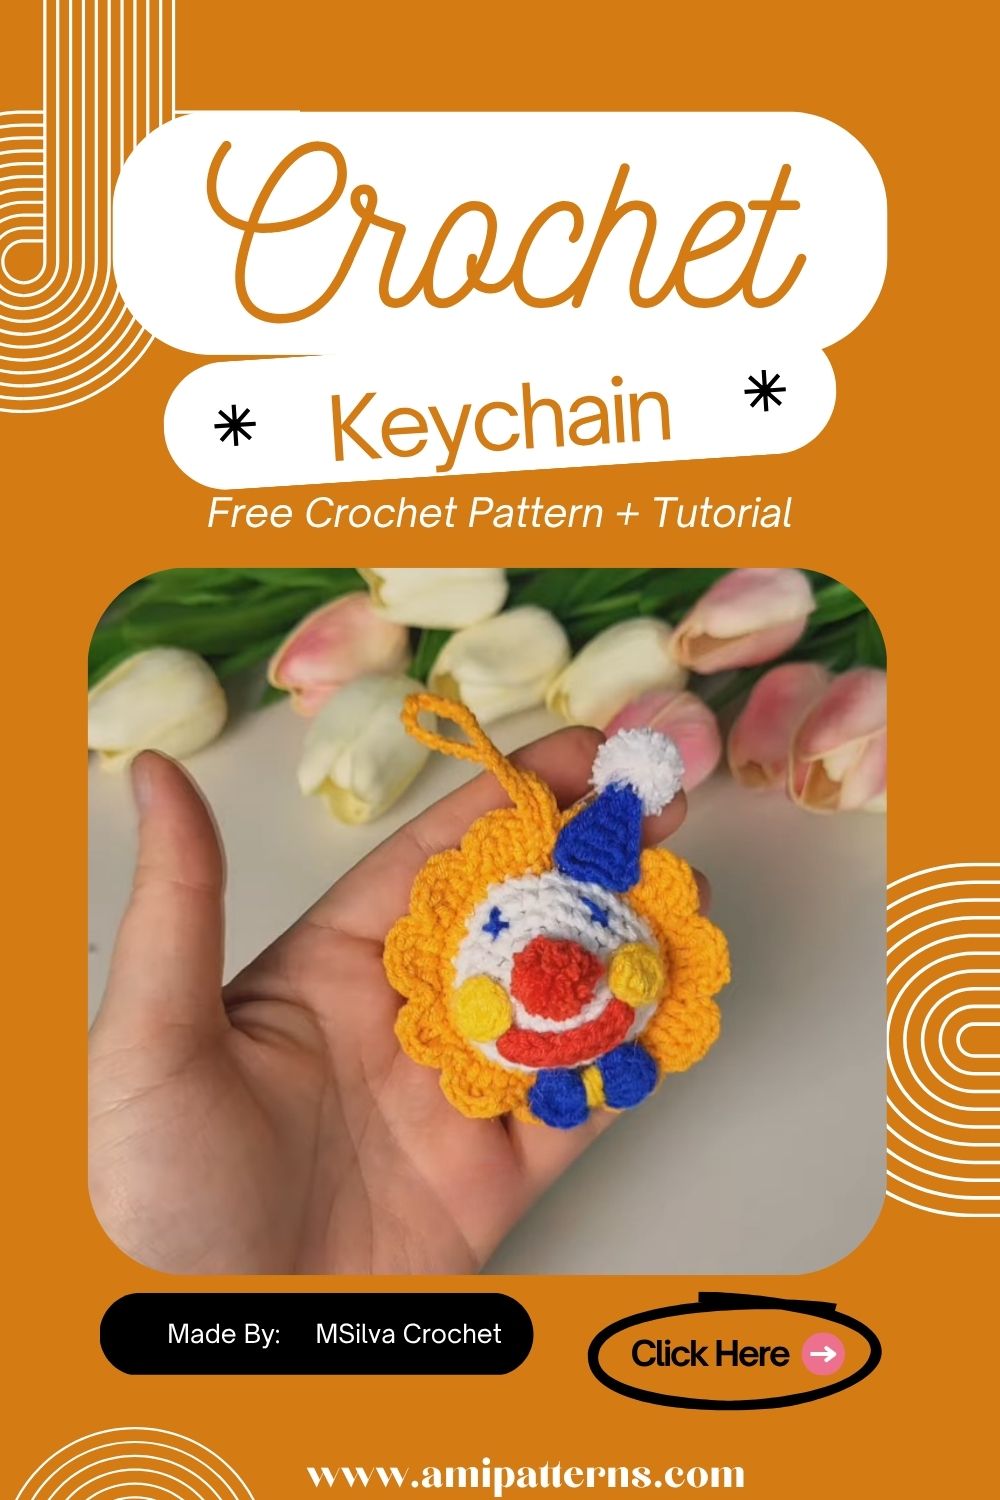
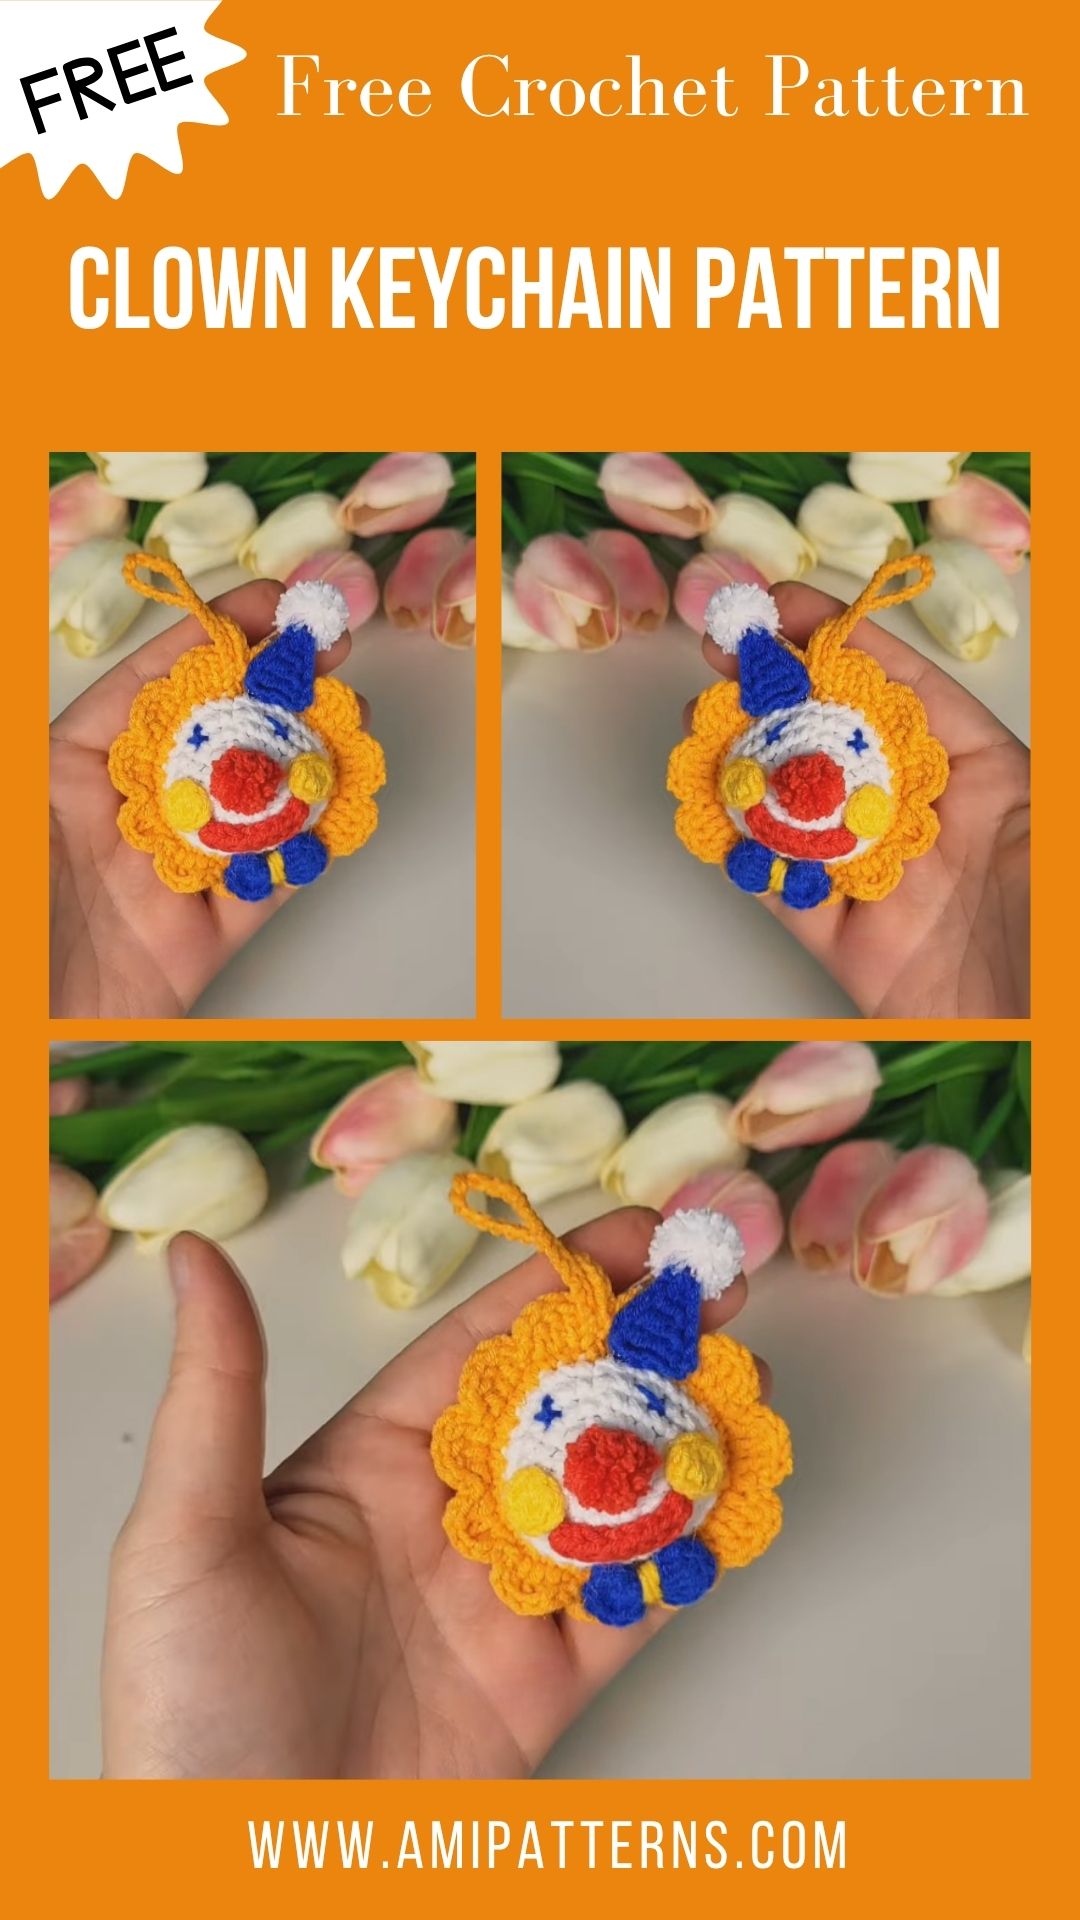
Charming Crochet Clown Keychain Pattern for Everyday Fashion
Keychains are one of the things that we use daily, whether it is our car, home or office keys, they are a necessity for us. Add a splash of playful colors to your daily life style with Charming Crochet Clown Keychain Pattern for everyday fashion. It is a simple yet delightful project that turns yarn into cheerful personality filled accessory.
Nowadays we all are looking for something sustainable and affordable. It will be fun to have a handmade item with you than can make others envy you. The best thing is that you can flaunt this crochet clown keychain as it will look cute and get all the attention.
Let’s imagine this, a small hat, colorful outfit and an expressive face make it more than just a keychain. It’s more like a mini work of art to keep with you. It will be easy to attach it with your keys, zipper pull, and bags to make every day softer and easier. And truthfully, it’s a project that slows you down a little and allows you to enjoy the process stich by stich.
Materials You Will Need
To start your project here are the necessary materials. You can use those which are available at home, or go to for shopping.
Yarn:
If you want a classic clown look, looking for bright colors like red, yellow, blue and white will be a good choice. Some black yarn is used to add face details. The most durable fabric is soft cotton or acrylic yarn.
Crochet Hook:
Small hook (2.5mm to 3mm) to make stitches tight and neat, particularly for small pieces.
Tapestry Needle:
This will be used to connect pieces together and to neatly finish loose ends.
Polyfil Stuffing:
Just enough to shape the clown without making it bulky.
Scissors
Used for cutting off yarn and to keep things neat.
Stitch Markers:
These are optional, but are very useful when working in circles.
How to Create a Crochet Clown Keychain Pattern?
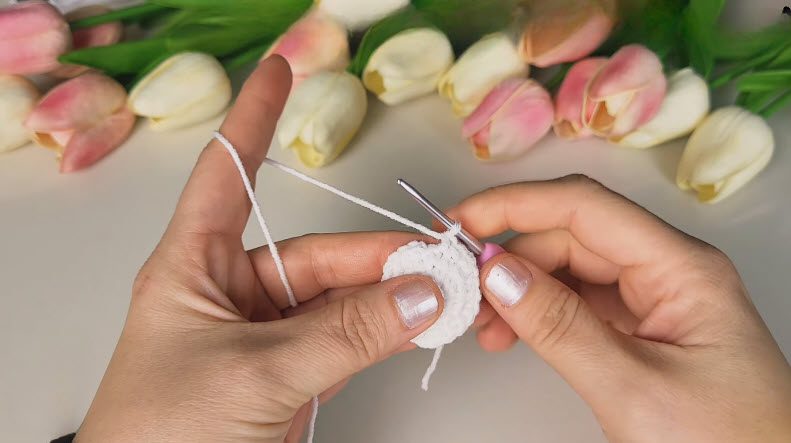
You will have to start with the body and work in small rounds to create a compact and round shape. This is where the magic ring technique will be useful, as it will allow you to create a clean end with no gaps. Keep the stitches even and snug to make your project a little more successful. Every little stitch needs extra attention; all this will be worthwhile when you will have the handmade stuff with you.
When going to the head, imagine a little bigger and more expressive. The clown’s face is where all the personality will reflect, so take your time to make it wonderful. A gentle increase in the stitches will help you form a round and balanced head.
It doesn’t have to be perfect, a little mistake can make your handmade piece look alive.
Arms, Legs and Other Details
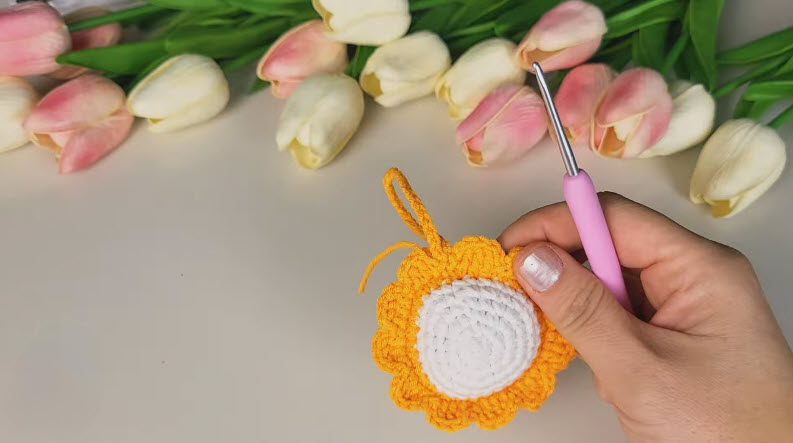
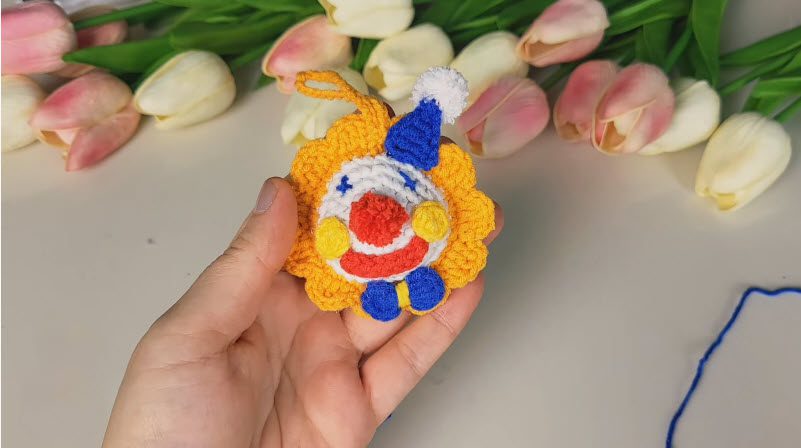
The arms and legs are simple, often single crochet. It’s the small details that add some movement and character to the design. Do not use them as equal in size to the body, as this will make it feel out of balance. The same goes for the little hat, and this is where you can have all the fun with the color combination. You can choose whatever color you like. A striped or two tone- hat can make your clown stand out instantly.
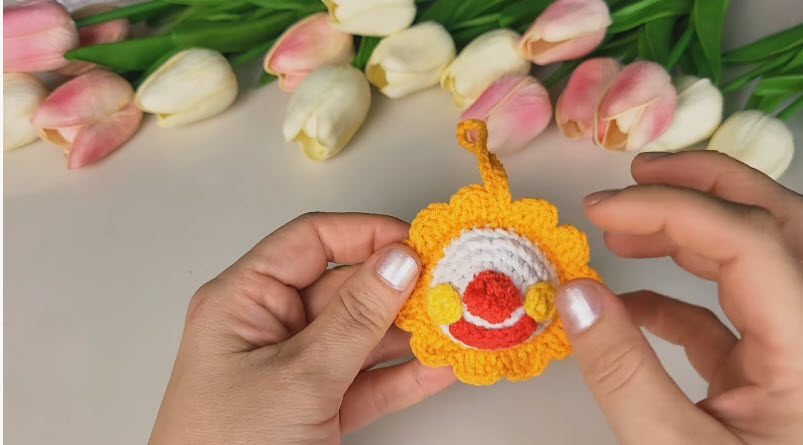
Now comes the most important part, the face. You can use black and white yarn to create the eyes and tiny smile, and of course the signature round nose. Placement is necessary, but then again, don’t stress over too much. When all the pieces are ready assemble them carefully with the tapestry needle. Stuff the body and head lightly before closing so that they do not become too loose.
Last, but not least, attach the keychain ring to the top, typically by passing through the hat or head. Just gently tug it to ensure there is a firm hold. After all, this little clown is supposed to travel with you!
Special Features
Playful Design: The bright colors and expressive face add a personality to each clown.
Compact and Practical: small enough to be carried anywhere, without feeling like it’s too big.
Customizable: You can tweak the style such as the colors, facial expressions and even clothing details.
Tutor’s Suggestions
Keep Stitches Tight: Loose stitches may show through the stuffing, so adjust the size of the hook if necessary.
Focus on assembly: Simple pieces can still be looked after with careful stitching and neat finishing – take a look at Assembly!
Uses
Everyday Accessory:
Attach to keychains or bags for a personalized and fun accessory.
Handmade Gift:
When you make a little handmade gift with care, your loved ones will be happy to receive it. Honestly, it is more meaningful than something you purchase from store.
Creative Expression:
Make a whole set in different colors and styles, each with its own personality.
What is the Level of Difficulty of this project?
This project is in between beginner and intermediate. If you know the basic stitches like single crochet and working in the round, it is manageable. At the same time, there are other small details like shaping and assembly that may become a challenge for some.
Step-by-Step Instructions
Make a magic ring and do the first round of sc. This forms the base of the body. Add stitches in the following rounds to create a soft, rounded form. When you have reached the width you want, keep the stitches the same for a couple rounds, then go down a few to close the form.
Repeat for head with a slightly larger shape. This helps to make a classic proportion, which naturally makes the face more noticeable as the head looks slightly larger than the body.
Arms and legs are knitted separately, using short rows or rounds. Keep them simple and uniform. The goal is not to create something complicated, but something clean, even, and that will fit easily into the body.
The hat can be as simple or creative as you like. Make a small circle, and add upward, changing colors as desired for striated effect. Slightly pointed or rounded top creates a playful finish.
As far as the face is concerned, don’t stitch anything down until you have done a quick inspection. Place the eyes, nose and mouth first just for a sample of how it will look. When you are sure of their position, carefully fix them. This is the moment that will make up the nature of your clown.
After assembling all the parts, lightly stuff the body and head. Do not overfill, it is preferable to be soft and slightly flexible. Seal any openings tidily and take care to weave in any loose ends. Now is the time to attach the keychain ring firmly making sure it is secure enough for daily use.
Conclusion
Making crochet clown keychain will turn out to be a satisfying project for you. It may require a little time but the handmade item will be worth the wait. And the best part? Never two clowns are alike. Each one has a little of you, your color palette, your fashion.
It’s also great to use afterward. You keep your keys and your bag and every time you pick them up or you look at them you’re reminded that you made that. It’s not much but it’s a little warmer to the day.
Pro Tip
For small details such as the eyes or nose use a smaller hook or a tighter hook tension. It is obvious that it can make a big difference and your clown looks really clean and crisp without having to do anything further.