Crochet Bunny Keychain With Daisy Crown
Soft lavender yarn, tiny white daisies and a pastel mint egg make this crochet bunny keychain really hard to resist. Floppy ears, glossy blue eyes and pink paw pads give the little amigurumi bunny a sweet, cheerful spring look.
A crochet bunny keychain works as a bag charm, a zipper pull or a small Easter gift. Because the pattern uses basic stitches, simple increases and short rounds, beginners can finish it in one relaxed weekend. Every piece is crocheted separately and sewn together later, so shaping stays easy and mistakes stay small. Expect a keychain about four inches tall with big floppy ears.

Crochet Bunny Keychain Pattern Overview
- Skill level: Beginner
- Finished size: About 4 inches (10 cm) tall, sitting
- Construction: Separate pieces worked in continuous rounds, then sewn together
- Abbreviations (US terms): MR = magic ring, sc = single crochet, inc = 2 sc in one stitch, dec = invisible decrease, dc = double crochet, ch = chain, sl st = slip stitch, st(s) = stitch(es), FO = fasten off
If you’re new to amigurumi, don’t worry, because small pieces like these are a gentle way to learn.
Materials for the Crochet Bunny Keychain
- Cotton yarn in DK weight: lavender (main), white, pink, mint green, yellow, and a small amount of light green
- 2.5 mm crochet hook
- 8 mm dark blue safety eyes
- Black and pink embroidery floss for lashes, nose and mouth
- Polyester fiberfill
- Tapestry needle, stitch marker and scissors
- Keychain clasp with a chain and a jump ring
- Dry pink blush and a cotton swab for the cheeks (optional)
Special Techniques
Magic ring: First, crochet the first round inside a loop. Then pull the tail tight, so the center closes with no hole.
Invisible decrease: Insert the hook into the front loops of two stitches and finish as a single crochet. That way, the fabric stays smooth.
Flat ear tube: Crochet the ear without stuffing, and then press it flat for a soft, natural droop.
Time Box
Plan on 45 minutes for the head, 30 for the ears, 25 for the body, 35 for the paws and feet, 20 for the egg, 30 for the collar and daisies, and 40 for assembly. In total, that’s about 3 hours 45 minutes.
Crochet Bunny Keychain Pattern Instructions
Step 1: Head
Use lavender yarn.

- Rnd 1: First, MR, 6 sc (6)
- Rnd 2: Then inc in each st (12)
- Rnd 3: Next, (sc, inc) x6 (18)
- Rnd 4: After that, (2 sc, inc) x6 (24)
- Rnd 5: Then (3 sc, inc) x6 (30)
- Rnd 6: Next, (4 sc, inc) x6 (36)
- Rnds 7-13: Now sc around (36)
- Rnd 14: Then (4 sc, dec) x6 (30)
- Rnd 15: Next, (3 sc, dec) x6 (24)
- Rnd 16: After that, (2 sc, dec) x6 (18)
- Rnd 17: Then (sc, dec) x6 (12)
- Rnd 18: Finally, dec x6 (6)
Before Rnd 14, set the safety eyes between Rnds 9 and 10, about 7 stitches apart. Then stuff firmly during Rnd 16, FO and close the hole.
Pro-Tip: Pin the eyes in place and check the spacing from a few feet away, because wide-set eyes give the bunny a baby-like face.
Step 2: Ears (Make 4 Pieces)
Outer ears (lavender, make 2):

- Rnd 1: First, MR, 6 sc (6)
- Rnd 2: Then inc in each st (12)
- Rnd 3: Next, (sc, inc) x6 (18)
- Rnds 4-15: After that, sc around (18)
Finally, FO with a long tail, and don’t stuff the ear.
Inner ears (pink, make 2):
- Rnd 1: First, MR, 6 sc (6)
- Rnd 2: Then inc in each st (12)
- Rnd 3: Next, (2 sc, inc) x4 (16)
- Rnds 4-12: After that, sc around (16)
FO with a long tail. Once both pieces are done, flatten each one and sew the pink inner ear onto the front of the lavender outer ear, with the bottom edges lined up.
Pro-Tip: Press the finished ears under a damp cloth for a minute, since they lie flatter and hang with a softer curve.
Step 3: Body
Use lavender yarn.

- Rnd 1: First, MR, 6 sc (6)
- Rnd 2: Then inc in each st (12)
- Rnd 3: Next, (sc, inc) x6 (18)
- Rnd 4: After that, (2 sc, inc) x6 (24)
- Rnds 5-9: Now sc around (24)
- Rnd 10: Then (2 sc, dec) x6 (18)
- Rnds 11-12: Next, sc around (18)
- Rnd 13: After that, (sc, dec) x6 (12)
- Finally, stuff the body, then Rnd 14: dec x6 (6)
To finish, FO and close the hole.
Pro-Tip: Stuff the lower half a little more firmly, because a heavier base helps the bunny sit upright.
Step 4: Paws and Feet
Feet (white, make 2):
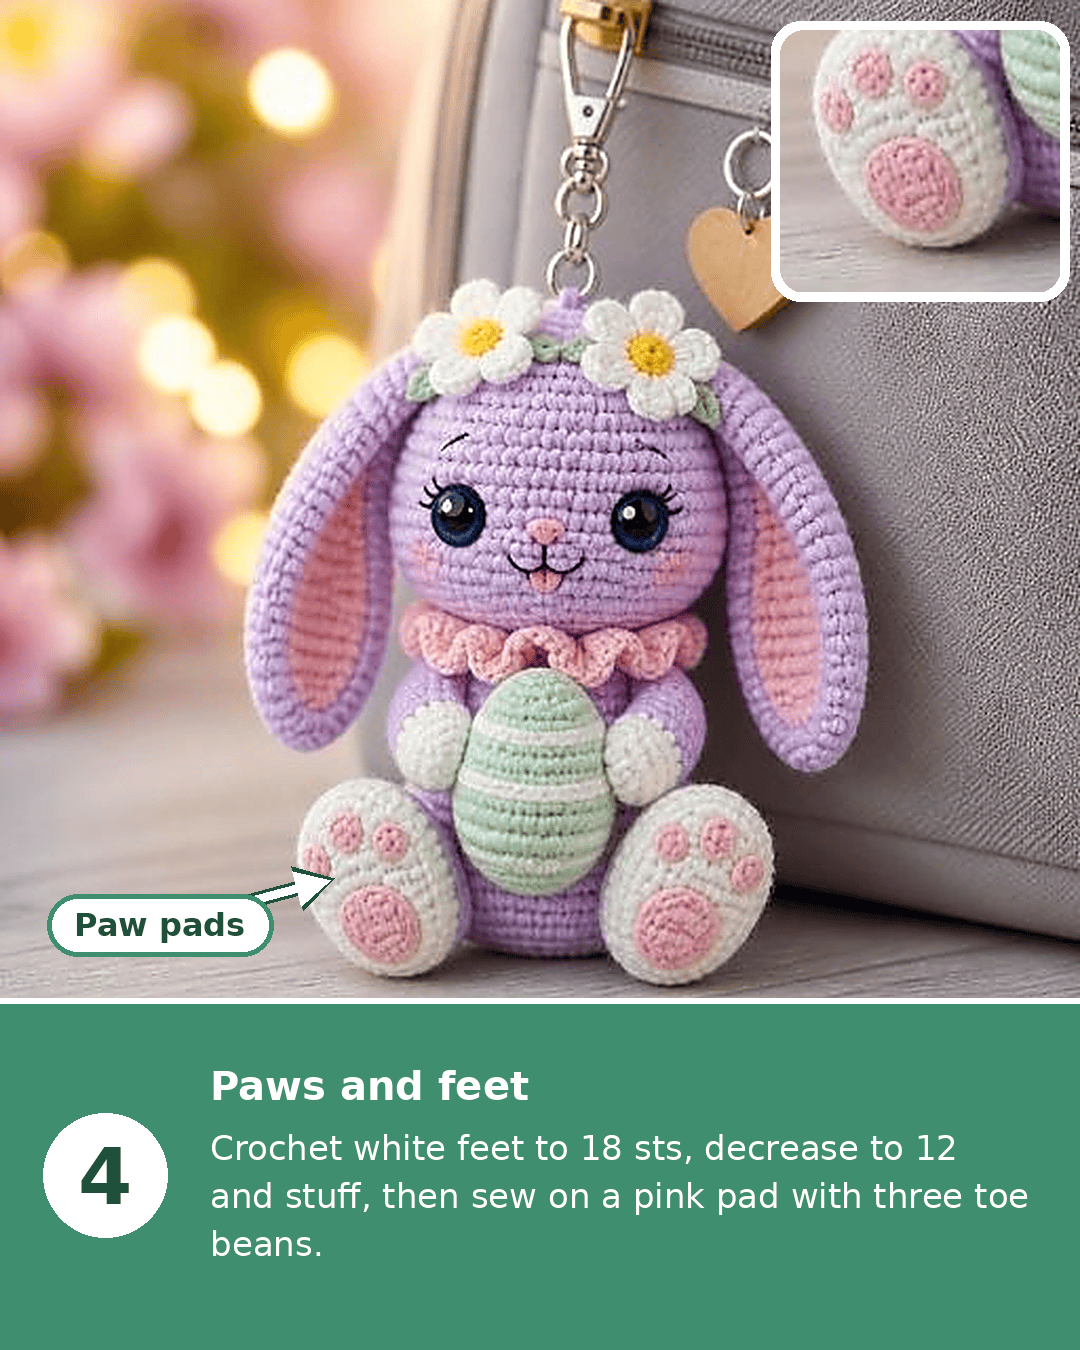
- Rnd 1: First, MR, 6 sc (6)
- Rnd 2: Then inc in each st (12)
- Rnd 3: Next, (sc, inc) x6 (18)
- Rnds 4-6: After that, sc around (18)
- Rnd 7: Finally, (sc, dec) x6 (12)
Stuff lightly, FO, and close.
Paw pads (pink): First, MR, 6 sc, and then inc in each st (12). Next, join with a sl st and FO. Make 2 large pads. For the toe beans, make 6 small pieces of MR with 5 sc each.
Arms (white, make 2): MR, 5 sc, and then sc around for 6 rounds (5). Afterward, stuff lightly, FO, and leave a tail for sewing.
Next, sew one large pad and three toe beans onto the sole of each foot.
Pro-Tip: Arrange the toe beans in a gentle arc above the pad before sewing, because a tidy arc makes the paws look store-bought.
Step 5: Easter Egg
Use mint green and white.

- Rnd 1: First, MR, 6 sc (6)
- Rnd 2: Then inc in each st (12)
- Rnd 3: Next, (sc, inc) x6 (18)
- Rnd 4: After that, (2 sc, inc) x6 (24)
- Rnd 5: Now sc around in mint (24)
- Rnd 6: Then sc around in white (24)
- Rnds 7-8: Next, sc around in mint (24)
- Rnd 9: After that, sc around in white (24)
- Rnd 10: Then (2 sc, dec) x6 in mint (18)
- Rnd 11: Next, (sc, dec) x6 in mint (12)
- Finally, stuff the egg, then Rnd 12: dec x6 (6)
To finish, FO and close the hole.
Pro-Tip: Keep the stripe changes in the same spot, so the tiny jog hides on the back of the egg.
Step 6: Collar and Daisy Crown
Ruffle collar (pink): First, ch 30. Then sc in the second chain from the hook and in each chain across (29). Next, ch 1, turn, and work 2 dc in each st across (58). Finally, FO and leave a tail.

Daisies (make 2): With yellow, work MR, 6 sc, and join with a sl st. Then FO. After that, join white in any stitch and work one petal in each of the 6 stitches: (sl st, ch 2, 2 dc, ch 2, sl st) all in the same stitch. Finally, FO.
Leaves (light green, make 4): Ch 4, sl st in the second chain from the hook, sc, and sl st in the last chain. Then FO.
Pro-Tip: Tuck the yarn tail from the center of each daisy into the back before sewing, because the yellow middle then stays plump and round.
Crochet Bunny Keychain Assembly
- First, sew the stuffed head onto the body, centered, with a slight overlap at the neck.
- Next, sew the ears to the top of the head, one on each side, leaving a gap for the daisies.
- Then sew the feet to the front bottom with the pads facing forward.
- After that, attach the arms at the shoulders, curved inward, and sew the egg to the chest between them.
- Gather the ruffle softly and sew it around the neck.
- Meanwhile, sew one daisy near each ear and tuck two leaves under each flower.
- Also, embroider a small pink nose, a smiling mouth with a tiny tongue, and black lashes, and then brush on a little blush.
- Finally, thread the jump ring through the top of the head between the ears, and attach the clasp.
Common Crochet Bunny Keychain Mistakes
- Eyes set too high: Place them near Rnd 9 for a rounder face.
- Overstuffed head: Stretched stitches reveal the fiberfill, so stuff in small pieces.
- Ears sewn too far forward: Sew them toward the back, so the face stays open.
- Uneven egg stripes: Recount the rounds before changing color.
Uses and Benefits of a Crochet Bunny Keychain
- Clip it onto a backpack zipper for a soft pop of spring color.
- Gift it with a small chocolate egg on Easter morning, in the spirit of the classic Easter Bunny.
- Hang it from a car mirror for a cheerful daily reminder.
- Practice shaping, color changes and embroidery in one small project.
Beginner Tips
- First, mark the first stitch of every round with a stitch marker.
- Also, count stitches at the end of each round until the pattern feels natural.
- Use a hook one size smaller than the label suggests, so the stuffing stays hidden.
- Finally, pin every piece before sewing, because small shifts change the whole expression.
Personalization Ideas
- Swap lavender for baby pink, sky blue or cream.
- Add a tiny satin bow beside one ear.
- Replace the daisies with small tulips or cherry blossoms.
- Embroider a first initial on the egg.
- Sew a small bell inside the body for a gentle jingle.
Care and Cleaning Tips
Spot clean the bunny with a damp cloth and a drop of mild soap. Press the fabric gently instead of scrubbing it. Then air dry away from direct sunlight, so the lavender doesn’t fade. If the keychain travels daily, brush off lint with a soft toothbrush once a week. Also, keep it away from sticky surfaces, since cotton yarn absorbs oils.
Crochet Bunny Keychain FAQs
What yarn works best for a crochet bunny keychain?
Cotton yarn in DK weight gives crisp stitches and a smooth finish. Acrylic works too, although the stitches come out slightly softer.
Can a beginner make the bunny?
Yes. The pattern uses only sc, inc, dec and a few chain-based petals, and every piece is small.
How can the ears stop standing up?
Skip the stuffing and press them flat. Cotton yarn then folds into a natural droop.
Can the bunny be made larger?
Use thicker yarn and a 3.5 mm hook. As a result, the same pattern makes a plush about 6 inches tall.
Hop Into Your Next Project
A tiny bunny with a daisy crown and a mint egg brings spring to any bag, no matter the season. Once the first one is finished, try a second in baby pink or sky blue, and build a whole basket of pastel friends. Happy stitching!