Red Crochet Halter Bikini Top Pattern for Summer Days
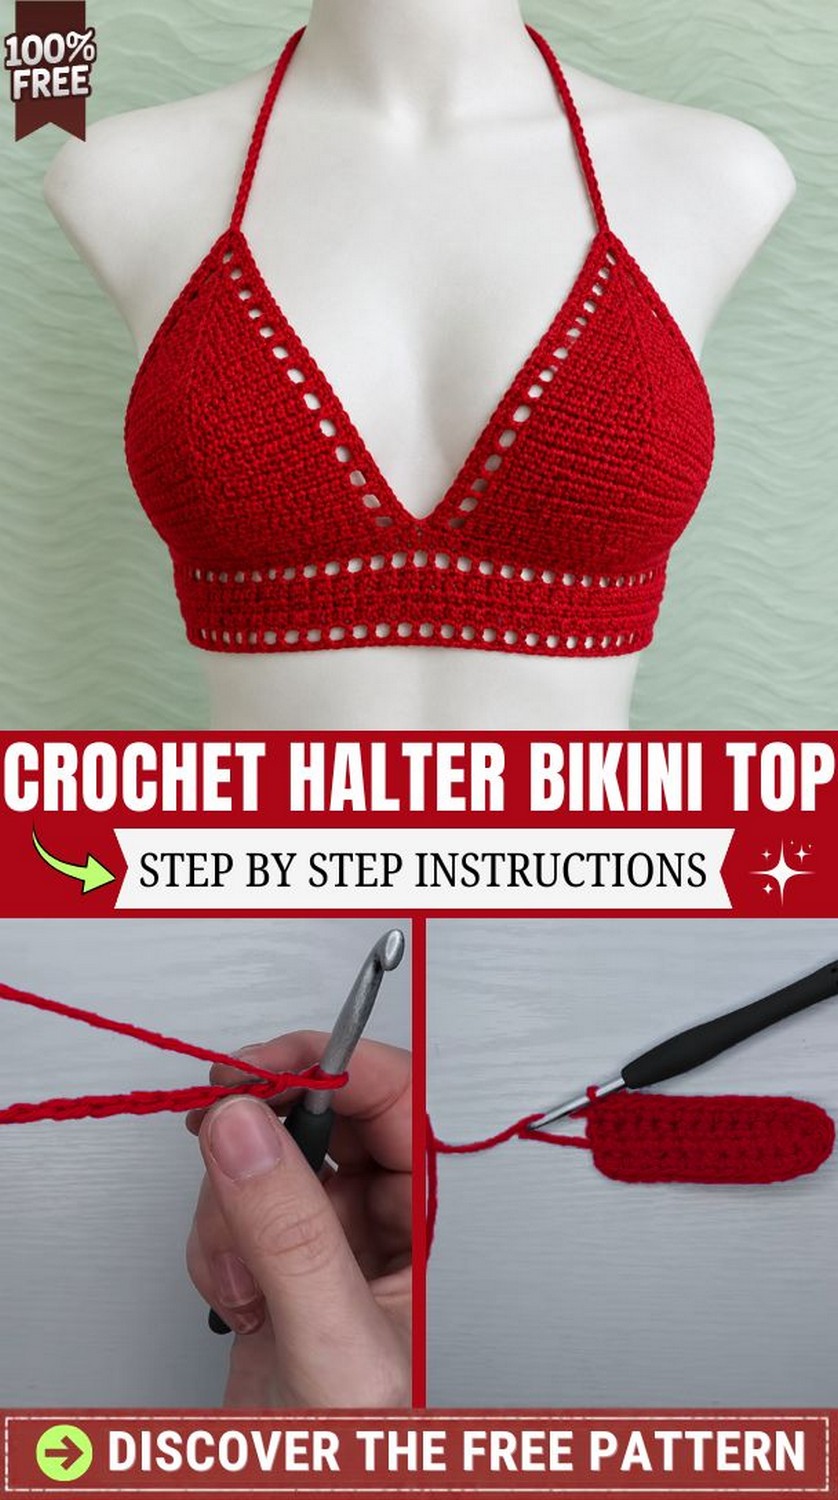
Want a bright red top for summer? The Red Crochet Halter Bikini Top Pattern has tiny eyelet windows and long tie straps, so it looks great at the beach. Pick up your hook and make one within the week, because it’s easier than it looks.
I fell for the top the moment I saw the red. It’s bold, but the little eyelet holes along the cups and the band keep it light and pretty. Also, the long straps tie behind the neck, so the fit is easy to adjust. Best of all, the stitches are simple, yet the finished top looks like something from a boutique. Overall, the red crochet halter bikini top pattern is a great pick for summer days.
Red Crochet Halter Bikini Top Pattern Overview
First, note that the instructions below are written for size small.
Materials
- Worsted-weight cotton yarn in bright red, about 2 balls (roughly 240 yards)
- 5 mm (H-8) crochet hook
- Yarn needle
- Sharp scissors
- 1 stitch marker
Skill Level: Easy, ideal for a confident beginner who already knows single and double crochet.
Finished Size: Each cup measures about 6 inches wide at the base and 5 inches tall. Meanwhile, the band is roughly 3.5 inches deep and fits a 30 to 34 inch bust. Finally, each tie strap runs around 45 to 50 inches.
Abbreviations (US terms)
- ch – chain
- sc – single crochet
- dc – double crochet
- sl st – slip stitch
- st(s) – stitch(es)
Special Techniques for the Red Crochet Halter Bikini Top Pattern
Working into the back bump. First, flip the foundation chain sideways and insert the hook into the small bump on the back of each chain. As a result, the edge stays tidy with no loose loops.
Stacked single crochet. Start with a regular sc. Next, insert the hook under the front loop of that sc and make a second sc. Because the pair stands tall, it replaces a turning chain, so row edges stay straight.
V-stitch at the cup tip. Work dc, ch 1, dc into one single stitch. In short, the little V pushes the tip of the cup forward for a better shape.
Time Box
- Prep: First, spend about 10 minutes gathering supplies.
- Stitching: Next, plan on about 4 to 5 hours, depending on speed.
- Finishing: Finally, allow 20 minutes for weaving ends and lacing the straps.
Red Crochet Halter Bikini Top Pattern Instructions
Step 1: Foundation Chain and First Cup Row
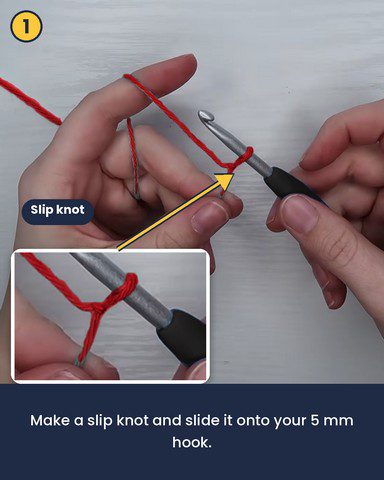
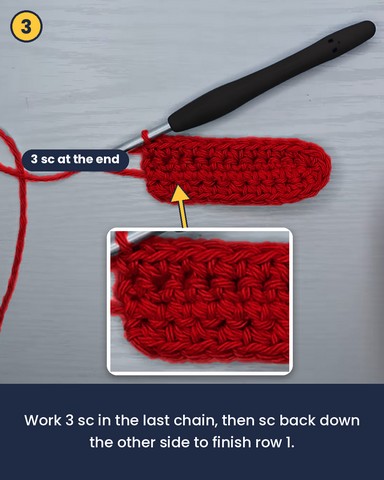
First, make a slip knot and ch 12. Then turn the chain sideways. Next, skip the first ch and sc into the back bump of the second ch. After that, keep working sc into each back bump until one ch remains. Finally, work 3 sc into that last ch and place a stitch marker in the middle stitch of those three.
Next, rotate the work and sc down the other side of the foundation chain, going under both loops of each stitch. Meanwhile, crochet over the starting yarn tail as you go. As a result, row 1 forms a wide U shape.
Why it matters: the marked stitch becomes the tip of the cup, so it keeps every later row centered.
Step 2: Build the Cup Rows
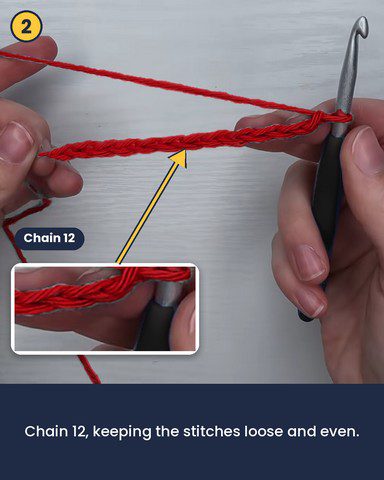
To begin, turn the work. Skip the turning chain, then sc in each st up to the marked stitch. Next, remove the marker and work 3 sc into that stitch. After that, continue with sc down the other side. Repeat that row until the cup has 10 rows.
Because the 3-sc increases stack on top of each other, they form a raised ridge up the center. In turn, the ridge gives the cup its pointed shape.
Row check: count rows from the center outward, never across the full width. For example, after two rows the count is two, not four.
Shape check: after 10 rows, the cup should resemble a rounded triangle with a raised ridge running up the center from the tip to the bottom edge. Meanwhile, the bottom edge stays nearly straight. Now the cup is ready for the eyelet row.
Pro-Tip: Prefer a turning chain? Simply add ch 1 before each row. Either way works, so choose whichever feels neater.
Step 3: Eyelet Row Along the Cup
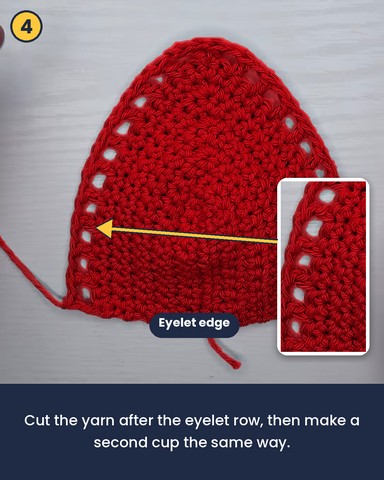
First, turn the work and make a stacked sc in the first st. Then ch 1, sk 1 st, and dc in the next st. Repeat that pair up the side until three stitches remain at the top. Next, work dc, ch 1, dc in the center stitch to form a V-stitch. After that, continue down the other side with ch 1, sk 1, dc. Finally, end with a dc in the final stitch.
Once the row is done, pull the yarn through the last loop and cut the yarn. Then make a second cup exactly the same way.
Step 4: Join the Cups with the Band Base
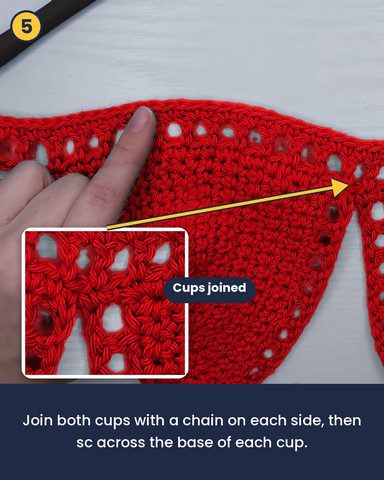
First, hold the first cup with the backs of the dc facing you. Then ch 7 for size small. However, lengthen the chain up to ch 10 for longer side extensions, or skip the chain entirely for no extension.
Next, sc in the first base stitch of the cup and continue across the bottom edge. Near the end, work around the post of the last dc. Then place the final sc in the top of that dc.
After that, position the second cup facing the same direction. Sc into its first spot, working over the loose yarn end, and continue across the bottom. Again, go around the last dc post and finish in the top of the dc. Finally, ch 7 to match the first side.
Fit check: both side chains must match in length, otherwise the band sits crooked on the body.
Step 5: First Band Eyelet Row
To start, turn the work and ch 1. Then make a stacked sc in the first ch. Next, ch 1, sk the next st, and dc in the following st. Repeat across the full bottom edge.
However, if the count fails to end on a dc, work two dc side by side at the end. Likewise, when only one stitch remains, skip the chain and place a dc in the final stitch.
Step 6: Solid Band Rows
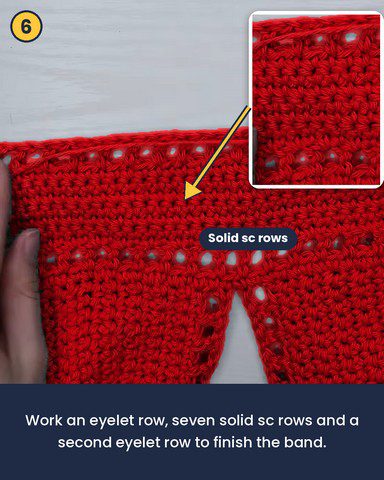
First, turn the work. Then sc in every dc and every ch-1 space. Because going around the whole chain is quicker than fiddling inside the small hole, it saves plenty of time. Repeat until the band holds 7 sc rows in total.
Pro-Tip: Keep the sc row count odd. That way, the right side faces you for the next eyelet row.
Want a longer top? Simply add more sc rows here, but keep the total odd.
Step 7: Second Eyelet Row and Closing Row
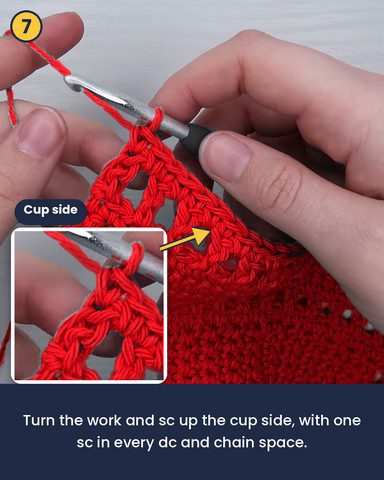
First, turn the work and repeat the stacked sc, ch 1, sk 1, dc pattern across the bottom edge. Then turn again and sc across to the opposite corner. At last, the band is complete.
Step 8: Border Up the First Cup
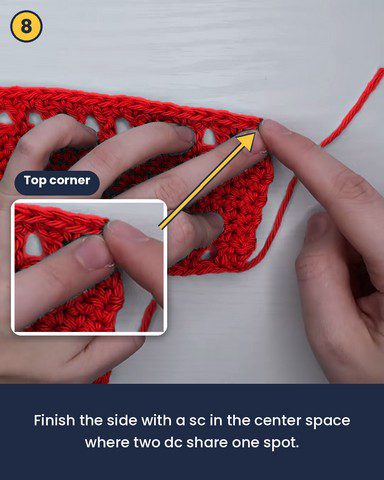
To begin, turn the work to climb the side edge. Add one more sc in the last stitch to round the corner. Next, sc along the extended side chains, then work 2 sc in the top corner stitch. After that, keep going along the side of the cup with sc in every dc and every ch-1 space, covering the yarn end as you stitch.
Finally, stop at the very top where two dc share one spot and finish with a sc in that center space.
Step 9: First Strap
First, ch 180 for size small. Then skip the first ch and sl st into the top loop of each remaining chain back to the cup. As a result, the strap turns out sturdy and slightly thick.
Next, at the final chain, sl st, and then sl st again into the front of the last sc beside the cup tip. As a result, the extra slip stitch closes any hole.
Pro-Tip: Want thicker straps? Swap the slip stitches for sc or hdc on the way back.
Step 10: Center Edge and Second Cup
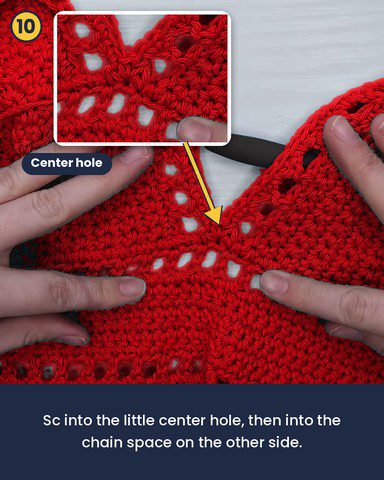
First, work a sc into the V-stitch. Then continue the sc border down the cup edge toward the center. Next, place one sc in the small hole at the center, followed by another in the chain space on the opposite side.
After that, climb the second cup with sc along the edge until the top. Then sc into the top space, ch 180, and sl st back down the chain. Finally, finish with a sl st into the front of the last sc.
Stitch check: both straps need the same chain count, so write the number down before starting the second one.
Step 11: Finish the Border
First, place a sc in the space beside the second strap and continue down the cup side. Next, work 2 sc in the bottom corner, then sc along the lower edge back to the starting point. Finally, cut the yarn, leaving a tail of 5 to 6 inches, and pull the end out of the last loop.
Assembling the Red Crochet Halter Bikini Top Pattern
First, thread the tail onto a yarn needle. Then pass the needle under both loops at the top of the first border stitch. Next, find the final sc and insert the needle down through its top. As a result, the border looks continuous with no visible start or end.
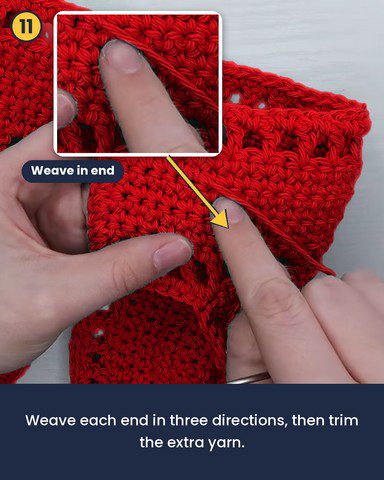
Now flip the work and weave the end in three directions: down, sideways, then back across a row below. After that, run the yarn under a couple of extra stitches and trim the rest.
Finally, lace the straps. Take the left strap across the front to the first eyelet space on the right side, and then bring it back to the left side through the bottom space. Likewise, repeat with the right strap in the opposite direction. Last, tie the ends in a bow.
Common Mistakes in the Red Crochet Halter Bikini Top Pattern
- First, counting cup rows across the full width instead of from the center outward throws the size off.
- Also, forgetting the marker pushes the cup tip off-center.
- Similarly, making straps with different chain counts leaves the bow lopsided.
- In addition, pulling the chain-1 spaces tight closes the eyelets.
- Finally, ending the band on an even number of sc rows flips the right side.
Uses and Benefits of the Red Crochet Halter Bikini Top Pattern
For example, wear the finished top with high-waisted denim for a casual evening, layer it under an open-weave cardigan for festival days, or pair it with a flowing skirt on a beach walk. Moreover, cotton yarn breathes well, dries quickly, and holds its shape after washing. Also, cotton feels cool against warm skin. Since the tie straps adjust to different torsos, one pattern fits several body shapes. Besides, friends who adore bold summer colors will love receiving one as a handmade gift. In the end, choose any shade you love.
Beginner Tips for the Red Crochet Halter Bikini Top Pattern
- First, practice the stacked sc on a swatch before starting the cup.
- Next, use a stitch marker on the first stitch of every row if the edges confuse you.
- Also, try the top on after the band to check length before adding straps.
- Because fuzzy yarns hide eyelets, choose a smooth cotton.
- Finally, keep the yarn tail on the right side while stitching, then weave it in at the end.
Caring for Your Cotton Top
First, hand wash in cool water with mild soap. Then press the water out gently with a towel rather than wringing. Next, dry the top flat so the cups keep their curve. Also, rinse after saltwater or chlorine, since both fade bright reds quickly.
Personalization Ideas for the Red Crochet Halter Bikini Top Pattern
Switch the Color
For instance, cobalt blue, sunny yellow, or soft white all suit the same eyelet design.
Lengthen the Band
Simply add extra sc rows in an odd count for more coverage around the torso.
Strengthen the Straps
Instead, replace the slip stitch return with hdc for a wide, flat tie.
Add a Tiny Detail
Also, thread a few beads onto the strap ends before tying the final knot.
FAQs About the Red Crochet Halter Bikini Top Pattern
What yarn works best for the red crochet halter bikini top pattern?
Worsted cotton works best because it gives clear stitch definition and stays cool in hot weather.
Can I make the red crochet halter bikini top pattern in a bigger size?
Yes. Simply add more cup rows and a longer foundation chain, then lengthen the band chains to match.
How long are the straps in the red crochet halter bikini top pattern?
Ch 180 produces ties of about 45 to 50 inches for size small. However, longer lacing needs more chains.
Is the top safe for swimming?
Because cotton stretches when wet, the top works best for sunbathing and beach strolls rather than active swimming.
Before You Tie That Bow
Okay, so that’s the whole top, done from start to finish. It does take a few evenings, but nothing in it is hard once you get through the first cup. Also, the second one goes way faster because your hands already know the rhythm. Just pick a red you really love and keep your counts steady. And if the band ends up a little off, don’t stress, because nobody’s going to notice. So tie the straps, try it on, and enjoy your summer in something you made yourself.