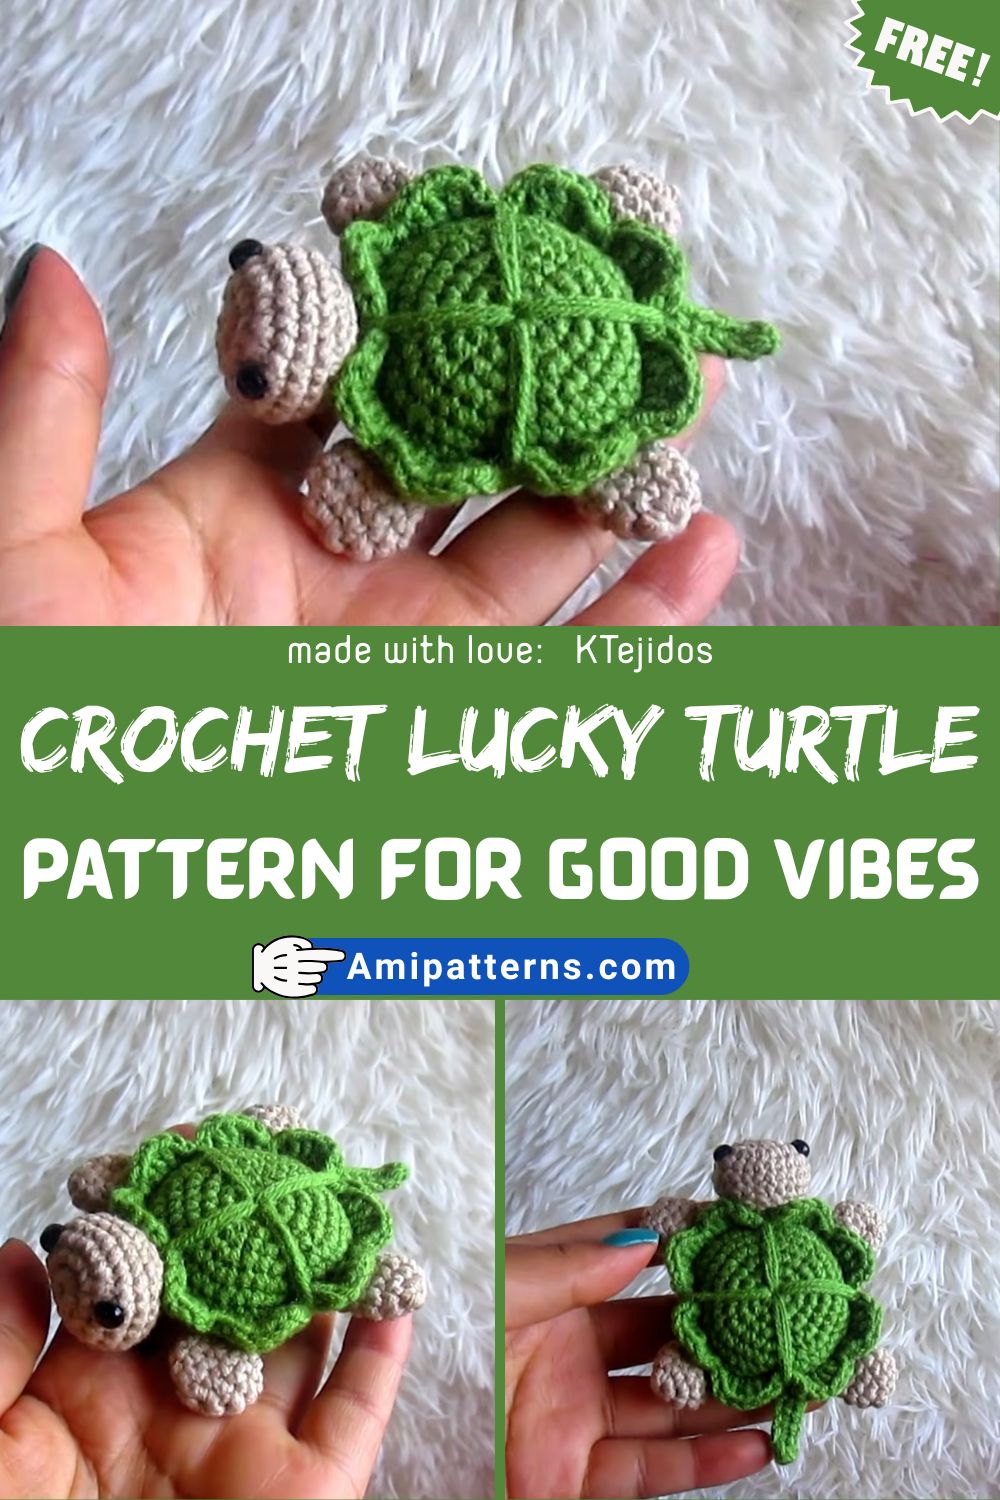
How to Crochet Lucky Turtle Amigurumi Pattern for Good Vibes
Something is quietly grounding about making a tiny turtle that looks so cute. When you make it with your own hands it will not be loud or flashy. A lucky turtle feels like a slow breath in craft form. The steady, calm and comforting feeling that you get while stitching it together is like no other.
It will become more than an Amigurumi project that stays with you forever. You can keep it on your desk, or give it as a gift to someone, nothing can beat this charm. This is what the crochet lucky turtle pattern is all about. It is not about perfection or speed. Just a small handmade reminder that good things are here to stay
Materials You’ll Need
There is no trick to it, making this project all the more appealing.
- Yarn: Green (shell and body), beige or light brown (belly) and a small amount white/yellow for details.
- Crochet hook: It is about 4mm thick) depending on the thickness of yarn
- Bedding: Soft pile for a plush look
- Safety eyes or black thread
- Stitch marker
- Tapestry needle
- Scissors
How to Crochet Lucky Turtle Amigurumi Pattern for Good Vibes
Starting with the Turtle Body
You start with a magic ring and wrap continuously around. It is only a close knit group at first, a rather unremarkable group. It gradually widens into a soft rounded bottom. That’s where the shape of your easy Turtle Amigurumi for beginners really begins.
Don’t rush, it’s okay. In fact, the slower you move the more even the whole thing is afterwards. You’ll see your hands getting into a “rhythm” of stitch, pull, adjust, stitch, pull, adjust, etc. It’s almost like your mind follows along and quiets down a bit.
Creating the Shell
It is the shell which most people are first attracted to. You’ll crochet a slightly domed shape using green yarn. The key is to gradually increase it, so it doesn’t grow too tight or flat. That rounded hill shape, that’s nice, you want that one that’s like it can be a little mini world in it.
Some prefer to add in some subtle spirals or a small gradation in color. Nothing too complicated. Just a variation of stitches can add personality to the shell. This is where the crochet lucky turtle pattern truly comes into its own. The shell is not only for decoration; it is the turtle’s identity.
Afterwards, stuff it very lightly. Not too firm. You don’t want it to be stiff like a toy block, but soft enough that it feels huggable.
Shaping the Head
Things begin to get a bit more alive now. The head is crocheted separately, also from a magic ring. It expands slowly, and gradually develops a rounded form, slightly elongated but with a softness. Nothing sharp or narrow, turtles are all about curves!
Carefully put eyes in before closing it up. This section can often be a bit tender. It makes all the difference when it’s just a little bit left or right. Then, it seems to be curious or sleepy or contentedly depressed. One of those instances that you stop for a second and realize that’s the bloody face.
Legs and Tiny Details
Legs are diminutive, but make everything come alive.
You’ll create four basic shapes that will form the body and tail of your turtle in the shape of tubes, but they will be slightly flattened at the bottom to let your turtle rest correctly. Symmetry is not an issue here. The beauty of a real handmade charm is in the imperfections.
After attachment, they should feel like they’re giving assistance, not like they are stiff or robot-like.
For an extra touch, you can add little embroidered claws to the bottom or soft color shading.
Many makers find this is where the process of the easy turtle Amigurumi for beginners is really so easy, so slow and so relaxed!
The Belly
Turn the turtle over for a second and you will see the turtle’s Belly Base. The belly is a flat, round section normally used in a soft beige or cream color yarn, which is attached to the body. Not exactly showy, but it balances the overall design visually.
It also provides structure, so do not neglect to make adjustments to stuff before sealing it. The turtle once attached, begins to feel real in an unexplainable manner. Just as it’s done and dusted before the finishing touches.
Assembling Everything
This is what it’s all about, and it’s a good feeling. Place the head on first. Make a minor adjustment of the angle, so it’s not stiff. It’s all about the small tilts, they really make a big difference in expression.
Then, place the legs so that the turtle looks so. Not too hard, not too good. Just… comfortable. Lastly, add the shell to the top and sew it closed. This is important as it brings the whole thing together. After, stand back for a second. It never looks exactly the same as it is supposed to look.
Adding the “Lucky” Touch
This is where this project gets its character. Some will include a little shamrock, coin charm or even a little heart stitched close to the shell. Some like delicate embroidery designs that convey the sense of luck or protection.
No need for anything big. The small stitch work patch can make a huge difference in the overall mood of the garment. This is also the reason that the small crochet turtle gift idea is so effective.
Special Features
- Cute, rounded shell and calming design.
- Simple, easy-to-understand structure; beginner-friendly shapes
- Completely adjustable hues and configurations.
- Lightweight and gift-ready
Tutor’s Suggestions
Don’t worry about making perfect stitches. Come on, turtles aren’t that big of a deal. Shape and softness is more important. If it does not feel right, change the stuffing before taking it to be a fault with the crochet. Additionally, take rest breaks. This isn’t a race. The slow build is the heart of Amigurumi. And if they’re a little “lopsided” initially, wait some minutes before you decide to swap them for a more even look. Sometimes they can just grow on you.
Uses
- The perfect present for a special day
- Soothing desk energy companion
- Nursery or room décor with a soft look
- An easy evening crochet project
- Part of a luck charm collection
Difficulty Level
This falls in the beginner to early intermediate level. Simple stitches but patience is required for shaping the shell and putting it together. It’s more about the rhythm, not skill. Round proficiency is not needed if you are comfortable with basic rounds.
Step-by-Step Flow
The body is first, the shell follows, then the head. Then the legs and tummy come out. When it’s all prepared, you put it together and finish it with the fortunate element.
It’s as if you’re building a puzzle without knowing how close you’re getting to finishing.
Conclusion
There is a lot of charm in carrying a crochet lucky turtle pattern. It is simple, steady and comforting. When you hold it in your hands, it gets attention from everywhere. Be patient and keep a little bit of calm, this handmade piece will stay with you forever.
Pro Tip
Before you close the final stitches, gently press and shape the shell with your hands. It helps smooth uneven stuffing and gives the turtle that soft, rounded “finished” look without losing its handmade personality.